How to Design a Logo in Illustrator CC
Skills:
UI Design80%
http://goo.gl/BBse40 - Design + Code a Professional Android App from Scratch
*
**Join DesignCourse Premium for 1-on-1 Design Training with Me:**
http://goo.gl/vTxVi6
- Learn how to design a logo in Adobe Illustrator CC. For the font, simply do a Google search for "Station Medium Font", and you will find several results that make it available.
Hit my personal site up if you need a custom logo design.
- - - - - - - - - - - - - - - - - - - - - -
Subscribe for NEW VIDEOS weekly!
My site: https://designcourse.com
My personal FB account: http://fb.com/logodesigner
Coursetro FB: http://fb.com/coursetro
Coursetro's Twitter: http://twitter.com/designcoursecom
Join my Discord! https://discord.gg/a27CKAF
^-Chat with me and others
- - - - - - - - - - - - - - - - - - - - - -
Who is Gary Simon? Well, I'm a full stack developer with 2+ decades experience and I teach people how to design and code. I've created around 100+ courses for big brands like LinkedIn, Lynda.com, Pluralsight and Envato Network.
Now, I focus all of my time and energy on this channel and my website Coursetro.com.
Come to my discord server or add me on social media and say Hi!
What You'll Learn
Designs a logo in Adobe Illustrator CC
Full Transcript
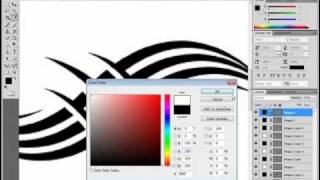
[Music] hello this is Gary Simon of Gary simon. net designcourse decom and also a course instructor at invad networks toots plus.com so in this free tutorial we're going to go ahead and take a look at designing a logo design in Adobe Illustrator CC and this I actually just released two days ago uh and there are some improvements but largely there's not a huge difference especially when it concerns logo design uh between previous versions so if you have a previous version don't worry you'll probably be able to follow follow along just fine uh so the first thing we're going to do is go to file new and we'll just name this logo project and I'm going to set my width and height at 750 by 500 points and we can leave all the rest of this same so let's hit okay and that popped up in a new window one second all right so if you hit control one we can get back to 100% okay so uh our fictional company uh for our logo is going to be called in Blood and this is just going to be for a TV series okay um um it doesn't exist it's just completely fictional uh and I came up with it just out of nowhere I don't know why but this is it so the first thing we'll do with the type tool is Type in blood now ordinarily when it comes to designing logos I you would first sit down and you would sketch out ideas that pertain to potential logo Design Concepts now I already came up with one that I thought would work well and so that would be I taking this in and actually putting it in blood I so let me just show you what I mean I'm going to take the ellipse tool right here and just with this red color right here in the swatches panel I'm going to make that our foreground and I'm going to hold shift and just create a sphere all right so if we go here to our layers panel and drop this down we can position this layer beneath the in type so now if we move this over here we'll see it is in this uh Circle so to make it actually look like more like blood we're not going it's not going to be a perfect sphere uh but before I do that let's go ahead and make the type white and I'm going to use a free font which I will link in the description of this video I called station station medium and it's just kind of like a bubbly font uh so now what I want to do is go ahead and make this more of a kind of like a envelope seal type of blood spatter uh so what we'll do is we will zoom up and then we will take the pen tool and if you've never used the pen tool don't worry it it just takes a little bit of time getting used to but I'm just going to click up around here and you don't have to follow me exactly uh it's not an exact sign so you can do however you want this uh to appear so we'll just left click and drag oops sorry left click and drag and then left click and drag around here again and what we want to do is just kind of stay around this General uh Circle so we'll do this a few more times and we want it to end up real nice right around there we want it to flow well okay so now what we can do is we can delete this circle back here and then we can position once again uh the shape that we just created beneath the in all right so let's go ahead and just position both both of these over here uh and then what we'll do is uh contrl C and then control F so we can copy it and let's first go ahead and make this that red color right here and then we will type blood which is our full uh name so real quickly I just want to go over this and see if uh this area right here is just a little bit too turbulent if we compare it to the rest of the shape so we can always just come in here with this tool the direct selection tool and adjust any of these points to smooth it out or make any adjustments that we think are necessary so let's see here and again uh you can POS you can do yours however you wish uh it's not a an exact science right now okay okay so now what we want to do is this in right here we don't want this to actually exist we want this right here to be a single shape so what I mean by that is this what we'll do is take our type now right now we can edit it and you know make it anything we want but now that we know it's obviously going to be in we want to convert this to an outline or to a path so let's go to object path oops one second first we go to control shift and O and then that creates the outlines and then we go to object path now this won't work if we try to hit divide objects below it will give us this error so the reason that is is because it's currently in a group because we have two letters here so all we have to do is right click and go to ungroup so now we can select the letters individually go to object path divide objects below now that changes the color here which we can just go ahead and change back now we have the N that or the I rather that we need to do the same thing with now because there's a DOT here we have two different shapes and this is called a compound so what we can do is right click release compound path so now we could select just that portion of the eye and go to object path divide objects below and then finally we have the circle in the eye up here and we'll do the same thing okay so now that we've done that we can go ahead and select the the n and then just hit the delete key now we are in the background right here so let's do the same thing for the IE and also the top of the eye so now this is one one shape there's only uh oh yeah we can delete these two paths beneath all right so now it is just a single shape and you can see only uh we have the group here selected but really this doesn't need to be group we can hit ungroup and uh we have our path right here okay so when you're desig logo you have to make sure absolutely have to make sure that your logo works well in black and white and obviously all you have to do is uh change the color to Black and another thing you have to make sure about your logo is that it scales well so what that means is uh really quick I'm just going to uh to convert this to a path control shift and O so if we go ahead and scale this down a lot we want it to be identifiable we want it to be readable still and it is and that's very good so simple is always better uh in terms of logo design when it comes to readability so let's go ahead and scale that back up so we know our logo works well in black and white which is great uh and if you were designing for a client or just yourself or for a personal project you would go ahead and Export this very basic version of our logo uh in multiple formats for example we would save it obviously as uh an Adobe Illustrator file AI which is 100% Vector we could save it as an EPS uh and then we can also export it in a in a number of different formats down here like a PSD or jpg etc etc uh and then we also denote those as the file names with you know- black this is the most simple version uh then we would create a second variation where it's containing our actual colors uh so if we wanted our official color to be the CMYK red right here we would also go ahead and Export those and save those as our uh files and denote that as like for example- red uh and then uh it's typical that we see uh in areas that a logo where it's displayed uh there are no restrictions like for example on the website uh or in print uh if there's no restrictions in terms of colors uh you you'll see a lot of big Brands uh their logo will be very diverse with uh a lot of colors and gradients Etc so that's completely acceptable if we wanted to create a more elaborate version of our in blood so let's go ahead and do that and what I'll do is just scale that up a little bit and so to give this some depth uh what we'll do is add some Shadows uh inside this Blood here to make it look like it's uh 3D a little bit so let's go ahead with our pen tool and I'm going to select a darker red just right around here and we'll go ahead and click down here and we're just going to follow the bottom of this and I just hit uh control Z just to undo uh if you place a point that's not accurate so let's just go ahead and follow this oops follow down okay and then we can add a highlight up here so if we take this color right here we'll double click it and then just choose a lighter Hue up there we can go ahead with the pen tool and do the same thing except on the top now and actually I may want to just end it right there because that I will clash with it a little bit so we'll start right back up here okay so now if I go to control one uh and zoom out to or Zoom back to 100% we'll see that it actually has a little bit of I guess you could call uh depth to it so we could take this a little bit further um let's see here we could go ahead around each one of these for example right here now the way we have the the the light coming from is pretty much from this upper left angle so if we zoom up a little bit more we can go ahead and oops and add this and just right back up and then continue it right here okay and once more up here and we do want to make sure these are all even in terms of their positioning around the actual letters and then we could take our uh Shadow color down here and then with the pen tool you can add one underneath then we can take this contrl C then crlf and hold the shift and move it over and then finally one more right here okay so that's uh one way that we can go ahead and actually I will just to make this consistent I will add the shadow in highlight portions around this circle here and take our highlight or Shadow rather and add it around here okay all right so if I zoom this up so we can get a better look at this we can see that it definitely looks pretty cool um so what we could do now I say for example if we wanted to present this to a client or something I of course we would always show it on a white background um but we could even do a little bit more with this and let's say for example uh we wanted to go to deviantart.com and we wanted to get like a kind of like a blood background so this is a great site and which you can use and you can find free stock uh and resource files so if we go down here to resources and stock images and take something like blood background we could see that we have some uh different options to choose from so if we choose this one paint blood spatter texture we could see that the uh author is given a description and it also lets you know how you can use this so you can use this image in your digital art Etc there's no need to note me just leave a comment here on the stock page that you used uh so if you wanted to download this then we could just go ahead and click download image and let me scale that down because it made this massive uh popup now I'm just going to right click and hit copy image and I will go back to illustrator and I'm going to select everything and just hit group real quick so that puts everything in a group layer and then I'm going to hit contrl V to paste so this image is massive so I have to scale it down a lot so I'm just going to hit shift and ALT together while scaling it down okay and then I'm just going to stretch it just [Music] to fill up the canvas and then put it in the back and just change the opacity down to like 40% or so and that way we can present the logo kind of in a different medium um so if I were to present this logo you would also for example uh we could save this as one variation or we could just take this let me lock the layer real quick and hit well first I'm going to scale it down by holding shift and then hit contrl C and then crlf so we want we would definitely want to show the Black and White Version uh so and also just the a single color version with our actual red color and then this version right here so I'll make this on our big version and this one will just be all black this one will be our red color and actually i' position those at the bottom here and that is our logo so I I hope you learned a little bit uh and enjoyed the tutorial all right uh if you have any questions just go ahead and post in the comment area and I will attempt to answer them all right thanks a lot talk to you later goodbye [Music]
Watch on YouTube ↗
(saves to browser)
Sign in to unlock AI tutor explanation · ⚡30
Playlist
Uploads from DesignCourse · DesignCourse · 12 of 60
1
 2
2
 3
3
 4
4
 5
5
 6
6
 7
7
 8
8
 9
9
 10
10
 11
11
 ▶
▶
 13
13
 14
14
 15
15
 16
16
 17
17
 18
18
 19
19
 20
20
 21
21
 22
22
 23
23
 24
24
 25
25
 26
26
 27
27
 28
28
 29
29
 30
30
 31
31
 32
32
 33
33
 34
34
 35
35
 36
36
 37
37
 38
38
 39
39
 40
40
 41
41
 42
42
 43
43
 44
44
 45
45
 46
46
 47
47
 48
48
 49
49
 50
50
 51
51
 52
52
 53
53
 54
54
 55
55
 56
56
 57
57
 58
58
 59
59
 60
60

Photoshop Pen Tool Tutorial (Tattoo Design)
DesignCourse
How to Design the Microsoft Logo in Photoshop
DesignCourse
Photoshop Gradients Video Tutorial
DesignCourse
Your Guide to Layer Styles
DesignCourse
Layer Masks in Photoshop
DesignCourse
iOS App Icon Design Tutorial in Illustrator CS6
DesignCourse
Illustrator CS6 Logo Design Tutorial - Archfold
DesignCourse
Photoshop CS6 3D Tutorial - Magic Tent Illustration
DesignCourse
How to Design a Tshirt Tutorial - Adobe Illustrator
DesignCourse
Types of Logos - Lettermark & Monogram Logo Type
DesignCourse
Banner Design in Photoshop CS6
DesignCourse
How to Design a Logo in Illustrator CC
DesignCourse
Designing a Logo in Photoshop CC
DesignCourse
1. Launch & Market a Web Based Business - Introduction
DesignCourse
2. Launch & Market a Web Based Business - Logo Design
DesignCourse
3. Home Page Mockup in PS : Part 1
DesignCourse
4. Home Page Mockup in PS : Part 2
DesignCourse
5. Home Page Mockup in PS : Part 3
DesignCourse
6. Home Page Mockup in PS : Part 4
DesignCourse
7. Home Page HTML & CSS - Part 1
DesignCourse
8. Home Page HTML & CSS - Part 2
DesignCourse
Using Photoshop to Showcase Mobile Projects
DesignCourse
Flat Icon Design Tutorial in Illustrator CC
DesignCourse
Illustrator CC Logo Design Tutorial - A Logo That "Pops"!
DesignCourse
Logo Design Follow Along 1: Emblem Logo Design
DesignCourse
Showcasing Logos in 3D with Blender
DesignCourse
How to Design an Effective Lettermark Logo
DesignCourse
Squeeze Page Design Tutorial in Photoshop (Part 1)
DesignCourse
Squeeze Page Design Tutorial in Photoshop (Part 2)
DesignCourse
Mobile GUI Element Design in Adobe Photoshop CC (Part 1)
DesignCourse
Mobile GUI Element Design in Adobe Photoshop CC (Part 2)
DesignCourse
Flat Mobile App Design in Photoshop CC - Weather App
DesignCourse
Create Reflective 3D Text in Blender (Beginner)
DesignCourse
Animating a Logo with Adobe After Effects CC (Beginner)
DesignCourse
Design a Game Website Mockup in Photoshop CC (Part 1)
DesignCourse
Design a Game Website Mockup in Photoshop CC (Part 2)
DesignCourse
Photo Manipulation Tutorial in Photoshop CC (Beginner)
DesignCourse
Advertising Illustration Tutorial in Photoshop CC
DesignCourse
Perspective Warp Tool Tutorial in Photoshop CC
DesignCourse
Free Giveaway Contest. (WiseBanner Banner Maker).
DesignCourse
Design an Animated Loading/Download Icon (GIF)
DesignCourse
Contest Winners (WiseBanner)
DesignCourse
Model & Animate a 3D Push Button in Blender (Beginner)
DesignCourse
Mega Tutorial - iPhone Breathalyzer - Project Introduction
DesignCourse
Part 1 - iPhone Breathalyzer - Blender
DesignCourse
Part 2 - iPhone Breathalyzer - Rendering & GUI Design
DesignCourse
Part 3 - iPhone Breathalyzer - UI Animation in After Effects
DesignCourse
Part 4 - iPhone Breathalyzer - Website Design in Photoshop CC
DesignCourse
Part 5 - iPhone Breathalyzer - HTML Part 1
DesignCourse
Part 6 - iPhone Breathalyzer - HTML/CSS Part 2
DesignCourse
Part 7 - iPhone Breathalyzer - HTML/CSS Part 3
DesignCourse
Part 7 - iPhone Breathalyzer - Finishing Touches
DesignCourse
Square Space Logo Maker - C'mon People.
DesignCourse
Design a Bloody Knife in Photoshop CC
DesignCourse
Typographic Poster Design Tutorial in Illustrator (Part 1)
DesignCourse
Typographic Poster Design Tutorial in Illustrator (Part 2)
DesignCourse
Modern Business Card Design in Illustrator CC (Part 1)
DesignCourse
Modern Business Card Design in Illustrator CC (Part 2)
DesignCourse
Parallax Tutorial using Parallax.JS
DesignCourse
Interview: Andrew Price of BlenderGuru.com
DesignCourse
More on: UI Design
View skill →


Related AI Lessons
⚡
⚡
⚡
⚡
Most People Won’t Make Money with AI — Here’s Why (And How You Can)
Medium · AI
I Asked My Professor If AI Makes My Degree Useless. He Paused for 10 Seconds.
Medium · AI
Google’s 20-Year Defense Just Crumbled.
Medium · AI
Photo Mengapa Teknologi Masa Depan Akan Berpusat pada AI, Internet of Things, dan Komputasi Awan
Medium · AI
🎓
Tutor Explanation