How to Design the Microsoft Logo in Photoshop
http://goo.gl/BBse40 - Design + Code a Professional Android App from Scratch
http://www.designcourse.com - Learn how to design a graphical version of the microsoft windows logo/icon in Adobe Photoshop in this free video tutorial.
- - - - - - - - - - - - - - - - - - - - - -
Subscribe for NEW VIDEOS weekly!
My site: https://designcourse.com
My personal FB account: http://fb.com/logodesigner
Coursetro FB: http://fb.com/coursetro
Coursetro's Twitter: http://twitter.com/designcoursecom
Join my Discord! https://discord.gg/a27CKAF
^-Chat with me and others
- - - - - - - - - - - - - - - - - - - - - -
Who is Gary Simon? Well, I'm a full stack developer with 2+ decades experience and I teach people how to design and code. I've created around 100+ courses for big brands like LinkedIn, Lynda.com, Pluralsight and Envato Network.
Now, I focus all of my time and energy on this channel and my website Coursetro.com.
Come to my discord server or add me on social media and say Hi!
What You'll Learn
Designs the Microsoft logo in Photoshop
Full Transcript
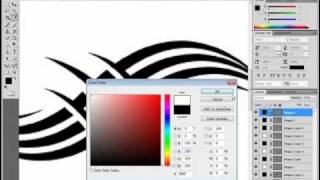
hello Gary Simon here with the design letter and design course calm in this tutorial we're gonna take a look at how exactly to design this Microsoft logo I'm gonna have to go really fast because I only have about nine minutes or so I with the promo that I have at the end and the intro at the beginning to get this tutorial done because ten minutes total is the maximum time I can upload a YouTube video that's their stupid restriction I don't know why so let's go ahead and get started it's gonna file new with 800 height I'm gonna put at 500 you can put whatever you want just something to fill up the space of the screen and we're gonna start here with the ellipse tool if that's not selected just hold and drag out and select the ellipse tool now choose a dark color for our background it ok and then just hold shift and get a perfect circle started right here in the center okay so now let's go ahead to the pen tool well first we're gonna change our foreground color to something like a real red slash orange color then we're going to take the pen tool with the shape layer selected and we're just gonna try to get the basic shape first and we'll be able to reuse this for the other three window panels I guess that's what you can call them all right so dragged out and I'll hold the Alt key click once get rid of that tangent come down here you know it may take you a while to get it right and the shape at first hold alt and then close it up now it looks like this side is off too far so if you want to make adjustments just go to your direct selection tool select on the Anchor Point and then use your arrow keys and you can make finer adjustments alright so that looks good now we have to give it an emboss effect so let's break double-click on the right side of the layer with the left mouse button that brings this up let's go ahead and select bevel and emboss and you see it makes the updates in real time and let's go ahead and change depth to something around 32% and size down as well okay maybe just the size can be up a tad bit all right and then we want to change the top highlight mode here that color to something like almost in an orange a light orange color and then the bottom one to something a little bit darker okay all right then we're going to give it a gradient overlay so it's like that and click here on gradient first Brannock cancel first we're going to change it to a radial gradient and then come over here and move it to right about there and then scale it up all the way angle also changes the scale a little bit too we want to come around here to make it big and then click on gradient and then select this first one right here and I'm gonna do is just put one right next to it and then get rid of this one you just drag and pull it off bring this one all the way over there double click on this one we're gonna make it lighter like a yellow so that gives it kind of a cool effect hit OK hit OK and hit OK that's our first one so what we're gonna do now is duplicate it right click duplicate layer hit OK and we're gonna move it over ooh as you can see I kind of messed up this line should be adjusted more so we're gonna delete that and we can make a quick adjustment but go into a direct selection tool selecting this one over here we want these two lines to be parallel basically let's see if that did anything duplicate layer' let's move it back over all right that's that's better now we have to flip this because it's not in the right orientation so go edit transform flip horizontal edit transform flip vertical all right there we go all right so that's not too bad let's go ahead and edit this one actually better yet we'll take these two layers hold ctrl and select both of them right click duplicate layers hit OK and drop right down so that they line up alright so let's take our second one which is this one right here and that one's gonna be green so you just drop this down click on gradient overlay click on the gradient color this is the lighter color so it's going to be a color like around here hit OK and then this is gonna be the darker green select right around here hit OK hit OK and then move it over here alright ok then we could change bevel emboss so you could tell I there's a little bit orange up here we could just change this to a green and then change this one something around there hit OK then we got one over here this is gonna be a blue one so let's click on gradient overlay change it to a light blue right here but ok double click on that one darker blue hit okay and above emboss changes to light one change this one to darker there we go what we have to go back real quick gotta put this right position hit okay and then we have a final one right here same steps let's click over here it's gonna be actually it's gonna be very close maybe just a little bit brighter and then this one's gonna be near yellow alright and I think it looks good so it's sorry did the same exact thing last time we go back over here and just move this in the correct position hit OK alright so those are our four little layers I create this icon here and if you have more time you can play further refine the shape to make it look exactly like what theirs does but now it's focused on the background let's go ahead and create a new layer so you can do that through his keyboard shortcut or up here new layer and we're gonna use a previous layer to create a clipping mask just like that hit OK then we're going to choose the brush tool at like 300 feather brush then we're going to take the foreground click here into this background color and make a real light blue and then just click once right there pretty cool effect now we're going to create another ellipse ok just above it hold the shift alt and ctrl key all at the same time after you click and we'll put it right around there we want it to be Center then we're going to right-click rasterize layer' and then change first i want to change the brightness here that doesn't affect it then what I want to do is take the eraser tool and just delete this part down here or get rid of and we can change with the up ASA D make it a little bit less and that is it as you can see it's pretty easy to go ahead and create something that looks pretty impressive in a very short amount of time alright that is all for now Gary Simon here and go ahead and check out design course comm if you haven't already there are a lot of awesome tutorials and I will see you later good bye you
Watch on YouTube ↗
(saves to browser)
Sign in to unlock AI tutor explanation · ⚡30
Playlist
Uploads from DesignCourse · DesignCourse · 2 of 60
1
 ▶
▶
 3
3
 4
4
 5
5
 6
6
 7
7
 8
8
 9
9
 10
10
 11
11
 12
12
 13
13
 14
14
 15
15
 16
16
 17
17
 18
18
 19
19
 20
20
 21
21
 22
22
 23
23
 24
24
 25
25
 26
26
 27
27
 28
28
 29
29
 30
30
 31
31
 32
32
 33
33
 34
34
 35
35
 36
36
 37
37
 38
38
 39
39
 40
40
 41
41
 42
42
 43
43
 44
44
 45
45
 46
46
 47
47
 48
48
 49
49
 50
50
 51
51
 52
52
 53
53
 54
54
 55
55
 56
56
 57
57
 58
58
 59
59
 60
60

Photoshop Pen Tool Tutorial (Tattoo Design)
DesignCourse
How to Design the Microsoft Logo in Photoshop
DesignCourse
Photoshop Gradients Video Tutorial
DesignCourse
Your Guide to Layer Styles
DesignCourse
Layer Masks in Photoshop
DesignCourse
iOS App Icon Design Tutorial in Illustrator CS6
DesignCourse
Illustrator CS6 Logo Design Tutorial - Archfold
DesignCourse
Photoshop CS6 3D Tutorial - Magic Tent Illustration
DesignCourse
How to Design a Tshirt Tutorial - Adobe Illustrator
DesignCourse
Types of Logos - Lettermark & Monogram Logo Type
DesignCourse
Banner Design in Photoshop CS6
DesignCourse
How to Design a Logo in Illustrator CC
DesignCourse
Designing a Logo in Photoshop CC
DesignCourse
1. Launch & Market a Web Based Business - Introduction
DesignCourse
2. Launch & Market a Web Based Business - Logo Design
DesignCourse
3. Home Page Mockup in PS : Part 1
DesignCourse
4. Home Page Mockup in PS : Part 2
DesignCourse
5. Home Page Mockup in PS : Part 3
DesignCourse
6. Home Page Mockup in PS : Part 4
DesignCourse
7. Home Page HTML & CSS - Part 1
DesignCourse
8. Home Page HTML & CSS - Part 2
DesignCourse
Using Photoshop to Showcase Mobile Projects
DesignCourse
Flat Icon Design Tutorial in Illustrator CC
DesignCourse
Illustrator CC Logo Design Tutorial - A Logo That "Pops"!
DesignCourse
Logo Design Follow Along 1: Emblem Logo Design
DesignCourse
Showcasing Logos in 3D with Blender
DesignCourse
How to Design an Effective Lettermark Logo
DesignCourse
Squeeze Page Design Tutorial in Photoshop (Part 1)
DesignCourse
Squeeze Page Design Tutorial in Photoshop (Part 2)
DesignCourse
Mobile GUI Element Design in Adobe Photoshop CC (Part 1)
DesignCourse
Mobile GUI Element Design in Adobe Photoshop CC (Part 2)
DesignCourse
Flat Mobile App Design in Photoshop CC - Weather App
DesignCourse
Create Reflective 3D Text in Blender (Beginner)
DesignCourse
Animating a Logo with Adobe After Effects CC (Beginner)
DesignCourse
Design a Game Website Mockup in Photoshop CC (Part 1)
DesignCourse
Design a Game Website Mockup in Photoshop CC (Part 2)
DesignCourse
Photo Manipulation Tutorial in Photoshop CC (Beginner)
DesignCourse
Advertising Illustration Tutorial in Photoshop CC
DesignCourse
Perspective Warp Tool Tutorial in Photoshop CC
DesignCourse
Free Giveaway Contest. (WiseBanner Banner Maker).
DesignCourse
Design an Animated Loading/Download Icon (GIF)
DesignCourse
Contest Winners (WiseBanner)
DesignCourse
Model & Animate a 3D Push Button in Blender (Beginner)
DesignCourse
Mega Tutorial - iPhone Breathalyzer - Project Introduction
DesignCourse
Part 1 - iPhone Breathalyzer - Blender
DesignCourse
Part 2 - iPhone Breathalyzer - Rendering & GUI Design
DesignCourse
Part 3 - iPhone Breathalyzer - UI Animation in After Effects
DesignCourse
Part 4 - iPhone Breathalyzer - Website Design in Photoshop CC
DesignCourse
Part 5 - iPhone Breathalyzer - HTML Part 1
DesignCourse
Part 6 - iPhone Breathalyzer - HTML/CSS Part 2
DesignCourse
Part 7 - iPhone Breathalyzer - HTML/CSS Part 3
DesignCourse
Part 7 - iPhone Breathalyzer - Finishing Touches
DesignCourse
Square Space Logo Maker - C'mon People.
DesignCourse
Design a Bloody Knife in Photoshop CC
DesignCourse
Typographic Poster Design Tutorial in Illustrator (Part 1)
DesignCourse
Typographic Poster Design Tutorial in Illustrator (Part 2)
DesignCourse
Modern Business Card Design in Illustrator CC (Part 1)
DesignCourse
Modern Business Card Design in Illustrator CC (Part 2)
DesignCourse
Parallax Tutorial using Parallax.JS
DesignCourse
Interview: Andrew Price of BlenderGuru.com
DesignCourse
Related AI Lessons
⚡
⚡
⚡
⚡
7 AI Tools That Can Save You Hours Every Week
Medium · AI
AI Automation for Ai For Small Independent Film Festivals How To Automate Submission Screening And Filmmaker Feedback Generat...
Dev.to AI
AI's Dark Mode Drama: A Tale of Persistence (And Other Boring Wins)
Dev.to AI
10 AI Tools That Will Replace Your Virtual Assistant
Dev.to AI
🎓
Tutor Explanation
