Logo Design Follow Along 1: Emblem Logo Design
Key Takeaways
Designs an emblem style logo in Adobe Illustrator CC
Full Transcript
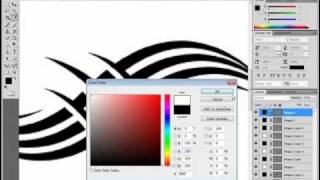
hello this is gary simon of design course calm and welcome to the fourth video of 2014 today is January 4th and today we're going to go ahead and do a logo project follow along and this is going to be for an upcoming radio show called try this at home with Dana Martin now Dana Martin is an advocate of peaceful parenting and unschooling and if you're unsure of what that is just go ahead and check out Dana Martin calm alright we're gonna use Adobe Illustrator CC to design a logo that meets her requirements so first if you haven't already check out design course calm put in your email and if you need access to the project files there in the link below this video in the description alright let's get started so let's go to file new and we're just going I'm going to use 800 by 600 and hit enter and then hit ctrl one to get to a hundred percent now the information that I had from her is that the name is try this at home with Dana Martin so she wanted to include all that along with the website address and she also wanted it to have a progressive feel I tribal um and to use pink and black and to also communicate the idea of you know what this is all about which is pretty much peaceful parenting and love etc so she did suggest possibly using a heart so I came up with a concept and we're gonna go ahead and design that now so the first thing I want to do is actually get the heart designed so to do this let's go to view and we'll go to show grid and then we'll go to view and snap to grid so now we have this grid here and we're gonna use the pen tool but first I'm going to zoom up just a bit about 200% and it doesn't really matter where I'm just going to start right I'll start right here and with the pen tool I'll just go ahead and left-click and I think I'll start right up or out here and hold shift so that we're gonna shift out one two three four five times and I'm going to go right around here and hold down shift down one two three four five times and I'm just eyeballing this by the way I mean definitely make some adjustments and then I'm going to come down to right around here and I'm going to drag out I'm using my mouse girl rule screw a scroll with wheel rather and I think right around there would be pretty decent and then if you want to make it any adjustments to any of these points you'll take the direct selection tool up here and you can click on the actual point and you can hold shift to drag that down I think that's basically than you adjust an adjustment that I want to make but yeah it's pretty easy to make these adjustments by dragging those around so now what we want to do is just basically flip this so first we have to duplicate it so I'm going to hit ctrl C and then ctrl F then right click go to transform reflect and this dialog box will come up and just leave it at vertical and hit OK so now what you want to do is drag that over right there by holding shift and now what we want to do is join those so let's go ahead i we don't need a stroke we're just going to give it a pink color here and so now what we want to do is bring up a window and go to pathfinder and we want to select this one a unite and that basically takes it all on a single path alright so let's go to window and then we will go to a view rather unclick snap to grid and then we'll go to hide grid so now I'm just going to take this and scale that down a bit and let's go ahead over here I'm just going to create a copy of this and hide it so I'm gonna hit ctrl C then ctrl F and now we have this ready to go alright so now what we want to do is create a sphere so let's drag out and we'll take the ellipse tool and holding shift and alt scale out to right around there it doesn't have to be the exact size doesn't really matter and now we're going to do we're going to drag this beneath and we're going to make it black and we're going to take this here and position it over it so I'm going to scale out by holding shift and alt and let's see go right around here okay that looks pretty good so once you have that all aligned up now what you can do is take this go to object path divide well first I want to copy that sorry about that and then hide that layer then we'll go to object path divide objects below alright so then what we want to do is get rid of that center portion and then we'll bring back the one that we copied and hid from the previous step so now what we want to do with this is select it and then hold shift null and scale that down to right around there alright so the idea that I had going with this is to accomplish a couple things first obviously we have the heart outline here and the heart within the heart right here I and secondly we also can see kind of like a flower if we got rid of that portion we can see you know basically the idea of what could be portrayed as a flower which is symbolic of growth and personal development etc so now what I want to do is go ahead and get the ellipse to a lot again and I'm gonna select right around the middle of everything hold shift and alt and we'll go light right around here and I'll go ahead and take the gradient area right there and I will hide the foreground or get rid of it rather and then we'll give it a stroke and the stroke right now isn't too poor and actually we'll save it for another step what we're going to do is hold alt and select right there with by left clicking and now this will allow us to create text that will follow this circle just path so what we want to do is to type try this at home okay and for the font we're going to use something called yeah known and I'm not even going to try to pronounce that portion and we're going to make that part bold and really increase the font size a bit here and then also I'm going to increase the letter spacing by clicking over here to a character and we'll make I will try 200 there actually I mean want to go for a little bit less we'll try 100 all right that looks pretty good alright and then what we want to do is duplicate this so control C and ctrl F and this time I'm going to move the start of it over here and I'm going to double click on everything there and type in with Dana Martin and this time I'm going to make the size if the 18 we'll try just try 11 and you may need to adjust it based on the font you're using and that looks pretty good and then finally we want to get the Idina Martin calm down there so I'm going to control C and control F that and then you'll see this area where we can drag this in and we see it comes up there we can just rotate this around and I'm going to enlarge this by left-clicking holding shift and all and scaling up I'm going to try right around there for now and we're going to type Dana Martin calm and this time we're going to use a light or the thin version okay and I also want them to be the same font size so this font size is 11 if you recall now because we scaled this up increase the font size to eleven point seven seven so let's just change that back down and we'll go ahead and twist that a little bit more all right so now what I want to do is create kind of a a border that goes all the way around here so I'll create another ellipse and we'll try to match this up just to right around here and we can make further adjustments once we get this out of the way so let's hide or get rid of the foreground let's give it a stroke of two pixels and further adjust this alright alright so now what we want to do is go to object path outline stroke and then I'm gonna take actually just so I can see underneath this I'm gonna go to transparency and just drop that down that down to 20 I'm going to zoom up here and again we can I adjust this so everything lines up the top of there and there all right and then we'll take the pen tool and we'll click right here and then right over here and then we'll just go all the way around and we'll go ahead and take this and then this and move it over holding shift and now we want to do is get an object path divide objects below select that portion and delete it and let's bring it all back I'm gonna take this and just scale it up alright alright that looks pretty good so I'm going to take that back to 100% and we need to adjust this this doesn't really seem in line enough so what I'm going to do is just take this here and we'll scale it up and position it a little bit differently you want this to basically follow this area and then once again if this was I 23.1 then this one needs to be changed to 23.1 as well alright so now I I'm going to focus on the actual heart now I want to take all this so let's take hold the shift key select these four layers and we're gonna hold the shift key now we don't want quite a 45 degree rotation but what we want to do is probably right around here okay and then we'll go ahead and zoom up here to this heart and just to try to get some lines here we want to follow the contour of this portion right here of the heart so we'll get started and we'll go ahead and end this right around here okay and then hold the Alt key and then left-click once and we'll click right around here and then right around this edge we'll drag up all right and then we'll hold alt and then combine it to the original starting point all right and then we'll go ahead actually I want to adjust that real quick so we'll take the direct selection tool and we'll drag that and then we'll go back to the move tool and we'll duplicate this so ctrl c ctrl f we'll right click and then go to transform reflect and vertical and then we basically just want to match this up on this side and that'll be and that's not quite right we want this to be even so we'll just have to play around with this just a little bit and not quite there yet okay that looks like close enough for now just for the demonstration of this we can refine it further if you wish and so now I what we want to do is basically take this and go to object path divide objects below and the same thing with object path divide objects below so now if we take these and select this we can hit the Delete key all right and so now that got rid of all those things now you may notice it will have created a couple of other layers that we don't want yeah so if we deleted that selecting knows and we'll deal with that in a little bit all right so now what I'm going to do is create some shadows so we'll go ahead and I'm going to just use I the same color here and I'm gonna select just around here and just end it right up around this point going right around there so now if I come up and I follow this middle portion and then go to object path divided objects below I can now use the direct selection tool so select this and we'll make this a darker color so we'll go to gradient we'll select a foreground color and just just a little bit darker right there and then we'll do the same thing for this side and this time we'll kind of invert how we tapered it off so we'll taper it off more over here oops and we'll come up end it right around there get an object path you've got it objects below direct selection tool and we will make it that color with the eyedropper all right so now I just a few other things to make this more look more like a flower usually at the top portion they have an edge or like a ring kind of like a tulip does so that's what I'm gonna do here so we're going to make a white foreground color choose the pen tool and kind of just start right around here with the pen tool and come in maybe yeah we'll start right here and end it right around here right there okay well make sure it's closed and then what we can do is just ctrl c ctrl f right click and go to transform reflect hit okay and then we'll just come over here and get that same thing kind of going which this is not correct yet you want the orientation to be the same over here and it looks pretty good alright and then finally I'm going to continue on these paths right around here so these shadowy areas we can go ahead and just take you can start right around here and go say right around there hold alt and we'll click around this portion and go to object path divide objects below and we'll choose this then also I'm going to take this as well go to object path divide object below delete that will get rid of those edges afterwards we'll do the same thing over here alright and then we will also do the same thing with this portion so we'll go ahead and and we'll start right around here and we'll come up and it doesn't really have to be it doesn't have to match this one exactly and then we'll come up around here and close that off the object path divided objects below select this portion and select that all right all right so now what we want to do is go ahead and take this I kind of just want to see I I think some adjustments do need to be but first what I want to do is get rid of those areas here before I do that I'm going to take all these hit ctrl shift and the letter O and that converts everything to outlines and then we'll zoom up here and we'll use the direct selection tool to get those out of the way and then do the same thing over here I think we saw some over here these oops these lines that got in the way actually this is its own oops layer so if we just go to object path divide object below we can I get rid of that now we have this and that all right all right so that looks pretty good to go for now now let's go ahead and take everything and we'll go to layers and we're just going to group this together hit by hitting ctrl G and we'll create a copy of that so ctrl C and ctrl F will hide this one beneath it and then hold shift and scale us down and let's see here alright so that looks pretty good so to kind of illustrate the concept what we could do is take everything let's copy it I'll just like select it and go to ungroup and we'll get rid of the type and if we wanted to show this to the client to kind of illustrate you know what we were doing in terms of thought processes I what we do is leave this one here and we could make this one with this path real light just to kind of illustrate once you get rid of this or make it light you can kind of see the flower effect that we're going for and then we can do the same thing we can move this over I and then also bring that back to black and also just kind of illustrate the fact that there is a kind of a negative space heart right here and then a heart within the heart and the client did request kind of a tribal feel so that's what these lines are and so I did present it to the client and they're really happy with it fortunately so that is it I so go ahead and visit these on course comm if you haven't yet and until tomorrow I'll see you then alright good bye
Original Description
http://goo.gl/BBse40 - Design + Code a Professional Android App from Scratch
Project Files: http://www.designcourse.com/videos/logo-design-follow-along-1-radio-program-logo/10
- Learn how to design an emblem style logo design for an upcoming radio program called "Try this at Home!" by Dayna Martin.
Follow us:
Facebook: http://www.facebook.com/designcourses
Twitter: http://twitter.com/designcoursecom
Google+: http://plus.google.com/+DesignCourse
- - - - - - - - - - - - - - - - - - - - - -
Subscribe for NEW VIDEOS weekly!
My site: https://designcourse.com
My personal FB account: http://fb.com/logodesigner
Coursetro FB: http://fb.com/coursetro
Coursetro's Twitter: http://twitter.com/designcoursecom
Join my Discord! https://discord.gg/a27CKAF
^-Chat with me and others
- - - - - - - - - - - - - - - - - - - - - -
Who is Gary Simon? Well, I'm a full stack developer with 2+ decades experience and I teach people how to design and code. I've created around 100+ courses for big brands like LinkedIn, Lynda.com, Pluralsight and Envato Network.
Now, I focus all of my time and energy on this channel and my website Coursetro.com.
Come to my discord server or add me on social media and say Hi!
Watch on YouTube ↗
(saves to browser)
Sign in to unlock AI tutor explanation · ⚡30
Playlist
Uploads from DesignCourse · DesignCourse · 25 of 60
1
 2
2
 3
3
 4
4
 5
5
 6
6
 7
7
 8
8
 9
9
 10
10
 11
11
 12
12
 13
13
 14
14
 15
15
 16
16
 17
17
 18
18
 19
19
 20
20
 21
21
 22
22
 23
23
 24
24
 ▶
▶
 26
26
 27
27
 28
28
 29
29
 30
30
 31
31
 32
32
 33
33
 34
34
 35
35
 36
36
 37
37
 38
38
 39
39
 40
40
 41
41
 42
42
 43
43
 44
44
 45
45
 46
46
 47
47
 48
48
 49
49
 50
50
 51
51
 52
52
 53
53
 54
54
 55
55
 56
56
 57
57
 58
58
 59
59
 60
60

Photoshop Pen Tool Tutorial (Tattoo Design)
DesignCourse
How to Design the Microsoft Logo in Photoshop
DesignCourse
Photoshop Gradients Video Tutorial
DesignCourse
Your Guide to Layer Styles
DesignCourse
Layer Masks in Photoshop
DesignCourse
iOS App Icon Design Tutorial in Illustrator CS6
DesignCourse
Illustrator CS6 Logo Design Tutorial - Archfold
DesignCourse
Photoshop CS6 3D Tutorial - Magic Tent Illustration
DesignCourse
How to Design a Tshirt Tutorial - Adobe Illustrator
DesignCourse
Types of Logos - Lettermark & Monogram Logo Type
DesignCourse
Banner Design in Photoshop CS6
DesignCourse
How to Design a Logo in Illustrator CC
DesignCourse
Designing a Logo in Photoshop CC
DesignCourse
1. Launch & Market a Web Based Business - Introduction
DesignCourse
2. Launch & Market a Web Based Business - Logo Design
DesignCourse
3. Home Page Mockup in PS : Part 1
DesignCourse
4. Home Page Mockup in PS : Part 2
DesignCourse
5. Home Page Mockup in PS : Part 3
DesignCourse
6. Home Page Mockup in PS : Part 4
DesignCourse
7. Home Page HTML & CSS - Part 1
DesignCourse
8. Home Page HTML & CSS - Part 2
DesignCourse
Using Photoshop to Showcase Mobile Projects
DesignCourse
Flat Icon Design Tutorial in Illustrator CC
DesignCourse
Illustrator CC Logo Design Tutorial - A Logo That "Pops"!
DesignCourse
Logo Design Follow Along 1: Emblem Logo Design
DesignCourse
Showcasing Logos in 3D with Blender
DesignCourse
How to Design an Effective Lettermark Logo
DesignCourse
Squeeze Page Design Tutorial in Photoshop (Part 1)
DesignCourse
Squeeze Page Design Tutorial in Photoshop (Part 2)
DesignCourse
Mobile GUI Element Design in Adobe Photoshop CC (Part 1)
DesignCourse
Mobile GUI Element Design in Adobe Photoshop CC (Part 2)
DesignCourse
Flat Mobile App Design in Photoshop CC - Weather App
DesignCourse
Create Reflective 3D Text in Blender (Beginner)
DesignCourse
Animating a Logo with Adobe After Effects CC (Beginner)
DesignCourse
Design a Game Website Mockup in Photoshop CC (Part 1)
DesignCourse
Design a Game Website Mockup in Photoshop CC (Part 2)
DesignCourse
Photo Manipulation Tutorial in Photoshop CC (Beginner)
DesignCourse
Advertising Illustration Tutorial in Photoshop CC
DesignCourse
Perspective Warp Tool Tutorial in Photoshop CC
DesignCourse
Free Giveaway Contest. (WiseBanner Banner Maker).
DesignCourse
Design an Animated Loading/Download Icon (GIF)
DesignCourse
Contest Winners (WiseBanner)
DesignCourse
Model & Animate a 3D Push Button in Blender (Beginner)
DesignCourse
Mega Tutorial - iPhone Breathalyzer - Project Introduction
DesignCourse
Part 1 - iPhone Breathalyzer - Blender
DesignCourse
Part 2 - iPhone Breathalyzer - Rendering & GUI Design
DesignCourse
Part 3 - iPhone Breathalyzer - UI Animation in After Effects
DesignCourse
Part 4 - iPhone Breathalyzer - Website Design in Photoshop CC
DesignCourse
Part 5 - iPhone Breathalyzer - HTML Part 1
DesignCourse
Part 6 - iPhone Breathalyzer - HTML/CSS Part 2
DesignCourse
Part 7 - iPhone Breathalyzer - HTML/CSS Part 3
DesignCourse
Part 7 - iPhone Breathalyzer - Finishing Touches
DesignCourse
Square Space Logo Maker - C'mon People.
DesignCourse
Design a Bloody Knife in Photoshop CC
DesignCourse
Typographic Poster Design Tutorial in Illustrator (Part 1)
DesignCourse
Typographic Poster Design Tutorial in Illustrator (Part 2)
DesignCourse
Modern Business Card Design in Illustrator CC (Part 1)
DesignCourse
Modern Business Card Design in Illustrator CC (Part 2)
DesignCourse
Parallax Tutorial using Parallax.JS
DesignCourse
Interview: Andrew Price of BlenderGuru.com
DesignCourse
Related AI Lessons
⚡
⚡
⚡
⚡
Career choice with the advent of AI - pure Computer Science or learn software with a background of core engineering area
Dev.to AI
The AI Hype Cycle: Calm Before the Next Breakthrough?
Medium · Programming
AI won’t replace scientists. It will make the current model of science obsolete
Medium · Data Science
The End of Knowledge: Why Artificial Intelligence Is Changing Not Only What We Know, but What It…
Medium · AI
🎓
Tutor Explanation