Create a Super Modern Menu Interaction with JavaScript
Key Takeaways
The video demonstrates how to create a modern menu interaction with JavaScript, utilizing the Greensock animation platform and CSS to achieve a slick animation for a menu navigation. The project involves creating a layout element, scaling it down on click, and using an overlay element that scales on the y-axis.
Full Transcript
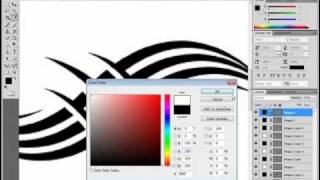
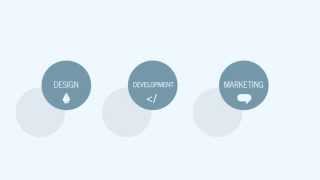
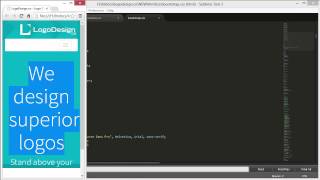
today I'm going to show you how to create this really smooth modern navigation reveal animation utilizing HTML CSS and JavaScript with the help of the green talk animation platform so let's get started if you enjoyed this video check out designcourse decom where you can learn uiux CSS and more with my custom interactive platform that makes learning fun and easy all righty let's get started so basically I here we go let's take a look at it one more time uh we click this I it it shrinks down and we have a overlay that kind of comes from the top that darkens everything and then we also have this navigation that comes in uh we click it it will completely reverse that entire timeline based animation from Green sock and there you go I I would personally have more interactions like hover States here but I I wanted to keep this pretty simple you know for instance like having like a a hover state for this icon when we hover over the hamburger menu but you again that's going to take a long a lot lot lot lot lot longer so um let's take a look before we hop into code I the figma document that I have set up and I this is just the general idea I came up with initially here all right that's it basically that's what we came up with and then right down here uh it's nice to have a plan of attack when it comes to trying to figure out your HTML scaffolding essentially um if you don't get that part right then you know the CSS won't really matter or the JavaScript so basically the idea here is these red boxes are just kind of Representative of our main HT containers all so we're going to wrap everything inside of a a container a div element called layout a class um and then this element right here if you notice the hamburger menu what it does if I click over here uh this is annoying okay I if I click on it notice how it changes I'm going to zoom up um oh my zoom tool is not working great I if I click it just notice what happens to it notice how it does not get dimmed out out it it actually it changes from black to white uh with that said we want to ensure that it it's able to break out of the the Box model essentially and so we're going to make this position fixed with a high Z index and then that overlay is going to be underneath it additionally um this element right here which is going to be an H1 element will be wrapped inside of a parent container called inner a div element uh and then we this layout element is going to have position relative and that's to make sure that this element still will scale in or scale down I even though it's position fixed but adding position relative on the parent element will still make it basically adhere to whatever's happening to the parent element um so and we we're going to be scaling it down by like 5% on click um and then over here uh once it actually comes in there's an overlay element that's kind of just initially hidden on a we're scaling it on the y- AIS and then scaling it all the way down 100% um and then our nav element right here is going to be position fixed as well we'll be able to sit it on top of all this stuff and that's basically the general idea so let's go ahead and stop talking and start coding okay so here's uh the starter uh the starter portion and all I in I'm doing is just I have two scripts where in in oh I don't even need the scroll trigger don't need scroll trigger all we need is green sock animation platform right here um I'm going to do a code pen for this check out the YouTube description you can grab all this stuff and so let's go ahead and just start writing out the HTML uh structure for this project so let me get out my reference code and we will start to rock so remember I said everything's going to be in in a element called layout there you go so we got our layout element right here let's go ahead and zoom up nice and big and beefy that so you can see everything is happening next element inside of layout is going to be that hamburger menu so we're just going to say uh we're going to wrap it in an a element it's not going anywhere but it will have a class of menu so that we can reference that in CSS and JavaScript now inside of there we're going to have an SVG element and I'm just copying this from figma itself again if you don't know how to do that you just go over here you take this sucker right click copy as SVG and that's exactly what I pasted here all right I'm not even removing width and height it's perfect as it is I don't even care uh that's that's that part now so after this part inside of the layout after the menu we're going to have enter remember we already talked about this H1 and then I'm just going to go ahead and just copy and paste this there you go and then finally we're going to have our overlay that will come down and just darken everything with uh an opacity on it um after that outside of layout we're going to have our nav element and again that's going to be position fixed or absolutely would work as well unordered list and then we're going to do a list item and I want these to animate like this so let me show you real quickly the final version if I go over here click this notice how they kind of I they they come from nowhere yeah they're kind of sliding up from nowhere we're going to wrap them inside of a mask element so we type in mask and inside of here we're going to have our a element and then education then you simply shift alt down a few times like that and you know just change up the the verbiage here so I already have that off screen so there we go entertainment enrichment excitement I don't know why I stuck with all EAS but it was cool so that's that now we're going to have our script uh we have our script import before we get to that let's go to the CSS though because it is completely blank um and I'm not going to write all this from scratch I'll just kind of Briefly summarize what's happening here so we have our body element which is margin zero get rid of that height 100 viewport height just because this is a simple demo I wanted to fill out I you know everything the entire viewport font family B Vietnam Pro it's actually a cool font I found today I and I'm importing with Google fonts right up here all right and then just the background color of like gray after that we're going to have our layout so remember that's like our first element inside of the body element the background is going to be white the Height's H 100 viewport height again this height viewport hun viewport height wouldn't work properly if it wasn't also on the body element and then remember position relative for that hamburger menu all right after that let's take our um H1 element and just doing some fluid type font size we're using clamp here font weight width 50% margin zero nothing special there we're going to take also our menu element is position fixed zindex 10 and then a padding of 25% and then we're just doing a little bit of like fluid responsive stuff with the clamp uh let's see what it looks like at this point it's not going to look correct so here's our actual version that we have okay so this is what we have so far um things are looking dark and y y y y um oh I'm sorry I was wondering how do I get to that point actually this is what it should look like at this point sorry I wasn't watching the SAS file so it was loading the old file okay so we're almost there but don't worry let's just keep on going uh we're going to have as well our nav element the nav element I has a fair bit of stuff in it so position fixed Z index I have 100 that's so it's just going to be really nothing's going to interfere with it right zero so we're positioning we're right aligning it top zero width of 55% height 80 few height display Flex align items end very simple stuff nothing crazy happening there we also have the unordered list and the mask and stuff inside of this this nested so we have list style none to get rid of that stuff overflow hidden for the mask for the animated text effect and then list items a so we're selecting each link right here like this and we have a display block padding just give us some white space between them font size tech text decoration you know nothing nothing crazy happening here so that's all we need for our actual uh see SS and if I go over here to our demo thing and we refresh oo nothing changed we just make sure that I let me shift F5 this yeah because something is not right well oh yeah that's why sorry about that I thought we were done we're not we just have two more we have enter padding 30% here clamp and then overlay position fixed um you can notice that we're having pointer events nuns that we can still interact with the elements from this the dark overlay that falls over it um transform Origins top because we want it from top to down when we do the scale and with this right here if we save it and we go back I to here this is what we have um so by default we don't want to hide this with CSS because if JavaScript is disabled then it will just be permanent hidden uh we can use uh green sock uh to set that position initially so now let's go ahead and switch over to JavaScript so I'm going to go ahead and paste in a number of uh variables that we're going to Define so the first one is going to be the menu button so we're just selecting the class of menu right here the next one is going to be layout I and that's selecting the overall layout that's wrapped around almost everything another one's going to be the overlay so remember we need to control the overlay so we could scale on the Y menu SVG I we want to access the SVG path element right here in order to change the fill from black to white that's what changes the color additionally we have menu uh sorry we have menu items and this is going to select all the menu items so that we can and we're using gsta utils to array you could also use document query selector all but this is a little bit more handy because it does some behind the scenes stuff essentially that makes it easier to deal with them all right so first thing also I forgot to also include let menu open equals false all right so we're going to we're going to store this bullan value of true or false in menu open um just to let us know if the menu is currently open or not so that we know whether to play the timeline animation or reverse it so now let's do our Gap sets so we're going to set initially the overlay to a scale y of zero so now when we save this and we go back we'll see that if I refresh it now the overlay is gone all right additionally oopsie let's go ahead over here and let's also set another value that's gsap set menu items now remember menu items is right here it's grabbing every Link in our unordered list and and by default we want those to be hidden I from The Mask so what's happening is we're going to take this a element each one of these and we're going to move it up outside the view of the mask and because the mask has this property right here overflow hidden we won't see the links anymore all right so what we'll do is y% 100 you could also go negative 00 as well by putting a negative if you want it to come from the different a different direction all right so coming back here again we don't see anything yet uh before there was white lengths here but now there's not uh because we just hid them okay so let's go ahead and create our actual timeline and to do that we're going to create a constant called navl Gap timeline we open up an object this part all this stuff is optional you just want to create you know a a default timeline but we want to create uh some defaults here so then inside of this object we put another one with defaults and then we set the E to power four in out and then a duration of one again not this doesn't do anything in of itself so now we actually have to create the timeline based animation referencing nav timeline so the first one that we're going to do is nav timeline we're going to use the two method you can also use from and from two we're going to use two and so we're going to say we're going to take our layout and we're going to scale it to 0 .95 so if I save this and I go back and we look at the result and we just refresh it's going to scale automatically without me clicking anything because I haven't yet paused the timeline so we're going to pause everything at the end of all these chain two methods that we're about to do um and in that way we can just click the button and then just call the play Method okay so we'll leave that here for now so let's keep on going on we're going to take uh our overlay so our overlay if you recall is is the dark element that is currently hidden at scale y it's not hidden it's just like so thin you can't see it it's at zero and it's at the top well we say scale y one because remember we set it to zero and then this right here this optional parameter I we have a a comma and then this is saying start a half second sooner than you would otherwise because if you leave this off each one of these chained animations or these twins will wait for the one that's before it to finish in order for it to begin but this allows you to to to either add time with a plus subtract time or if you want it to happen at the same exact time use a less than value like this all right just a quick crash course and the timing of things so now if I save this and we go over here and I refresh look at that okay very cool next up we're going to change that fill to White on the menu SVG element so fill white so Watch What Happens now so if you go back and we refresh notice how that changes right there so pay attention to the hamburger menu and this right here starts exactly at the same time as this overlay coming down because we used the less than sign the final one that's going to be a part of this this final animation is our menu items so remember menu items is an array and we're going to set each one of these to y% Z so that's going to take it right back to its default position because remember we're setting it to y% 100 up here so stagger is going to be 0.1 so a tenth of a second between each of the the menu items that it found the list items um and then we're making a duration two and then we're also making it start 1.5 seconds sooner than it would normally so now let's go ahead and save this go back and let's see what this looks like nice okay at this point we're just going to pause it now if we save it go back and notice it doesn't play anymore because we paused it so now all we have to do is this I'm just going to paste in this code real quick so we take our menu button we add an event listener of click and if menu open is false we play it and then set menu open to True else nav timeline reverse menu open is false that's it so we can play and reverse and if we save it we're going to have the final and result refresh click it there you go click it again reverses so easy so easy now like I said it would be much more cooler to have some uh micro interactions when you hover over these things maybe you can do that on your own um but yeah that is basically how you create uh a modern very cool very animated navigation all right everybody make sure you sub subscribe if you haven't yet and check out designcourse decom and the advanced front ends course which is linked here in the bottom is coming out fully releasing here in a month or two where you're going to learn how to do this stuff and so so much more from the beginning from the ground up as a beginner so um again I'll see you all very soon make sure to subscribe goodbye
Original Description
https://bit.ly/3RKqHdt 👈 Design & code like me. Use "UI2023" for 23% Off!
https://designcourse.com/af 👈 My upcoming "Advanced Frontends" Course
-- Today, I'm going to show you how to create a very modern and slick animation for a menu navigation. We'll utilize greensock to create this really cool effect.
Codepen:
https://codepen.io/designcourse/live/MWZzGZM (Live view)
https://codepen.io/designcourse/pen/MWZzGZM (Code)
0:00 - Intro
0:19 - HTML
5:45 - CSS
9:30 - JavaScript & Greensock
16:26 - Final Result
#javascript #frontend
- - - - - - - - - - - - - - - - - - - - - -
Subscribe for NEW VIDEOS!
Learn UI/UX: https://designcourse.com
My personal FB account: http://fb.com/logodesigner
Coursetro FB: http://fb.com/coursetro
Coursetro's Twitter: http://twitter.com/designcoursecom
Join my Discord! https://discord.gg/a27CKAF
^-Chat with me and others
- - - - - - - - - - - - - - - - - - - - - -
Who is Gary Simon? Well, I'm a full stack developer with 2+ decades experience and I teach people how to design and code. I've created around 100+ courses for big brands like LinkedIn, Lynda.com, Pluralsight and Envato Network.
Now, I focus all of my time and energy on this channel and my website Designcourse.com.
Come to my discord server or add me on social media and say Hi!
Watch on YouTube ↗
(saves to browser)
Sign in to unlock AI tutor explanation · ⚡30
Playlist
Uploads from DesignCourse · DesignCourse · 0 of 60
← Previous
Next →
1
 2
2
 3
3
 4
4
 5
5
 6
6
 7
7
 8
8
 9
9
 10
10
 11
11
 12
12
 13
13
 14
14
 15
15
 16
16
 17
17
 18
18
 19
19
 20
20
 21
21
 22
22
 23
23
 24
24
 25
25
 26
26
 27
27
 28
28
 29
29
 30
30
 31
31
 32
32
 33
33
 34
34
 35
35
 36
36
 37
37
 38
38
 39
39
 40
40
 41
41
 42
42
 43
43
 44
44
 45
45
 46
46
 47
47
 48
48
 49
49
 50
50
 51
51
 52
52
 53
53
 54
54
 55
55
 56
56
 57
57
 58
58
 59
59
 60
60

Photoshop Pen Tool Tutorial (Tattoo Design)
DesignCourse
How to Design the Microsoft Logo in Photoshop
DesignCourse
Photoshop Gradients Video Tutorial
DesignCourse
Your Guide to Layer Styles
DesignCourse
Layer Masks in Photoshop
DesignCourse
iOS App Icon Design Tutorial in Illustrator CS6
DesignCourse
Illustrator CS6 Logo Design Tutorial - Archfold
DesignCourse
Photoshop CS6 3D Tutorial - Magic Tent Illustration
DesignCourse
How to Design a Tshirt Tutorial - Adobe Illustrator
DesignCourse
Types of Logos - Lettermark & Monogram Logo Type
DesignCourse
Banner Design in Photoshop CS6
DesignCourse
How to Design a Logo in Illustrator CC
DesignCourse
Designing a Logo in Photoshop CC
DesignCourse
1. Launch & Market a Web Based Business - Introduction
DesignCourse
2. Launch & Market a Web Based Business - Logo Design
DesignCourse
3. Home Page Mockup in PS : Part 1
DesignCourse
4. Home Page Mockup in PS : Part 2
DesignCourse
5. Home Page Mockup in PS : Part 3
DesignCourse
6. Home Page Mockup in PS : Part 4
DesignCourse
7. Home Page HTML & CSS - Part 1
DesignCourse
8. Home Page HTML & CSS - Part 2
DesignCourse
Using Photoshop to Showcase Mobile Projects
DesignCourse
Flat Icon Design Tutorial in Illustrator CC
DesignCourse
Illustrator CC Logo Design Tutorial - A Logo That "Pops"!
DesignCourse
Logo Design Follow Along 1: Emblem Logo Design
DesignCourse
Showcasing Logos in 3D with Blender
DesignCourse
How to Design an Effective Lettermark Logo
DesignCourse
Squeeze Page Design Tutorial in Photoshop (Part 1)
DesignCourse
Squeeze Page Design Tutorial in Photoshop (Part 2)
DesignCourse
Mobile GUI Element Design in Adobe Photoshop CC (Part 1)
DesignCourse
Mobile GUI Element Design in Adobe Photoshop CC (Part 2)
DesignCourse
Flat Mobile App Design in Photoshop CC - Weather App
DesignCourse
Create Reflective 3D Text in Blender (Beginner)
DesignCourse
Animating a Logo with Adobe After Effects CC (Beginner)
DesignCourse
Design a Game Website Mockup in Photoshop CC (Part 1)
DesignCourse
Design a Game Website Mockup in Photoshop CC (Part 2)
DesignCourse
Photo Manipulation Tutorial in Photoshop CC (Beginner)
DesignCourse
Advertising Illustration Tutorial in Photoshop CC
DesignCourse
Perspective Warp Tool Tutorial in Photoshop CC
DesignCourse
Free Giveaway Contest. (WiseBanner Banner Maker).
DesignCourse
Design an Animated Loading/Download Icon (GIF)
DesignCourse
Contest Winners (WiseBanner)
DesignCourse
Model & Animate a 3D Push Button in Blender (Beginner)
DesignCourse
Mega Tutorial - iPhone Breathalyzer - Project Introduction
DesignCourse
Part 1 - iPhone Breathalyzer - Blender
DesignCourse
Part 2 - iPhone Breathalyzer - Rendering & GUI Design
DesignCourse
Part 3 - iPhone Breathalyzer - UI Animation in After Effects
DesignCourse
Part 4 - iPhone Breathalyzer - Website Design in Photoshop CC
DesignCourse
Part 5 - iPhone Breathalyzer - HTML Part 1
DesignCourse
Part 6 - iPhone Breathalyzer - HTML/CSS Part 2
DesignCourse
Part 7 - iPhone Breathalyzer - HTML/CSS Part 3
DesignCourse
Part 7 - iPhone Breathalyzer - Finishing Touches
DesignCourse
Square Space Logo Maker - C'mon People.
DesignCourse
Design a Bloody Knife in Photoshop CC
DesignCourse
Typographic Poster Design Tutorial in Illustrator (Part 1)
DesignCourse
Typographic Poster Design Tutorial in Illustrator (Part 2)
DesignCourse
Modern Business Card Design in Illustrator CC (Part 1)
DesignCourse
Modern Business Card Design in Illustrator CC (Part 2)
DesignCourse
Parallax Tutorial using Parallax.JS
DesignCourse
Interview: Andrew Price of BlenderGuru.com
DesignCourse
More on: UI Design
View skill →


Related AI Lessons
⚡
⚡
⚡
⚡
Had my Frontend Developer interview with Capgemini (Application Developer) today, and I wanted to…
Medium · JavaScript
10 Frontend Developer Tools to Boost Productivity in 2026
Medium · Programming
10 Frontend Developer Tools to Boost Productivity in 2026
Medium · JavaScript
The US Frontend Engineer Market in 2026: A Data-Driven Reality Check (and the Bias That Stops Us Seeing It)
Dev.to AI
Chapters (5)
Intro
0:19
HTML
5:45
CSS
9:30
JavaScript & Greensock
16:26
Final Result
🎓
Tutor Explanation
