Kali Linux install Apple M1
Skills:
Linux & CLI90%
Key Takeaways
Installs Kali Linux on Apple M1 silicon using Parallels and configures WiFi adapter
Full Transcript
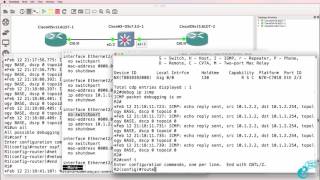
In this video, I'm going to show you how to get Kali Linux up and running on an Apple M1 computer. This is actually a very simple installation these days, but there are some restrictions. As an example, you can't change the display currently, but hopefully things will improve in the coming weeks and months. I'll also show you that it's very, very simple to get a Wi-Fi adapter connected and you can sniff Wi-Fi networks using this. So, in this example, I've got an Alpha network adapter. I'll plug it in. I'm asked to give permission for parallels to access the device. So I'll allow that. I'll open up a terminal. And when I type iwconfig, you can see that a Wi-Fi adapter has been connected. It's in managed mode. But what I could do as an example is run an application such as Wi-Fi. Put my password in. And this device can now go into monitor mode and can sniff networks. So I'm able and I'll just cancel that. I'm able to sniff Wi-Fi networks around me. As an example, this GVM network is one of the lights right behind me. So I'm going to show you all the steps now. How to download Parallels, how to install it, how to download Keali, how to import it into Parallels, and how to get the setup. The installation is actually quite simple. Use the menu below if you want to jump to specific topics. Okay, let's get started. [Music] Okay, so the first thing you need to do is download the parallels software. So on the parallels website and I'll put a link below this video so that you can find this easily. they have an option to try the technical preview. Now, the technical preview 2 has been recently released and this works well with the Cali installation. They talk about some of the new features, but what we're interested in is downloading the technical preview. It's about 329 meg size. They give us a MD5 check sum and they give us an activation key. You'll need this activation key to start up the virtual machines in Parallels. You'll also need a Parallels account to log in. So, if you don't have one, then create one so that you can get hold of the technical preview. Now, while that's downloading, I'll download the Keali installer for ARM 64. This is 3.2 gig in size. So, you need two pieces of software. You need the Parallels desktop software and you need the ARM 64 ISO. Once again, I'll put links to the software below this video. Okay, so in our downloads directory, we've got the Parallels software. What I'm going to do is right click on the Parallels DMG file and click open to install the software. I'll right click and click open. I'm warned that the software was downloaded from the internet. I'm happy with that. So, I'm going to click open. Software is now installed. have to put in my password. Now, I've previously installed the software, but you may have to give the software permissions to access your documents, access your downloads directory, and so forth. But the installation is very, very simple. So, hopefully that didn't take too long. And once it starts up, you'll be presented with the installation assistant and you can click continue to now create a new virtual machine. Now, I previously created an entire video showing you how to use Debian to get Cali up and running on a M1 Apple Mac. You would install Debian and then upgrade it to Cali. That's no longer necessary because we're using the ISO that Steve created. So, I'm going to select choose manually to select the file that I want to use. And in this case, it's going to be the Kelly ARM 64 ISO. Click open. It's unable to detect the operating system. That's okay. I'm going to click continue. I'm going to select Debian GNU Linux. Click okay. I'm going to call this Kelly Linux. I'm going to customize my settings before installation. Click create. In the hardware settings, you could change the processes. I'm going to leave it at the recommended of two. I am going to increase the RAM to 4 gig. Under graphics, I'm going to allocate 512 meg of RAM, but be aware that the resolution doesn't change. You're stuck at 1,024x 768. So that probably doesn't make much difference, but I'll leave that as it is. One thing that I suggest you do change is uncheck share Mac camera with Linux. So uncheck that. So basically all I did was increase the RAM, increase the graphics, and disable sound and camera. I'll close this and click continue. And hopefully now we'll be able to install Cali. And there you go. I can select install to install the software. Now I'm going to select as many default options as I can. I'm going to keep this as simple as I can. You can change this if you like, but I'm going to select English as the language. I'm going to set my location as United States. Keyboard will be American English. Host name I'm going to set as Kelly M1. Domain name, I'll leave it the default of local domain. Username, I'm going to try and make this as close as possible to the virtual machine that's available for download from the Kelly website. So the username I'm going to use is Cali. So Kelly as a username, password I'll set as Kelly. I'll leave the time zone as eastern. Partition I'm going to use guided. Use entire disk. Select the default partition. All files in one partition. Press enter. I'm going to write those changes to the disks. The base operating system has now been installed. Now you need to select the software that you want to install. I'm going to select the default desktop environment and I'm also going to select large which installs the default selection plus additional tools. You can obviously select the options that you want to press continue. And now the software has been installed. Now I'll speed the video up at this point because all it's going to do is install the various packages. And there you go. The installation has completed. I'm going to press enter to continue. System is rebooting. And there you go. Kelly is now booting up. I can log in with my username of Kelly, password of Kelly running on an Apple M1 computer. So if I go to about Mac, notice this is a Mac Mini version 11.0, 8 gig of RAM on this Mac Mini, but I'm running Cali on this Mac Mini. Now one issue you will have is the display resolution can't be changed. So I can't change the display resolution and I'm also not able to install parallels tools. So even though I try and install them so open up parallels tools go to the installation directory ls. Let's make this a bit bigger. pseudo.install. Put in my password. Notice permission denied. I've had similar issues with Parallels tools on iuntu. Something that they still need to work on. So Parallels Tools doesn't work. So I can't change the resolution, but I can once again install a Wi-Fi adapter. So just before I plug that in, I'll clear the screen. IW config. No wireless adapters installed. I'll plug that in. Connect it to Cali. Allow the connection. IWconfig. You can see we now have a Wi-Fi adapter connected. And I could use a command such as pseudo wifi and run Wi-Fi and detect Wi-Fi networks. So once again, I'll I'll stop that. So, I've got the GVM networks as an example. So, there you go. It's now really easy to get Kali Linux installed and working on an Apple M1. Hopefully, things will get better and we'll be able to change the resolution and it will work like it does on an Intel processor. Now, if you enjoyed this video, please consider subscribing to my YouTube channel. Please like this video and click on the bell to get notifications. That really does help me with the YouTube robots. I'm David Bumble. Want to wish you all the very best. [Music]
Original Description
It's now easy to install Kali Linux on Apple M1 silicon using Parallels.
Parallels preview: https://bit.ly/parallelsm1
Kali Linux download: https://kali.org/downloads/
Need help? Join my Discord: https://discord.com/invite/usKSyzb
Menu:
Kali Linux installation Apple M1: 0:00
Sniff WiFi network using Kali Apple M1: 0:16
Download Parallels software: 1:37
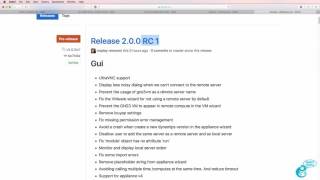
Download technical preview: 2:02
Download Kali ISO for arm64: 2:27
Install Parallels software: 2:47
Create Kali Linux virtual machine: 3:38
Install Kali Linux on Apple M1 CPU: 5:15
Kali Linux booting on Apple M1 computer: 7:10
Display resolution issues: 7:45
Parallels tools installation issues: 7:56
Plug in WiFi adapter in new Kali Installation: 8:30
Easy to install Kali Linux on Apple M1 processor: 9:13
================
Connect with me:
================
Discord: https://discord.com/invite/usKSyzb
Twitter: https://www.twitter.com/davidbombal
Instagram: https://www.instagram.com/davidbombal
LinkedIn: https://www.linkedin.com/in/davidbombal
Facebook: https://www.facebook.com/davidbombal.co
TikTok: http://tiktok.com/@davidbombal
YouTube: https://www.youtube.com/davidbombal
================
Support me:
================
Buy my CCNA course and support me:
DavidBombal.com: CCNA ($10): http://bit.ly/yt999ccna
Udemy CCNA Course: https://bit.ly/ccnafor10dollars
GNS3 CCNA Course: CCNA ($10): https://bit.ly/gns3ccna10
======================
Special Offers:
======================
ITPro.TV:
https://itpro.tv/davidbombal
30% discount off all plans Code: DAVIDBOMBAL
Boson software: 15% discount
Link: bit.ly/boson15
Code: DBAF15P
kali linux
kali linux install
kali linux install m1
kali linux install apple m1
macbook m1
mac m1
kali mac
kali linux mac
kali mac m1
kali linux mac m1
kali mac mini
mac mini
mac mini m1
parallels
virtualization
parallels
parallels desktop
parallels m1
parallels mac m1
parallels desktop 16
Please note that links listed may be affiliate links and provide me with a small percentage/kickback shoul
Watch on YouTube ↗
(saves to browser)
Sign in to unlock AI tutor explanation · ⚡30
Playlist
Uploads from David Bombal · David Bombal · 0 of 60
← Previous
Next →
1
 2
2
 3
3
 4
4
 5
5
 6
6
 7
7
 8
8
 9
9
 10
10
 11
11
 12
12
 13
13
 14
14
 15
15
 16
16
 17
17
 18
18
 19
19
 20
20
 21
21
 22
22
 23
23
 24
24
 25
25
 26
26
 27
27
 28
28
 29
29
 30
30
 31
31
 32
32
 33
33
 34
34
 35
35
 36
36
 37
37
 38
38
 39
39
 40
40
 41
41
 42
42
 43
43
 44
44
 45
45
 46
46
 47
47
 48
48
 49
49
 50
50
 51
51
 52
52
 53
53
 54
54
 55
55
 56
56
 57
57
 58
58
 59
59
 60
60

RYU SDN Controller Part 4: Graphical User Interface (GUI): Practical GNS3 SDN and OpenFlow
David Bombal
HPE Network Protector SDN Application Part 1 - Introduction
David Bombal
HPE Network Protector SDN Application Part 2 : DNS Interception using OpenFlow
David Bombal
HPE Network Protector SDN Application Part 3 - Lab Setup using Physical Switches
David Bombal
HPE Network Protector SDN Application Part 4 - Demo of malicious websites blocked
David Bombal
HPE Network Protector SDN Application Part 5 - Demo OpenFlow table interception flows
David Bombal
HPE Network Protector SDN Application Part 6 - Demo of Physical Switch configuration
David Bombal
HPE Network Protector SDN Application Part 7 - Demo Service Insertion Tunnel / GRE Tunnel
David Bombal
HPE Network Protector SDN Application Part 8 - Demo SDN OpenFlow Reporting
David Bombal
HPE Network Protector SDN Application Part 9 - Demo switches interception of DNS traffic
David Bombal
GNS3 Talks: GNS3 version 1.5.X Appliance Tips
David Bombal
CCNA 200-125 Exam: AAA demo: TACACS+ with GNS3
David Bombal
GNS3 2.0.0 beta 2 install
David Bombal
CCNA #012: Learn SNMP with GNS3, Wireshark and Solarwinds NPM - CCNA 200-125 exam
David Bombal
CCNA #013: Spanning Tree CCNA Exam Questions: Know the answer? CCNA 200-125 exam
David Bombal
GNS3 2.0.0 beta : GNS3 VM integration with GNS3 GUI
David Bombal
CCNA #018: Routing exam questions: Who wins? OSPF, EIGRP or RIP? Sure? CCNA 200-125 exam
David Bombal
CCNA #019: Spanning Tree CCNA Exam Questions: Root Bridge, Root Port and more: CCNA 200-125 exam
David Bombal
GNS3 Download, installation and configuration - GNS3 1.5.3 and Windows 10
David Bombal
CCNA #023 EIGRP Neighbor Troubleshooting (DUAL Issues) for the CCNA 200-125 Exam
David Bombal
GNS3 2.0 Architecture and schema Part 1: What is the GNS3 Controller?
David Bombal
GNS3 2.0 Architecture and schema Part 2: Emulators and virtualization
David Bombal
CCNA #028 VTP Troubleshooting for the CCNA 200-125 Exam
David Bombal
CCNA #029 VTP & DTP Troubleshooting for the CCNA 200-125 Exam
David Bombal
CCNA #030 VTP Troubleshooting for the CCNA 200-125 Exam
David Bombal
GNS3 : How to download Cisco IOS images and VIRL images. Which is the best? How do you get them?
David Bombal
GNS3 ASA setup: Import and configure Cisco ASAv with GNS3
David Bombal
GNS3 switching setup and options: Cisco and other switching options in GNS3
David Bombal
GNS3 switching setup and options Part 2: GNS3 unmanaged built-in switch
David Bombal
GNS3 switching setup and options Part 3: Router on a sick with GNS3 unmanaged built-in switch
David Bombal
GNS3 switching setup and options Part 4: Etherswitch Router for Cisco Dynamips Part 1
David Bombal
GNS3 switching setup and options Part 5: Etherswitch Router for Cisco Dynamips Part 2
David Bombal
GNS3 switching setup and options Part 6: Etherswitch, Wireshark, 802.1Q, InterVLAN routing
David Bombal
GNS3 Talks: Docker, Open vSwitch, SDN and OpenFlow Part 1: GNS3 Switching Part 7
David Bombal
GNS3 Talks: Docker, Open vSwitch, SDN and OpenFlow Part 2: GNS3 Switching Part 8
David Bombal
GNS3 Talks: Docker, Open vSwitch, SDN and OpenFlow Part 3: GNS3 Switching Part 9
David Bombal
GNS3 Talks: Docker, Open vSwitch, SDN and OpenFlow Part 4: GNS3 Switching Part 10
David Bombal
GNS3 Talks: Docker, Open vSwitch, SDN and OpenFlow Part 5: GNS3 Switching Part 11
David Bombal
GNS3 Nexus (NX-OSv) switch setup and configuration Part 1: GNS3 switching options Part 12
David Bombal
GNS3 Nexus (NX-OSv) switch setup and configuration Part 2: GNS3 switching options Part 13
David Bombal
GNS3 Talks: Docker, Open vSwitch, SDN and OpenFlow Part 6: GNS3 Switching Part 14
David Bombal
GNS3 Talks: Docker, Open vSwitch, SDN and OpenFlow Part 7: GNS3 Switching Part 15
David Bombal
GNS3 Cisco CSR 1000v setup and configuration Part 1: GNS3 NFV
David Bombal
GNS3 Cisco CSR 1000v setup and configuration Part 2: GNS3 NFV
David Bombal
GNS3 Talks: Use the NAT node to connect GNS3 to the Internet easily!
David Bombal
GNS3 Talks: GNS3 2.0 RC1 is now available
David Bombal
GNS3 Talks: GNS3 2.0 Portable Projects - easily export and import GNS3 projects
David Bombal
GNS3 Talks: Multiple clients sharing projects in real time, plus console session shadowing!
David Bombal
CCNA #035 NAT Troubleshooting Scenario 1 - Can you find the issue? CCNA Exam 200-125 troubleshooting
David Bombal
CCNA #036 NAT Troubleshooting Scenario 2 - Can you find the issue? CCNA Exam 200-125 troubleshooting
David Bombal
GNS3 Talks: ESXi, GNS3 VM and KVM support Part 1: leverage servers and the cloud
David Bombal
CCNA #037 OSPF Troubleshooting - can you find the issue? CCNA Exam 200-125 troubleshooting
David Bombal
GNS3 Talks: ESXi, GNS3 VM and KVM support Part 2: leverage servers and the cloud
David Bombal
CCNA #038 NAT Troubleshooting Scenario 3 - Can you find the issue? CCNA Exam 200-125 troubleshooting
David Bombal
CCNA #039 - OSPF DR, BR and DROTHER Election - do you know the answers?
David Bombal
CCNA #040 NAT Troubleshooting Scenario 4 - Can you find the issue? CCNA Exam 200-125 troubleshooting
David Bombal
GNS3 Talks: Arista vEOS GNS3 import and configuration Part 1
David Bombal
CCNA #041 - OSPF DR, BR and DROTHER Election - do you know the answers?
David Bombal
GNS3 Talks: Arista vEOS GNS3 import and configuration Part 2
David Bombal
GNS3 Talks: ipterm: Linux, Docker, Python, SDN and more! Part 1
David Bombal
More on: Linux & CLI
View skill →


![MITRE CTF 2019 - Linux [50] Escaping RBASH with SSH](https://i.ytimg.com/vi/MEGBY3XAe_4/mqdefault.jpg)


Related Reads
📰
📰
📰
📰
The AI Tools You’re Paying For Have Free Twins Nobody Mentions
Medium · AI
I Accidentally Stumbled Into an AI Side Hustle — Here's Everything I've Learned
Dev.to AI
How I Made $700 in 2 Weeks Selling AI Automation Templates
Dev.to AI
MCP Server Tutorial: Build Your Own AI Tools in 30 Minutes
Dev.to · NeuroLink AI
🎓
Tutor Explanation
