Programming Fibonacci on a breadboard computer
Skills:
ML Maths Basics60%
Key Takeaways
Programming a breadboard computer to calculate Fibonacci numbers using Assembly Language and machine code, demonstrating low-level programming concepts and computer architecture.
Full Transcript
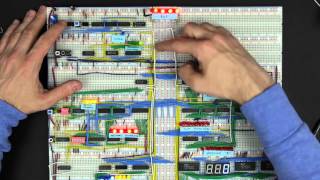
okay so I got this compiled program from running a the g c compiler on my on my MacBook and this this Assembly Language will work on my MacBook but it won't work on this computer that I built because this computer has its own Assembly Language that that I sort of invented um and so what we would need to do is we would need to find a c compiler that would compile this program for this computer but um since I haven't written one it doesn't exist so instead what we can do is actually um kind of handwrite the Assembly Language program ourself and so that's what I've done here and so this this program is is basically the same thing as as this but it's written in the Assembly Language for for this computer um and so if we want to kind of look at it just really quickly um zoom in a little bit here help us see what's going on but if we look at our uh our C program again basically um what we're doing here in these first two lines is the x equals 0 actually we're doing the Y equals 0 here there's a little bit of an optimization that I needed to do because the uh the the memory on this program this this or excuse on this computer this computer only has 16 bytes of memory which is not very much memory at all um and so because we needed three bytes left over here at the end for the variables x y and z um I had to do a little bit of an optimization here to make the rest of the program fit and so the first two lines is setting y equal equal to one let me just cross that out this is y equals 1 is what this is doing so it's loading one into the a register and it's storing that in the E which is y uh at memory location e which is y um and then it's uh this is sort of uh the the x equals equals zero except we're not really saving it um and that's just to kind of save me that one line of code um so this is sort of x equals z and then we output um so the so we're kind of doing these a little bit out of order but doesn't matter um and then the print f is is sort of my my output here and then we do the add uh and we're adding uh let's see we're adding e so we're adding y to X so X is in the register we're adding y so this is kind of uh you can think of this line as being the Z well this line here actually these two lines are the zal X + Y because this store a is storing the the result of this in F which is address location f is z so this is the zal X+ y um and then these two lines here are the xals Y uh cuz we're loading and uh from E and then storing to D so e to D is y to X so xal Y and then here we're doing the uh y equals z and is the same thing we're going from F to e f is uh Z and address e is is is um variable y um and then at the end here we we load a again um and this is just or we load uh the value of x into the a register and that's that way when we loop back we output the value of x and this is kind of again the sort of optimization I did to um rather than storing it up here and then loading it again that would take two extra bytes um so this is down here um and then the jump carry so what this is saying is that if the result of the last addition which is up here uh had a had a carry bit which means that uh you know this is an 8-bit computer so if the result of that addition was uh took up nine bits um and you know because one bit had to be carried then go to the top and that's kind of a way of of detecting whether uh X is greater uh than uh than 255 because if it carried into a nth bit then you know something that takes you know more than eight bits to to to store is going to be greater than 255 so if that's the case then jump all the way to address Z which then resets the yal 0 xal 0 otherwise it falls down here and we jump uh we only jump up to address three which is the output so again sort of going back to the printf um so you can see this this program is is basically um an assembly another assembly of or another compilation I guess if you want to think of it that way um we've compiled this this C program uh but instead we've compiled it for uh this this homebuilt computer here now the next step um now that we have this Assembly Language is is to convert this to um to machine code um and so I've done that here and uh slide this over so you can see everything um and so what done here is is this is the same program that we just walked through and what I've done is just converted everything to Binary uh because when we program the computer we're going to be using these switches and we have to enter these things in in binary on these switches which is very cumbersome but fortunately it's a short program um and so basically the addresses here are just uh 0 through uh C heximal which is 0 through 1 1 0 0 in binary um and then each of these op codes here each of these instructions has a corresponding 4 bit binary value and so I've just substituted those in here um and then most of these um instructions have some sort of parameter that goes with them um and then that just is just converted to Binary over here and so this is what we'll we'll go ahead and enter um and so let me just kind of slide this over a little bit so we can get it right next to here and zoom in so we can see what's going on and so to program this I'm going to stop the clock real quickly and uh just clear everything out of the computer and then we'll switch it over to programming mode and so in programming mode what I can do is I can set the address so this is uh all zeros and then I can set down here the data that I want to program in so one one one 00 0 1 and then once I have that programmed in I'll just push this button to program it and then I can move on to the next value so this is memory location one and it's going to be turn a little off it's going to be 0 1 0 0 1 one one zero and I can program that and I'll go ahead and program the rest of this and through the magic of video editing we can speed this up for you and there we go so I think we're all programmed here so we can go ahead and shift that back into run mode and I will uh zoom out here so you can see what's going on and get this here think you can see everything there um and so now uh we can reset the computer and uh try running this and it looks like it is working yeah here we go it's counting through all the Fibonacci numbers and it looks like there might be a bug it looks like it's missing the last one the 233 so there's probably probably a little bug with the jump logic maybe um oh yeah because I'm outputting first and then adding um okay well maybe I'll fix that a little bit later but uh it's close enough we're getting Fibonacci numbers
Original Description
If you want to learn more about how this computer works or how I built it, check out https://eater.net/8bit
Support me on Patreon: https://www.patreon.com/beneater
Watch on YouTube ↗
(saves to browser)
Sign in to unlock AI tutor explanation · ⚡30
Playlist
Uploads from Ben Eater · Ben Eater · 16 of 60
1
 2
2
 3
3
 4
4
 5
5
 6
6
 7
7
 8
8
 9
9
 10
10
 11
11
 12
12
 13
13
 14
14
 15
15
 ▶
▶
 17
17
 18
18
 19
19
 20
20
 21
21
 22
22
 23
23
 24
24
 25
25
 26
26
 27
27
 28
28
 29
29
 30
30
 31
31
 32
32
 33
33
 34
34
 35
35
 36
36
 37
37
 38
38
 39
39
 40
40
 41
41
 42
42
 43
43
 44
44
 45
45
 46
46
 47
47
 48
48
 49
49
 50
50
 51
51
 52
52
 53
53
 54
54
 55
55
 56
56
 57
57
 58
58
 59
59
 60
60

KA 60 Minutes Sep 2013 rerun (10x speed)
Ben Eater
Frame formats | Networking tutorial (6 of 13)
Ben Eater
TCP: Transmission control protocol | Networking tutorial (12 of 13)
Ben Eater
Clock synchronization and Manchester coding | Networking tutorial (3 of 13)
Ben Eater
TCP connection walkthrough | Networking tutorial (13 of 13)
Ben Eater
Lower layers of the OSI model | Networking tutorial (7 of 13)
Ben Eater
Hop-by-hop routing | Networking tutorial (11 of 13)
Ben Eater
Sending digital information over a wire | Networking tutorial (1 of 13)
Ben Eater
ARP: Mapping between IP and Ethernet | Networking tutorial (9 of 13)
Ben Eater
Analyzing actual Ethernet encoding | Networking tutorial (4 of 13)
Ben Eater
Intro to fiber optics and RF encoding | Networking tutorial (2 of 13)
Ben Eater
The Internet Protocol | Networking tutorial (8 of 13)
Ben Eater
Looking at ARP and ping packets | Networking tutorial (10 of 13)
Ben Eater
The importance of framing | Networking tutorial (5 of 13)
Ben Eater
Programming my 8-bit breadboard computer
Ben Eater
Programming Fibonacci on a breadboard computer
Ben Eater
Connecting to a mystery signal | Digital electronics (4 of 10)
Ben Eater
Using a transistor to solve our problem | Digital electronics (8 of 10)
Ben Eater
Inverting the signal with a transistor | Digital electronics (9 of 10)
Ben Eater
8-bit computer update
Ben Eater
Bus architecture and how register transfers work - 8 bit register - Part 1
Ben Eater
RAM module build - part 2
Ben Eater
Using an EEPROM to replace combinational logic
Ben Eater
Build an Arduino EEPROM programmer
Ben Eater
Build an 8-bit decimal display for our 8-bit computer
Ben Eater
8-bit CPU control logic: Part 2
Ben Eater
Reprogramming CPU microcode with an Arduino
Ben Eater
Update and PODCAST ANNOUNCEMENT!
Ben Eater
The case against Net Neutrality?
Ben Eater
Making a computer Turing complete
Ben Eater
CPU flags register
Ben Eater
Conditional jump instructions
Ben Eater
“Hello, world” from scratch on a 6502 — Part 1
Ben Eater
What is a stack and how does it work? — 6502 part 5
Ben Eater
RAM and bus timing — 6502 part 6
Ben Eater
Subroutine calls, now with RAM — 6502 part 7
Ben Eater
Why build an entire computer on breadboards?
Ben Eater
How assembly language loops work
Ben Eater
Binary to decimal can’t be that hard, right?
Ben Eater
Hardware interrupts
Ben Eater
What is error correction? Hamming codes in hardware
Ben Eater
Installing the world’s worst video card
Ben Eater
World's worst video card gets better?
Ben Eater
Breadboarding tips
Ben Eater
So how does a PS/2 keyboard interface work?
Ben Eater
Keyboard interface hardware
Ben Eater
Keyboard interface software
Ben Eater
How does a USB keyboard work?
Ben Eater
How does USB device discovery work?
Ben Eater
How does n-key rollover work?
Ben Eater
SPI: The serial peripheral interface
Ben Eater
Why was Facebook down for five hours?
Ben Eater
How do hardware timers work?
Ben Eater
The RS-232 protocol
Ben Eater
Hacking a weird TV censoring device
Ben Eater
Let's build a voltage multiplier!
Ben Eater
6502 serial interface
Ben Eater
RS232 interface with the 6551 UART
Ben Eater
Fixing a hardware bug in software (65C51 UART)
Ben Eater
Running Apple 1 software on a breadboard computer (Wozmon)
Ben Eater
More on: ML Maths Basics
View skill →


Related AI Lessons
⚡
⚡
⚡
⚡
The Beginner Python Mistake That 17 Tutorials Never Explained
Medium · Programming
The Beginner Python Mistake That 17 Tutorials Never Explained
Medium · Python
Train Neural Networks without Draining your Pocket: Distributed Training in TensorFlow using…
Medium · AI
Train Neural Networks without Draining your Pocket: Distributed Training in TensorFlow using…
Medium · Deep Learning
🎓
Tutor Explanation