Breadboarding tips
Key Takeaways
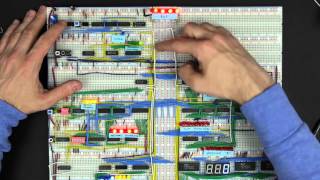
The video provides tips and techniques for breadboarding, including the use of long flexible jumpers, high-quality breadboards, and 22 gauge solid core wire. The speaker also demonstrates how to use wire strippers, needle nose pliers, and other tools to manage wires and components on the breadboard.
Full Transcript
one of the most common questions i get is how do i make my breadboard wiring so neat and tidy so in this video i'm going to share some tips and tricks that i use in my breadboard projects and first of all remember that the primary purpose of breadboarding is experimentation so i would actually encourage you not to make things too neat when you're first trying to get something to work you know using long flexible jumpers like this makes it really easy to put something together quickly to test out an idea or figure out how something works as you stumble around to create a new circuit spending a bunch of time measuring and cutting wires can really slow down the creative process so even if your goal is to make something sort of semi-permanent on a breadboard i'd still recommend wiring it up loosely like this at first just to test everything out for example you want it to be easy to try out different component values and make other changes to be able to quickly see what the effects are especially if you're not 100 certain how a circuit's going to work before you build it and then of course once you've got it working the way you want you still may not necessarily want to do anything else with the breadboard often at this point you may just want to rebuild the circuit more permanently you know soldering it together on a solderable perf board or something like this and then you know you're kind of done you don't really need the breadboard anymore but that's not why you're watching this video you know i've done tons of projects where i very neatly wire everything on a breadboard and you know i do that in my videos because i think it makes it easier for you to see how things are wired but the result you know definitely has its own aesthetic value that i think a lot of people like let's take this little blinky light circuit here and i'll show you how i would uh tidy this up and you know i always recommend starting with a high quality breadboard and that's especially true if you're building something semi-permanent because you don't want the contacts to sort of stretch out over time so i've got another video where i talk more about that and you can always check out eater.net breadboards for my up-to-date recommendations but of course in addition to the breadboard we've also got the wire and basically for wire um i'm not too picky uh basically just want a 22 gauge solid core that's that's pretty much a has to be solid core has to be 22 gauge so it's the right size and everything and then for tools there are basically three tools that i use i've got the wire strippers i've got the wire cutters and then needle nose pliers and of these i think the wire strippers i'm maybe the most particular about i really like these uh this particular style here because it's small and just sort of easy to work with it's adjustable i guess you know this has this sort of adjustment here for the wire size this is 18 that's uh 20 22 and this is 22 gauge wire but actually i find at least with this particular set over here on 24 is the right size because what you want is you want it so that when you put the wire in there and squeeze all the way it cuts through the insulation but doesn't nick the wire at all and so if i squeeze it on the wire like that you'll see it doesn't really nick the wire but it cuts nice and cleanly through the insulation and so anyway that's just my personal preference i really like this style and i'll talk a little bit more about why uh in a minute you can also get it uh with you know you just sometimes see it like this where you have this nut that you can move back and forth which is maybe a little bit more adjustable than this because this just has these sort of set positions although this one seems to work for me but whatever either way that those are the wire strippers i like as for wire cutters um doesn't matter too much i mean this is what i'm using um the key part is that it's just really small because you're going to be able to you know you want to be able to get in there real close and cut as you'll see the technique that i use um you want something that's just kind of small and and can get in there and then same thing with the needle nose pliers you want these to be you know nice and fine point like that i like the ones that don't have the serrated edge i don't know if you can tell but that's smooth in there but other than that you know they're just nice and small i don't like tweezers uh you get i think you get a lot more sort of grabbing power with the needle nose pliers like this whereas tweezers you just can't put as much pressure on stuff and so i recommend the needle nose pliers okay so let's start wiring some stuff up so i'll start with this wire here we've got a wire that's going from i guess pin three of the 555 timer over to the led here so it's just a nice straight wire that's an easy place to start and what i do is i typically will start by putting one end you know stripping one end like this and putting that in where where it belongs so what i'll do is i'll bend this 90 degrees and that's i use the needle nose pliers for that and then i can just bend it like that and then i get a nice uh 90 degree bend there you can see and then what i'll do is i'll put that in one end here where it goes and i use this to measure because right from there we can see you know it needs to go to this point here but actually it needs to of course you know we can't cut it there because we need to leave a little extra room to strip off so that we can you know connect it to the breadboard there and the way i do that is i take advantage of the fact that the amount that you need to strip off actually works out to be about .3 inches and that for you metric folks is 7.62 millimeters but i use the 0.3 inches because it turns out that the holes on the breadboard are 0.1 inch apart so if we measure 0.3 inches is 3 holes so what we can do is we put this back where where it's going to go there's one end of it the other end is right here and if i count three holes past where it goes so it's it's gonna end there and i count one two three holes past that and that's why it's very nice to have these very small wire cutters because you can get them in there like that anyway i count three holes and then i cut that right there and so now i actually have the right length so what i'll do is i'll use my pliers to extract this and now what i need to do is just strip off the other end and i need to strip off 0.3 inches off the end of this and for this i honestly have just been able to sort of eyeball what point three inches looks like and it's about that so i strip that off and i don't know we can see see how i did here yep got a pretty pretty well calibrated eyeball there maybe maybe it's a little longer that's fine but that just kind of comes with practice you get to get to be able to eyeball that but anyway i got that and now use the needle nose pliers to bend that and now we're done we've got the the wire and it should fit in there so let's put one end there put the other end there and that's perfect so we can get rid of this and we've got one wire done let's do another one so i've got this uh black wire here this is pin one on the 555 timer that goes to ground and actually i can connect it to ground down here so let's just do a little short jumper right in here i'll use black wire for that because it's ground and you know you may be tempted to use one of these fancy wire strippers so these are really nice because you just put the wire in there and squeeze and it's stripped which seems a lot easier than using using these and in fact it is and in fact i do i do use these as well for for stuff like this so but i'll show you in a minute here why that doesn't doesn't do it for everything so i'll bend that put it in here and now we want to go to the black power rail here and here we can't count three holes because there's only one hole so this is another one where i sort of eyeball and you just kind of go just a little bit past the edge of the of the breadboard there and that gives you enough that if you strip off .3 inches it works out and then here is where this kind of wire stripper doesn't work anymore because you just the wire has to be a certain length in order for this to work and you just can't fit it in there so that's why as much as it might be tempting to use those fancy wire strippers uh this thing is always going to work because you can always always got enough room to make this work strip that off and then again use the needle nose pliers to bend it so i'll put it in there like that bend it down and i've got a nice little jumper like that that should connect pin one to the ground rail and we can get rid of that jumper there we go this is getting tidier and tidier so now we'll do the same thing for this 5 volt rail up here i'll just spin this around get some red wire and again you know we can use the fancy stripper for for one side at least because it does make things go a little faster and then use the needle nose pliers bend 90 degrees stick it in where it's going to go and let me move this resistor because i want it to go in that pin there and then again we can't count three holes because there's only one there but if we go right to about there that's the right amount so again i'll use my needle nose pliers to pull that out and then i have to use these strippers to strip and again i'm just kind of eyeballing that point three inches of how much to take off and that that is definitely something that comes with experience but that looks about right so put that in there bend it like that and we've got another little jumper and that one goes right there and we get rid of that and so that's starting to get better and then you know the components of course are much easier because you just trim the leads to fit and so like this resistor over here for example that's going to be pretty simple we just want to straighten out the leads here and just bend them down so that it's the right the right length and they do actually make these like sort of fancy lead bending tools so the idea here is depending on how how big a gap you're trying to uh to cover you can put it in here and say oh well you know this is 0.6 right there so you can put your resistor in there and bend it bend it like that and then you know it's the perfect length to cover essentially six holes honestly i don't find these to be that useful it's to me it's just as easy to eyeball it i also find that if i'm bending leads using the needle nose pliers it just gives me much more precise control and lets me get a much sharper angle when i bend it like that that that's sort of what i prefer so anyway that's just kind of my my preference but you know these things do exist and then once you've got it bent into the right shape there just trim off again kind of leave the right amount so that the resistor sits flush with the breadboard once it's in there there it goes led is even easier for that we're just going to trim the legs put it back in there it goes and then these resistors are a little bit different because they're only going um you know one hole over and so you know one thing you can do with resistors is bend one lead down like that and install them this way and then what we'll do is just trim those leads like that and then this resistor can sit upright like so and then we'll just do the same thing with the other one bend that down trim it off and put it in and so there we go the resistors are nice and neat that's looking pretty good and i've got this wire here and and these are always the tricky ones where you uh don't have a straight shot like you like we did here so we've got to sort of put some bends in here to get it to go around from pin two over to pin six so i'll show you how i do that so start off by stripping off an end here and then bending that 90 degrees like that and spin this around so that i can put this in here pin two to where we're coming from and then what i do is use the needle nose pliers to sort of create a pivot point here where i can bend the wire so i'll bend it like that actually let me get this out of here that's the one we're replacing i'll bend it like that and then spin this around and do the same thing here we'll bend it and bend it right about there i think that looks right and then we want it to go to pin 6. which is over here so this is pin six and then i count three holes past pin six let me do that so you can kind of see what i'm doing here so one two three is right there and so now i just need to strip off that last bit so i'll use the pliers to pull this out and then i can use my stripper to go in there and this is why these little ones are nice because you've got the room to get in there there we go i probably pulled too much off of that but maybe that's fine so use the needle nose pliers then to bend that around and now we should have something that fits very nicely from pin two around to pin six oh i can get it in there there it is yeah not too bad so there we go and now we just have this jumper tying the two ground busses together so i can take a black wire to replace that with and we're just running from here over to here and now here we're at the very edge of the board so we can't you know sort of easily count just count three holes over so again we sort of have to eyeball it and i think it's probably about there and i think here we have enough wire we can probably use this thing to strip that indeed we can and then another bend in that see if it fits it's a little tight yeah that works and for completeness sake we can also tie the positive busses together so i'll go ahead and just put some red wire in here so i'm going to go from there and again this is just a little bit off the edge so i'll eyeball that i think maybe there pull this out and we can use the fancy strippers and that should be the right length so let's stick that in there there we go now we don't need this anymore and see if it works hey there goes so that's it that's our uh our cleaned up spiffy new breadboard circuit now one other trick is that sometimes you get a more complicated circuit like this where you can't fit all the wires just nice and flush like this on the on the breadboard like we're showing before and in that case you know what i do is just sort of arch the wires up like this and the way to make this look kind of neat um like this is just to add a constant length to each wire so for example if if i want to just pull this wire out here i'll show you how i would make this particular jumper and really it's it's sort of the same thing you figure out where it's going from and where it's going to and you just want to figure out what that length is so we can count these uh these holes here so 1 2 3 4 5 6 7 8 9 10 11 12 13 14 15 16. so it's 16 holes across so that would actually be 1.6 inches but really just knowing that it's 16 holes is what we is what we need so let's make a wire that's uh the right length so as usual start by stripping that 0.3 inches off the end putting a right angle in it and i'll put it in the breadboard here and i'm actually going to use the numbers that are on the breadboard here so this is 40. so we want something that's 16 long so if we go out to 56 this would be the length so if we if we cut it right here right here 56. if we add one two three and cut here then it would be just long enough to sit flat between those two but what i do if i want to arch it up like this is just add another point three so another one two three and what we'll do is just cut it here so get the cutter cut that there now go ahead and remove this and strip off that last point three eyeball it close enough and then this should be about the right length and kind of form it into the right shape and if we put one end in here and the other end over here you should find that it fits pretty well and then you kind of massage all those wires together to sort of make it look like they all fit there so that looks that looks good so that's how i would do something like that is just add point three and then so all of these they might be different lengths if they're going from from in two different places but you just measure each one and add an extra point and they all will sort of line up nicely like that and then same thing for these ones that that curve you just sort of count the length you just count holes along and then you know making turns wherever you need to and even though all of these are actually different length because you know they start you know the one maybe are these different lengths yeah they're probably some of them are different lengths so anyway you just measure each one you just count how many holes it is and you know count along whatever path you want to take add 0.3 to it and measure it out and fit them in and then once they're all sort of in place you can sort of bend them and get them to to be exactly where you want and so that's pretty much it i mean those are the basic techniques that i use for breadboarding so hopefully you found that interesting hopefully you found it helpful i know certainly a lot of people have asked how i uh how i do my breadboarding and so hopefully this video was useful and for more information including all the tools that i use and up to date recommendations and everything you can always go to eater.net breadboard so i'll put all my sort of breadboard related stuff over there so check that out and you know as always thanks to all my patrons whose support makes these videos possible so thank you you
Original Description
More breadboard stuff: https://eater.net/breadboards
Support these videos on Patreon: https://www.patreon.com/beneater or https://eater.net/support for other ways to support.
------------------
Social media:
Website: https://www.eater.net
Twitter: https://x.com/beneater
Patreon: https://patreon.com/beneater
Reddit: https://www.reddit.com/r/beneater
Special thanks to these supporters for making this video possible:
Aleksey Smolenchuk, Alexander Wendland, Andrew Young, Anson VanDoren, Anthanasius, Armin Brauns, Ben Cochran, Ben Dyson, Ben Kamens, Ben Williams, Bill Cooksey, Binh Tran, Bouke Groenescheij, Bradley Pirtle, Bradley Stach, Brent Reusing, Brian T Hoover, Bryan Brickman, Bryan Glezerson, CaffeinatedClockmaker, Carlos Ambrozak, Christopher Blackmon, Dale Andrew Darling, Daniel Jeppsson, Daniel Tang, Dave Burley, Dave Walter, David Brown, David Clark, David Cox, David House, David Sastre Medina, David Turner, David Worsham, Dean Winger, Dissy, dko, Dmitry Guyvoronsky, Dušan Dželebdžić, Dzevad Trumic, Emilio Mendoza, Eric Brummer, Eric Busalacchi, Eric Dynowski, Erik Broeders, Eugene Bulkin, George Foot, George Miroshnykov, Harry McDow, HaykH, Ingo Eble, Ivan Sorokin, james schaefer, Jason DeStefano, Jason Specland, JavaXP, Jay Binks, Jayne Gabriele, Jeffery Springs, Jeremy A., Jim Kelly, Jim Knowler, Jim Van Meggelen, Joe Beda, Joe OConnor, Joe Pregracke, Joel Jakobsson, Joel Miller, Johannes Lundberg, John Fenwick, John Meade, Jon Dugan, Joseph Portaro, Joshua King, Kefen, Kenneth Christensen, Kent Collins, Koreo, Lambda GPU Workstations, Larry, Lucas Nestor, Lukasz Pacholik, Maksym Zavershynskyi, Marcus Classon, Martin Roth, Mats Fredriksson, Matt Krueger, Matthäus Pawelczyk, melvin2001, Michael Garland, Michael Tedder, Michael Timbrook, Miguel Ríos, mikebad, Mikel Lindsaar, Miles Macchiaroli, Nicholas Counts, Nicholas Moresco, Nick, Örn Arnarson, Paul Pluzhnikov, Paul Randal, Pete Dietl, Phil Dennis, Philip Hofstetter, Phillip Glau, PixelSerge
Watch on YouTube ↗
(saves to browser)
Sign in to unlock AI tutor explanation · ⚡30
Playlist
Uploads from Ben Eater · Ben Eater · 44 of 60
1
 2
2
 3
3
 4
4
 5
5
 6
6
 7
7
 8
8
 9
9
 10
10
 11
11
 12
12
 13
13
 14
14
 15
15
 16
16
 17
17
 18
18
 19
19
 20
20
 21
21
 22
22
 23
23
 24
24
 25
25
 26
26
 27
27
 28
28
 29
29
 30
30
 31
31
 32
32
 33
33
 34
34
 35
35
 36
36
 37
37
 38
38
 39
39
 40
40
 41
41
 42
42
 43
43
 ▶
▶
 45
45
 46
46
 47
47
 48
48
 49
49
 50
50
 51
51
 52
52
 53
53
 54
54
 55
55
 56
56
 57
57
 58
58
 59
59
 60
60

KA 60 Minutes Sep 2013 rerun (10x speed)
Ben Eater
Frame formats | Networking tutorial (6 of 13)
Ben Eater
TCP: Transmission control protocol | Networking tutorial (12 of 13)
Ben Eater
Clock synchronization and Manchester coding | Networking tutorial (3 of 13)
Ben Eater
TCP connection walkthrough | Networking tutorial (13 of 13)
Ben Eater
Lower layers of the OSI model | Networking tutorial (7 of 13)
Ben Eater
Hop-by-hop routing | Networking tutorial (11 of 13)
Ben Eater
Sending digital information over a wire | Networking tutorial (1 of 13)
Ben Eater
ARP: Mapping between IP and Ethernet | Networking tutorial (9 of 13)
Ben Eater
Analyzing actual Ethernet encoding | Networking tutorial (4 of 13)
Ben Eater
Intro to fiber optics and RF encoding | Networking tutorial (2 of 13)
Ben Eater
The Internet Protocol | Networking tutorial (8 of 13)
Ben Eater
Looking at ARP and ping packets | Networking tutorial (10 of 13)
Ben Eater
The importance of framing | Networking tutorial (5 of 13)
Ben Eater
Programming my 8-bit breadboard computer
Ben Eater
Programming Fibonacci on a breadboard computer
Ben Eater
Connecting to a mystery signal | Digital electronics (4 of 10)
Ben Eater
Using a transistor to solve our problem | Digital electronics (8 of 10)
Ben Eater
Inverting the signal with a transistor | Digital electronics (9 of 10)
Ben Eater
8-bit computer update
Ben Eater
Bus architecture and how register transfers work - 8 bit register - Part 1
Ben Eater
RAM module build - part 2
Ben Eater
Using an EEPROM to replace combinational logic
Ben Eater
Build an Arduino EEPROM programmer
Ben Eater
Build an 8-bit decimal display for our 8-bit computer
Ben Eater
8-bit CPU control logic: Part 2
Ben Eater
Reprogramming CPU microcode with an Arduino
Ben Eater
Update and PODCAST ANNOUNCEMENT!
Ben Eater
The case against Net Neutrality?
Ben Eater
Making a computer Turing complete
Ben Eater
CPU flags register
Ben Eater
Conditional jump instructions
Ben Eater
“Hello, world” from scratch on a 6502 — Part 1
Ben Eater
What is a stack and how does it work? — 6502 part 5
Ben Eater
RAM and bus timing — 6502 part 6
Ben Eater
Subroutine calls, now with RAM — 6502 part 7
Ben Eater
Why build an entire computer on breadboards?
Ben Eater
How assembly language loops work
Ben Eater
Binary to decimal can’t be that hard, right?
Ben Eater
Hardware interrupts
Ben Eater
What is error correction? Hamming codes in hardware
Ben Eater
Installing the world’s worst video card
Ben Eater
World's worst video card gets better?
Ben Eater
Breadboarding tips
Ben Eater
So how does a PS/2 keyboard interface work?
Ben Eater
Keyboard interface hardware
Ben Eater
Keyboard interface software
Ben Eater
How does a USB keyboard work?
Ben Eater
How does USB device discovery work?
Ben Eater
How does n-key rollover work?
Ben Eater
SPI: The serial peripheral interface
Ben Eater
Why was Facebook down for five hours?
Ben Eater
How do hardware timers work?
Ben Eater
The RS-232 protocol
Ben Eater
Hacking a weird TV censoring device
Ben Eater
Let's build a voltage multiplier!
Ben Eater
6502 serial interface
Ben Eater
RS232 interface with the 6551 UART
Ben Eater
Fixing a hardware bug in software (65C51 UART)
Ben Eater
Running Apple 1 software on a breadboard computer (Wozmon)
Ben Eater
More on: Tool Use & Function Calling
View skill →
🎓
Tutor Explanation