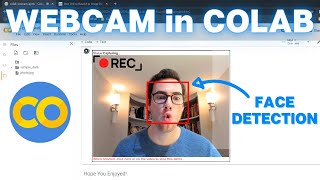
How to Use Webcam In Google Colab for Images and Video (FACE DETECTION)
Key Takeaways
This video tutorial demonstrates how to access and utilize a webcam within Google Colab for image and video processing, specifically for face detection using OpenCV's HAAR cascade classifier model. It covers the setup, connection to the local webcam, and face detection on images and video streams.
Full Transcript
hey everyone and welcome to the video in today's video i'll be showing you how to process images and videos using your webcam within google collab for the sake of today's tutorial i will be using opencv's har cascade to run face detection on the images and video streams so i hope you all enjoy and let's dive right in all right everyone so this has been a highly requested video a lot of comments on my previous google collab videos or tutorials saying you know how do i access my webcam for image how do i access my webcam for video so in today's video i'm going to answer that and i'm going to show you guys how to process image and video from your webcam in google collab so i hope you all enjoy it let's get to it so first things first you're gonna be wanting to copy this google cloud notebook and get it up and running for yourself so there's two ways to do that the first is just to copy the link to the notebook in the description of this video so it'll be down below in the description just copy over the link and then you should see a button in the top left corner that says copy to drive if you click that you'll copy it over to your own google drive and then you can just start running it from there the second way is going to be my github repository i'll also link that down below you can clone the notebook and then upload it to your own google collab so the two ways they both work the exact same so which other way you chose you should now have a google collab notebook up and running so you're going to want to first make sure you're connected to a runtime so that you're actually using a cloud vm a workstation so you're just going to make sure that this says ram or disk if it doesn't it'll just say connect and you're just going to go ahead and hit that connect button then you're going to go over to edit and go to notepad settings or notebook settings click that and you're going to want to select gpu this is just a best practice i'm not sure necessarily if we're going to be using gpu for this tutorial but i recommend doing this whenever you're opening a notebook so first things first you know webcam is actually a difficult thing to connect in google collab because you're using a cloud vm you're using another server computer somewhere in the cloud and it does not have a webcam so the way we're going to be connecting to your machine's webcam is through some javascript code so we're going to run some javascript code and it's going to do the connection to your local webcam for you so first you're going to go ahead and run the first cell to import the dependencies that we're going to be using and in this tutorial we're going to be doing some simple face detection so we're going to go ahead and run some helper functions this is just going to define a couple functions that will be converting the image files from javascript to opencv images and then throughout the process that's going to help so we're going to be using those and now let's go ahead and run our webcam in google collab on images so the face detection we're going to be doing is using har cascade classifier this is already pre-built into opencv so it's super handy so this cell right here go ahead and run it and it's just going to initialize your face detection model so it's just out of the box there is parameters you can use if you're trying to do some custom face detection but that's not what this video is about so i urge you to look into that if you're curious so webcam images uh is actually pretty straightforward compared to video it's a little bit easier um there's actually a code snippet right here on the left side of your notebook if you go and click this and go to camera capture this is kind of the base template that i've used and i'm now editing i've edited it for the purpose of our face detection so you'll notice that this code is very similar this is where i inserted it you just expand this i just want insert and then i've customized down here at the bottom section so this part right here it was just before it was just saving the original webcam image so if you were to insert this and just run it it would just save a normal image to your workstation but let's go ahead and run ours and we'll see what it looks like so first all we have to do is run this take photo function and this first parameter right here is what it's going to save the image afterwards as so by default it's just going to save it to photo.jpg and you can adjust the quality of the image if you want so if you scroll down to the bottom of this function this is the custom code that i've added that will actually take in the image transfer it over to an opencv format then grayscale it for the purpose of the face detection then i'm going to do run the face detection on the gray image and then for the loop through the faces and draw them on to the image itself and then we're just going to go ahead and save the image so that's the custom code i've added for this simple face detection and we'll now try it out so to try it out you're just going to go ahead and run the cell it should work and if it doesn't it says some type of error you might not have a webcam or your webcam might not be configured properly so if we go ahead and run this should open up your webcam you should see an image of yourself you're just going to hit this capture button to do go ahead and do the detection so i'll just come forward capture and the output should look something like this where it's going to be drawing a square bounding box around any faces detected within the image and it should look it should work right out of the box like that so it's super simple and it saved it to photo.jpg so if we go over here to the left side and look in our files and click on double click on photo.jpg you'll see it opens up the photo and it has saved it with the face detection so it's super easy and now that's how you do it on images it just runs the javascript and then you hit the capture button and it will do a face detection on the image so pretty straightforward if you want to dive more into the javascript code i recommend you know just playing around with this take photo function it's pretty uh self-explanatory and there is some documentation for collab on it and then the custom part i added right here does the face detection so if you want to play around with the actual face detection that's being done you can do so right in here so for the actual video um streaming within google collab it's a little bit trickier like i said that the for images because for video you're just gonna have to constantly stream the video and do some type of processing or program run the program on it so like we did for the image we're gonna be running our face detection using the hard cascade and what we're gonna do is we're gonna i've done this diagram for you so what we do is we open up a video stream from the webcam and that's gonna show your face and we're just gonna keep it live running and then at the same time um in parallel we're gonna be doing the face detection and we're gonna be saving that as a transparent image a sort of overlay so that is only gonna have the bounding box um as the image so it's gonna be a blank image with only the bounding box the face detection bounding box and then we're gonna overlay it back onto our video stream in the next frame and it's gonna have a result that is the same as the image but being able to actually stream and we'll see how it runs so we have this very similar to our take photo but for a video stream it's gonna do some javascript um that starts the video stream for us and keeps it running so if you want to play around with the actual video stream itself i recommend uh doing that but also one thing to note is before in our image we printed out the height of our video and the width of our video so if you see values different than 480 and 640 down here in the video stream you're going to want to go ahead and change all of the values where it's different so you're just going to go find 480 and 640 and this below code and change the values to what your height and width are and there's a couple places to do that right here and up above you're going to want to change that so that the overlay is being properly put on to the video stream and that the video stream is the proper height and width so it might differ depending on your output size so after you've done that all you do is run this cell below to start streaming from your video um and then this is the code that does again the face detection very similar to the image it's pretty straightforward but the additional step this time is the transparent overlay with the bounding box so right here we're just creating a blank image of rgb a type that's what this four right here is four channels and then it's our same height and width and then after we detect our faces we're just going to go ahead and now put the rectangle bounding box on to our blank image instead of drawing it on to our grayscaled image so that's kind of the difference and then we go ahead and update this be box um b box bytes that gets fed into our video stream and adds the overlay on to the image so it's pretty cool technique um comment down below if you have a better technique for this i'd love to see so um it's pretty hard to get video up and running properly in google collab and this is a solution i found to work pretty well and i will be doing a video on yolo object yolo object detections in video in google cloud for webcam so let's go ahead and run it so just run this cell and you should see your stream open up and you should start to see your face detections on it as you can see the out-of-the-box cascade model uh parameters i haven't tuned at all so you're getting some misclassifications within the image and you can see if you move around the screen it follows you but since you're writing one frame you're always one frame behind so it's never going to be perfect but if you play around with the cascade parameters you can actually get these false detections rid of but as you can see it's streaming the video and writing the bounding box onto the video stream as the next frame it adds it to the next frame so if you move really fast it's a little bit lagged in behind but overall it's still high frame rate which is pretty impressive and you can just click to end it and now just to show you guys kind of what the transparent overlay image actually looks like what i did was i just added a print statement right below this line right here to go ahead and print b box bytes right here that's going to be the actual bounding box overlay image and what i did is i just went over to a base64 image converter so the image is base64 um so you can just print that and then paste it in here i just googled base64 image converter and yeah you just hit generate image and this is the image you receive so you can see it's just a transparent image that's what the rgba format does for you and you set it all to zeros and then it has the bounding box of where the face is and this is the image this blank image that it's going to overlay to the video stream and get you that working uh almost real time one frame behind video stream in google collab so that's really it for this video i'm going to be like i said having a video where i do this with yolo v4 in google cloud on the webcam so stay tuned for that and i hope you guys have enjoyed if you enjoyed the tutorial and you want to see more videos always feel free to go check out my youtube channel and if you enjoyed this video hit that like button and subscribe to the channel if you're not because i'm going to start posting regularly again and it would mean a lot to me so thanks have a great day [Music] [Applause] [Music] you
Original Description
Learn how to access your webcam within Google Colab for Images and Video! This tutorial will run you through how to use your local machine's webcam within a Google Colab VM notebook. We will be using OpenCV's Haar Cascade Classifier model pre-trained to detect faces in order to run face detection on our webcam images and video.
#facedetection #googlecolab #objectdetection
Run the Notebook Here: https://colab.research.google.com/drive/1QnC7lV7oVFk5OZCm75fqbLAfD9qBy9bw?usp=sharing
Video Breakdown:
1. Cloning or Copying the Google Colab Notebook.
2. Helper Functions and Initializing Face Detection Model.
3. Running Face Detection on Webcam Images.
4. Running Face Detection on Webcam Video Stream.
--------------------------Resources---------------------------
Github Code Repository: https://github.com/theAIGuysCode/colab-webcam
Haar Cascade Documentation: https://opencv-python-tutroals.readthedocs.io/en/latest/py_tutorials/py_objdetect/py_face_detection/py_face_detection.html
Other Google Colab Advanced Functions: https://colab.research.google.com/notebooks/snippets/advanced_outputs.ipynb
If you enjoyed the video, please toss it a like! 👍
To Subscribe: https://www.youtube.com/channel/UCrydcKaojc44XnuXrfhlV8Q?sub_confirmation=1
Thanks so much for watching!
- The AI Guy
Watch on YouTube ↗
(saves to browser)
Sign in to unlock AI tutor explanation · ⚡30
Playlist
Uploads from The AI Guy · The AI Guy · 26 of 28
1
 2
2
 3
3
 4
4
 5
5
 6
6
 7
7
 8
8
 9
9
 10
10
 11
11
 12
12
 13
13
 14
14
 15
15
 16
16
 17
17
 18
18
 19
19
 20
20
 21
21
 22
22
 23
23
 24
24
 25
25
 ▶
▶
 27
27
 28
28

How to Setup a Machine Learning and AI Environment
The AI Guy
Introduction to Machine Learning | | Learning ML with Scikit | Iris Dataset
The AI Guy
Introduction to Machine Learning | Learning ML with Scikit | Iris Dataset | Part 2
The AI Guy
How to Install OpenCV on Windows | OpenCV Python Tutorial | Setting up Computer Vision
The AI Guy
How to Build and Install OpenCV from Source | Using Visual Studio and CMake | Computer Vision
The AI Guy
YOLOv3 Object Detection with Darknet for Windows/Linux | Install and Run with GPU and OPENCV
The AI Guy
Creating a YOLOv3 Custom Dataset | Quick and Easy | 9,000,000+ Images
The AI Guy
Train YOLOv3 Custom Object Detector with Darknet | Aimbot and Security Camera | Fast and Easy
The AI Guy
Create Labels and Annotations for Custom YOLOv3 Google Images Dataset | LabelImg Tutorial
The AI Guy
How to Build an Object Detection Classifier with TensorFlow 2.0 on Windows/Linux
The AI Guy
YOLOv3 in the CLOUD : Install and Train Custom Object Detector (FREE GPU)
The AI Guy
A.I. Learns to Play World's Hardest Game (QWOP)
The AI Guy
How to Build Object Detection APIs Using TensorFlow and Flask
The AI Guy
Getting Started with Azure Machine Learning Studio
The AI Guy
Real-time Yolov3 Object Detection for Webcam and Video (using Tensorflow)
The AI Guy
How to Build an Object Tracker Using YOLOv3, Deep SORT and TensorFlow
The AI Guy
YOLOv4 in the CLOUD: Install and Run Object Detector (FREE GPU)
The AI Guy
YOLOv4 in the CLOUD: Build and Train Custom Object Detector (FREE GPU)
The AI Guy
YOLOv4 Object Detection with TensorFlow, TensorFlow Lite and TensorRT Models (images, video, webcam)
The AI Guy
How to Build a Custom YOLOv4 Object Detector using TensorFlow (License Plate Detector)
The AI Guy
Counting Objects Using YOLOv4 Object Detection | Custom YOLOv4 Functions with TensorFlow
The AI Guy
Object Tracking Using YOLOv4, Deep SORT, and TensorFlow
The AI Guy
Crop and Save YOLOv4 Object Detections | Custom YOLOv4 Functions with TensorFlow
The AI Guy
License Plate Recognition Using YOLOv4 Object Detection, OpenCV, and Tesseract OCR
The AI Guy
YOLOv4 in the CLOUD: Build Object Tracking Using DeepSORT in Google Colab (FREE GPU)
The AI Guy
How to Use Webcam In Google Colab for Images and Video (FACE DETECTION)
The AI Guy
Real-time YOLOv4 Object Detection on Webcam in Google Colab | Images and Video
The AI Guy
Getting Started with Agent Development Kit Tools (MCP, Google Search, LangChain, etc.)
The AI Guy
More on: CV Basics
View skill →


Related Reads
📰
📰
📰
📰
The Role of 3D Cuboid Annotation in Autonomous Vehicle Perception
Dev.to AI
Vision AI: Transforming Business Operations with Computer Vision AI
Medium · AI
Vision AI: Transforming Business Operations with Computer Vision AI
Medium · Machine Learning
Cloud-Optimized OpenCV + A Special Surprise Announcement on OpenCV Live
OpenCV Blog
🎓
Tutor Explanation