LUT Secrets Live Stream - OlivioTutorials.com
Key Takeaways
The video demonstrates various image editing techniques using tools like LUTs, Affinity Photo, and Photoshop, with a focus on color grading, artistic effects, and composition.
Full Transcript
[Music] [Applause] [Music] there we go hey my friends how are you doing hi okay so today i'm super late i'm so sorry i was preparing so much stuff i completely forgot about time for the stream today uh so i'm i'm making a coffee right now i believe ready in a second and something is wrong with the screen behind me so it's it's the the classic mess let's see ah that's already much better no it isn't if my big head comes into the picture where is this it's right here hmm maybe move it a little bit back one second how about now yes well it's good enough okay hi hey um hi cho thank you for subscribing to my um youtube what is it called actually youtube membership or something uh supporting my channel is what i want to say thank you very much for that that's really awesome and also let's welcome all the others in the stream hi eric from midling hey neighbor again hi delford from colorado hi uh wait a second i will move this over so you i can actually look at you while i'm doing this ah there we go okay here we go so now i can look wiggly into the direction of the camera here we go uh what was i saying hey delphi from color radio hey pavel from oh my god no that's that's completely wrong sorry i can't pronounce that hi jens from germany hi joe from southern california thanks again for your support hi timmy how are you doing would tell me where you're from hi christian from cubic city hi frank from new york hi manuel from romania hi yat kong from china how are you doing um hi surisya from poland hi how are you doing greg hi from mississippi northern mississippi okay and now i will pick up my coffee it's just finished one second i will be back in a second all right okay good okay there i am back again all right with my beautiful new coffee cup from thailand look at that really big it's aluminium on the inside so it holds the coffee warm i still have the other big coffee cup i usually use but for the moment just to keep the holiday feeling i use this a little bit and then yeah that's that okay uh let's switch the screen here also i have to change the timer let me do this first uh let's go ahead and streamlabs tell me a little bit about your day how are you doing what is your um [Music] what is your later what oh there's the login okay sorry um how was your summer how was your summer i mean i don't know about your region but here in austria right now we have very little cases and also the vaccination is going on uh good so uh people are out and about and doing parties and stuff like that so that's pretty cool it's a lot of activity outside i haven't been outside too much since i came back um but yeah i should um one second cloudbot that sounds good timers and that timer last time didn't work i remember okay do you see my screen no you don't okay that's good so let's look in here real quick i also have to test the link one second let me look at the i was so busy uh looking up things reading texts and stuff um i polish name just for fun vacation time at the bartik c okay that's awesome i think a lot of a lot of people are at in vacation right now on youtube this time is known as the summer slump that means that not a lot of people is there and so everything is like um sleeping a little bit like the numbers are getting down from the views and from the clicks and from everything um so yeah wait a second this should be the right link let's see if this works yes this works okay good good good good good let me copy this over because last time that didn't work so this is the why is this now big link oh okay i see one second iconic i call nick lutpeck there we go let me test the link again before we put that into the stream yes that works okay cool and then i also will put this as a sticky note uh let's copy this and then we can close this and then i want to put this in here sorry for the um delay pin okay so this should be on top now good okay so now we can switch over so you can actually see my screen if you want to one second okay how did you like my video from yesterday was a little bit more um how do you say opinionated and how do you say when a topic is um [Music] um i don't find the right word if a topic uh like has different like sites you know uh controversial it's a little bit controversial that's what i wanted to say there we go let's let's give me back the chat the back screen is still looking a little bit strange that's stupid should i push it back a little bit more maybe one second at some point at some point i need to have a permanent a permanent green screen that is just always the same so i can just turn on the light and everything works um hi craig from northern mississippi tim from western colorado uh okay i already read that greg says just got back from ohio wow pretty nice i was able oh by the way you have independence day today right a friend of mine sent me a message about that i was able to get a night photo of cincinnati with fireworks oh that's awesome pretty cool jen says i did work uh in my vine yard oh nice you have a vineyard pretty awesome and also took some pictures from the uh from the birds nesting at my house awesome so you make your own wine like for selling or just for the private use is that can you do i think you can do that yes uh delphi says having a quiet fourth of july um took shots last night at local fireworks oh again also okay pretty cool with your sony rx 100 is it is that seven or is it we two uh dpi informative and fun yeah controversial yes that's what's it i wanted to explain a little bit more about that by the way and by the way i read online about that and there were so many bad informations about that it was really surprising uh that the different things that people wrote about that topic uh so let me switch the screen real quick um boom there we go okay okay so here we have an example to explain this a little bit more before we go into the luts as i promised and also maybe i'm doing a composite i'm not sure because i i prepared a composite i took a really long long time to select all of the images and then i remembered wait i wanted to make this stream about lots so i'm not sure we can do both um or like the stream should be short so maybe not but anyways here we have a picture of our assistant what should we call her i don't know carrie nancy lucy whatever whatever you want okay so she is blowing a bubble gum as you can see and so now here is the thing with pixels and dpi or ppi or whatever you want to call it of course they are different but still here we have pixels look at that so we make a picture on her bubble boom so now what we do have is we have a picture very abstract picture that has three by three pixels resolution which is a total of nine pixels right okay good so now look at this if we start or if she starts to blow up that bubble gum oh no why does it work okay i have to push the [Music] look at that so it's bigger now right it's bigger but we still have three by three pixels right so the resolution the image resolution of our pixel of our artwork didn't change at all even though it got bigger so what does that mean and by the way if you ask do you think like when i have my small bubble balloon right like this and then i blow it up does the dpi get higher or does it get lower right what would you say does it get higher when it's bigger is it a higher dpi because it's bigger or is it a slower smaller dpi right or is it the same dpi basically what what do you think is happening there if we start small like this so the resolution of the picture stays the same right three by three pixels and we blow it up is this is this a higher dpi or is this a higher dpi because it's bigger right what what do you think what's happening here right because i think this is a good example to to think about that because this is what's actually basically happening right so um let's look at the chat what the chat says um hi toad um greg says it stays the same interesting okay sweet uh perfect way to pass time in the hospital oh i hope you get better soon unless you work there then i wish you a nice work day of course and i hope you're not look watching my stream while you're working next to the operation you know heart surgery and then just watching my stream and i don't want to be responsible for that stays the same says delford ali also says the same christian says the same really that is interesting okay um no not it doesn't stay the same the dpi so um why not why here's the thing in our example now imagine this is an actual bubble it's not a photo of a bubble it's an actual bubble that she's blowing with her bubblegum right so when it's small this is a certain amount of dpi and you can see that we have a distance between these dots right so we have this amount of dots per inch now if we blow the bubble up and make it bigger the dots go further apart and they have to cover more space so that means the bigger the bubble goes the smaller the dpi is if we keep the same pic pixel uh sorry the same resolution of the image which is still three by three pixels right so now we have three by three pixels but they have to spread over a further distance so the amount of dots per inch is smaller right makes sense right okay so this is basically what um uh what dpi means but you can see and this is what i said in my video that the resolution of the image does not change it's still nine pixels in total it doesn't change but the dpi is changing so the resolution of the image in pixels has nothing to do with the dpi the dpi is what the end result is after you've printed the image or what the the setting of the printing machine is how the printing machine is built but not the image the image can be any kind of resolution i will show you this in another way so here i will open two pictures uh let me go to download here so this picture and this picture it's the same picture okay so look at this this picture here has a dpi of one right and this picture here is the same picture it has a dpi of 300 right it has the same exact pixel resolution right so yeah this is what i'm saying if you of course would print that with that size the 300 dpi pixel photo would be small sorry the the 300 dpi pixel would be smaller as a result printed on paper or any kind of other material and the one dpi picture would be humongous right because you have only one pixel or one dot per inch right of course an inch is smaller but you know what i mean anyways now the other question is what is actually ppi what is the difference for that right well now ppi is when you have a screen and the screen has a fixed ppi because this is how the screen is built so let's go to the apple website real quick one second let's go to apple here and we're gonna look at the new iphone for a second so here is something really interesting if you look at that um how do i i looked at one where it compared the iphone today where was that information learn more maybe hmm uh one second where did i found that today iphone 12 ppi wrestler resolution let's see boom oh no oh maybe this ah yes here you can see it this is this is the right one let's look at the chat real quick what the chat is saying whoops that's the wrong one sorry there we go um [Music] dbi will get smaller yes the more dpi the smaller the picture yes dots for inch the more you zoom in less of an inch you see what the less of an inch you see um the dots yeah the dots represent dpi the dots but the dots are the dots are yeah dots per inch right so that's a fixed that's a fixed um size in the real world it's not a fixed size in the digital world because and this now this is the amazing thing if you look at the picture it does not exist there is nothing it's a digital it's a virtual picture this doesn't even have color it has nothing at all it's just data on your hard drive the only way to see that picture is to make it appear on a device that gives it to you in the real world like a screen or a print otherwise there is no picture at all this is a simulation of the data right and it looks to us like a picture but actually it's not and because of that this can be any size it doesn't have an inherent size as also the pixels don't have an inherent size and the reason for that is that this is basically also the reason why you can zoom into a picture if if a pixel would have a fixed size you wouldn't be able to zoom into it you wouldn't be able to make it bigger right well maybe you could go you can go closer with a microscope maybe right or with the lens but not like physically make it bigger because in the real world a meter is a meter and a mile is a mile and the inches inch it doesn't change you can't change it it's it's fixed like that right okay let's go back to the screen so you can see here two things you have here um the iphone pro what is that actually so that's the iphone mini and that's the iphone 12. okay look at this now here you have ppi and now the iphone mini and this is surprising has 476 ppi while the iphone 12 which is not the mini it's the better version only has a ppi of 460. now you would say that that sounds worse that doesn't sound good but what you have to take into consideration is when you look at this resolution here it's 2340 by 1080 compared to the resolution of the 12 version which is 2532 by 1170 so the resolution of the screen is higher so why is the ppi lower when the resolution of the screen is higher because the device is bigger the screen is bigger you see on the mini it's just 5.4 but on the normal version the 12 version it's 6.1 so even though the resolution of the screen is higher the screen is even bigger than that and so the relation between the size of the screen and the resolution makes the ppi a little bit lower on the uh on the on the 12 version than on the smaller version right so that is what that means but on top of that you also have to remember this ppi and that resolution is the maximum number of what the screen can display you can always display less pixels if you want to and that is that you can have a picture and then zoom into it or have a smaller resolution picture and just fill the screen with it that is possible but you can never show more pixels than that even if the picture has more pixels than that the only thing that happens is that the pixels are going to be mushed together so they are re-rendered basically so they can fit on the screen which is basically what happens here if we zoom out of the picture like this it is not higher ppi it's not higher it doesn't we don't suddenly magically have more pixels in this area of the screen it only is it only shows us it only displays the amount of pixel we can see and you will see that if you go close to the screen and look with it with a magnifying glass you will see that the screen of course has a fixed resolution and there is not more to see it's not the same detail as when you zoom into the picture right if you show it at this size right and of course also if i zoom in you will see that at some point you see the pixels off the screen no matter the resolution of the screen in ppi the pixels are getting so big that you still can see individual pixels and again when you go in with a lens you will see that there is more like screen pixels physically in your screen but they are just showing the same pixel of the picture because it's just bigger than what the screen can display right okay so that's basically what's happening right um but again the resolution is completely independent from that right it's always the same resolution from the picture this is what i said in my video and this is also why it doesn't not really matter if you print a file in one dpi or in 300 dpi as long as the resolution is good enough it's printing it it doesn't change anything about that right uh okay sorry let's go back to the if you can bme here but feel free to contact me through huh good questions sure i can show i don't know why this got hidden uh let's go any channel tips on taking raw photos i encounter difficulties by un unintended parts of my image being blurry unintended parts of your image being blurry uh well it really depends on the on the depth of field right where the sharpness is there is um you can look on online for example there's charts where you can calculate there's also apps by the way where you can calculate the field of depth where the sharpness is where the blur is going to um happen in your picture so um you can basically calculate that beforehand so the sharpness is where you need it to be and then the blurs in other areas so um and uh yeah it basically it has to do it has mainly to do with the aperture the opening um of the of the lens you know inside that defines how big um the area of sharpness is so for example if you have a 1.4 lens it doesn't mean you should photograph all the time in 1.4 because for example if you photograph a face um in in like a side view like this three quarters or something like that and you have different distances to the lens so it might be that the tip of the nose is sharp and then the eyes are blurry or you you focus on the eyes so the eyes are sharp and then the nose tip is blurry that can be nice but maybe you want everything in the face sharp so you have to use another aperture where the sharpness is going bigger and it covers more of the face right so this is how you can control that basically but it doesn't really have to do anything with raw photos um it only has to do with the photo process there was a company related to capture one saharan they printed in 400 ppi not dpi but didn't last long ah interesting okay yeah there is like a higher resolution prints also um that's that's also possible yeah it really depends on on the the process that you use uh to doing that right i think i'm not actually sure but i think with with laser print you can go to higher because like it's light it you should be able to go higher with that right um my other message isn't sent i recently got the first dslr and enjoying taking pictures really in now but i i'm just i i don't want to like um how do you say poop on your on your party but the dslr are going out of like they are fading out the dslr and the mirrorless is like replacing them so maybe you mean a mirrorless but still i mean dslr is still cool um yeah yeah but i feel uh it's kind of hard to answer without sample images uh yeah i think the photography is complicated but i'm trying learning from people thank you very much samuel um raw and not raw has not much to do yes yeah yeah uh by the nature also not sharp you need to process them they're by their nature raws are not sharp why that's like maybe it's the first time i hear that you can of course sharpen the picture more uh through editing it with contrast and and with texture and clarity and all these kind of things to to like artificially enhance the sharpness but the picture should be sharp uh on its own i think the apache is important but the actual focus point is the real issue yeah but you can you can calculate that where the focus point is going to be um on the other hand i would also say like experience is important for that because you don't have always the time to calculate these kind of things um should still be able to nail by the way um i i reviewed uh an app uh some months back uh let's see if i find the video for that uh youtube let's go to youtube here real quick and then let's go to my channel if you're on my channel you have this search icon here they should make that bigger they should make them more apparent anyways you can go here and uh photo pills let's see no oh i wrote it wrong okay oh yeah there we go this um check out this video here hello wow there we go um from an app it's called photo pills and with that app there is a calculation in there not only does it calculate where the focus point is and where the depth of field is and all these kind of things you can also translate that between different kinds of lenses and brands of lenses and also camera type so that's really nice to be able to do that of course it's not a hundred percent uh uh the same between different lenses because they give you different results and also between different cameras like uh small format and and full frame and stuff like that uh but still um it gives you kind of average right or kind of a nearest um um what was i want to say uh kind of the nearest value yes what do you hear about mirrorless cameras being a thing but i wasn't under the impression these are our irrelevant well um yeah that the reason is because if you don't have a mirror at all uh you can do a lot more things with that right and you can do things a lot faster also for example the series of pictures you can take in a row is a lot faster with a mirrorless camera and there's some other like benefits to that um for example you can i don't know if you can do this with a dslr but you have you can have silent mode where you have nothing at all um if you take a photo stuff like that i think it's also good for filming so there's a lot of benefits to mirrorless and also the build size can be a lot smaller because you don't have to have the room for the mirror in there so and they can put more stuff in there and make the camera smaller i think star or thinner you have to read up on it i'm not an expert on that um [Music] didn't waste my money no it's still good don't worry about that it's still cool it's still like we are still completely in the transition process so you can still go for a lot of years with a dslr and be happy with that and then at some point change over to a mirrorless don't worry about that there's still a lot of products for that uh okay uh let's go for the oh my god these pop-up messages are really annoying on facebook i wish there was a way to put to pause them and of course they pop up in every tab all right uh there we go so uh i wanted to i wanted to also talk about um i wanted to talk about luts how luts work and so here i have some examples i also um borrowed one of the pictures from my community i ask you to send me some this one is by mary allison hill and um i asked to send me some pictures so i can prepare my luts for that so i can test them against um several uh of your pictures to see the kind of effects i can do with the pictures you take by the way i was very surprised that when i asked for city pictures like i said sent me city skyscraper and park photos that most people sent park photos at that moment i was a little bit shocked because most of my luts are not park oriented they are more city oriented uh so yeah that was really interesting but i think it still worked out well with the pack some pretty cool stuff in here uh so i i wanted to just use this to to show us an example but before we do that i quickly want to explain what luts actually do i also do that in my online course but i just want to like reiterate that real quick in my live stream uh to give people a better impression of that let's pull this over here okay let's have it like this so let's go um like so i will make a dot here and then we will fill this with color let's make this one red and then we make the next one whoops we make the next one uh green there we go and then we make the next one blue for example right so we have basically the classic colors of the screen and then i will i will simply copy this over to the right side here let's move everything up here please no okay just stay there all right so let's cover this side here and then i will make an hsl adjustment good okay so uh just to like reiterate what a lot does how a lot works right so um first of all let's open up the hsl adjustment so every pixel that you see on your screen this is really important to understand that i can actually open the the other picture we had here okay so every pixel you see on your screen if you look at this these are individual pixels right so every pixel has a brightness a saturation and a color in it right and this is what we see when we open up hsl adjustment the hue is the color saturation is the amount of color in there and then luminosity is the brightness of the color so these are the three values you find in every pixel and now the lut is going to look at these three values for every pixel in your image right and you can always like also check that yourself if you go for example here let's make a new layer here okay let's go here for example and we check this one and click on that and let's go here hsl you can see these are the values right that this pixel has let's go to another pixel you can see that this pixel has these values so all of them have basically a mathematical value in that kind of chart of the possible colors that your screen can display or that the image can have right on that bit depth also right anyways okay so you can see each of them has different values in there now what a lut does it is looking for these values that you've just seen here with the the h which is the like the color the saturation the brightness these three values and is seeing and says oh this is that red okay cool i have found that red in a chart and so now i'm going to transfer this kind of red with this kind of color brightness and saturation into a new value and this is what then the lut does when we say okay this is the lut um let's move this over you can see suddenly now this red is this kind of blue and this green is this kind of red and this blue is this kind of green but the difference is there is not just one hsl adjustment there is an hsl adjustment for each color you can find in a picture so hundreds of thousands of them right so you have a very long list of input values and of output values well the output yeah yes that's it you have a very long list of input values of output values and it says okay if i find this specific red i'm going to turn it in this specific blue right so with the green it's going to do something else so it can be that the green also ends up as blue and it can be that the blue is unchanged uh because of the settings that go into a lot to make this kind of change right so this is basically what a lot is doing and the importance for that is because at that point you need to have certain uh like colors and saturations and brightnesses so the lut can react to that because it's searching for these values in the picture right so this is really important when you then start to adjust an image right because okay we can retire our assistant here um let's now go to the picture from who was it again mary ellison hill i i hope it's okay that they take your picture for this presentation uh okay and let's go here to adjustments and then we go here to one of our fake park [Music] images like so you can see here so that looks pretty interesting so we have these fake infrared images um that you can do and for example this one and this one they are a little bit faded and this is cool you can you can go like that if you want that to happen but if you want to adjust that what you can do is now you can go in between the lut and the image and adjust the values and a good way to do that is to do it with a curve adjustment and to do it with for example a color balance adjustment to change the input color that goes into the lut so the luts can output different values right as i just explained so let's go here for a curve and you can see now if i pull down here we get different values and it's not just getting darker this is the important thing it's not just getting darker look at the door here look at this part here you can see it's not really getting it's getting a little bit darker of course but it's also getting a lot more pink in here so the saturation is getting a lot higher in that area because this is what this kind of input value would do with our image so by just pushing this around a little bit like so you can see if i push this up i have a higher contrast and now i have a completely different result that is has a lot more saturation in it and just gives us a nicer result in the end right so this is one thing to look out for if you have a lot and the result is not very satisfying for you uh go in here and use for example a curve adjustment or use a color balance adjustment i will show you the color balance adjustment based on this image here let's delete everything here okay let's go for the chat real quick before i do that um a nifty 50. oh yes they are good uh for um that is they are good for a small size camera like a small sensor camera what are they called in english like you have full frame and then the other one is small frame or what do you say in english to that like the classic dslr right that you have as a like a layman is that the right word like a normal photographer right um and for that the 50 is good if you have a full frame you need an 85 instead right and they don't really they don't completely like give you the same result they are similar but this is still different and for example i hate to photograph with a 50 but i love to photograph with the 85. it's just it's just different um in how it handles how it feels the results you get is just like i don't know why it's just like i like i really love my 85 and the 50 is like i always felt like it's it's not it doesn't show me what i want to see in the picture so there's some there's some like um uh uh uh uh how can i say some some focal lengths that i really don't enjoy using for certain purposes and and others i i really like and hmm i can't really explain it it's it's like peripheral personal preference aps-c is it that i thought apc is the is the is a kind of chip right interesting a kind of sensor anyways i have to read up more on these kind of sensor things to be honest um okay so let's go in here and talk about the um if i bought a new diesel or the sensor are usually the same and very similar to the ones in the mirrorless probably i don't know i have no idea about that i have to read up on that okay um and by the way sorry um like i shouldn't have even gone into the topic of mirrorless versus dslrs like just i don't know sometimes i talk too much anyways uh let's go back here okay so you have this picture here and let's go to our um adjustment again and use one of these night um night uh lights here let's yeah let's use the first one this is also nice with the orange and then we have this one is a little bit more pink but you can see here that the pink is not very interesting right it's a little bit like shallow and faded and nah and um by the way um i i copied this picture from the internet without downloading it maybe i should download it because the resolution is a little bit low here is it still open here there we go let me download that real quick so we have a little bit nicer picture this is what i prepared for the composite but i'm i don't think i'm going to do that today ah let's open this up here real quick where are we where are we stream and then week 26 materials boom there we go okay this well looks kind of it looks a little bit better by the way what do you see here these big blocks that is that is compression fragmentation that is that has not really much to do with the pixels um you can see here that the pixels are finer than these big blocks these big chunks that you see here and that is like just from from a high compression that is used on the website to save some space and save some uh like data transmission okay let's go in here use this again and you can see of course same result so again what we can do here is we can go again in between the image and the lut not on top of the lut but in between the image and the light really important is a huge difference um let's go here curves and then we can for example push this a little bit down you can move this a little bit up or let's move it to original position and already we get some nicer values here but what we can also do is now i'm going to go and go here with color balance which is a nice way to tune colors and you can see now if i adjust this i get a different output so for example if i go over here more sign the output is also a little bit more aqua from the from the tone and when i go more red then the blue here is going to look different from the output of the lot again this is about the output of the lut right so let's move this around here a little bit and you can see if i move this over i get some nicer values in here and by playing around with these settings you can adjust the output of your lut in a way um that is more to what you're expecting in your image right what are you expecting as an output so as you can see when we turn this on and off we have a much nicer image with exactly the same lut because we change the input now if we look at the input without the lut this is how it changed so you can see we have changed the background a little bit to more violet and the orange is a little bit more intense than before and the contrast is higher stuff like that and this will influence then what the lot is doing with the picture now after we have done you can also put adjustments on top of the lut if you want to you can still go in here and say okay let's make another color balance and you can now adjust the output of the lut and you can see how different that is if i move this around it doesn't change just the sky too much but it changes the light down here in the city right so that's interesting how that changes this changes the sky now can move this over so as you as i as i told you before this has a very different impact onto the image if the adjustment is on top of the lut or below the luts in between the image and the light so it's really really important to keep that into keep that in mind right okay and of course you can do all kinds of other adjustments now that you want to do you can also do like vibrance and stuff like that anything you want to do with the picture to adjust it to to the kind of taste that you want to have the kind of result you want to have and this is a very easy way uh to make luts look better if the result doesn't really satisfy you from the picture that you put into the lut right so it's really important to keep that in mind because this is like this is the biggest problem uh with luts also often with presets for example for lightroom stuff like that that people think well this is a one-click solution i just applied and it has to look like i've seen in the advertisement well that's not the case because the advertisement or the the original lut or the original preset is based on a a certain kind of image i'm i'm usually making a canvas that has for example six different images in there so i have a variety of photos and i see the effect on them at the same time with the same adjustments so i can kind of average it and it works for a lot of pictures for example a lot of night pictures or a lot of um like uh uh park pictures where you have similar kinds of green or similar kinds of for example in most night pictures you will find this kind of orange in this kind of like uh blue in the picture stuff like that because this is simply how we light our cities around the world we all have these kind of light temperatures for our um like white or orange light in the night right so we have you have a certain similarity okay let's look at the chat real quick okay again i'm talking so much nobody's saying anything anymore all right ah okay um okay uh yes yes we have our we have our challenge for today let's have a look at that oh by the way this is what i wanted to do today i look for some interesting ideas and this like really stood out to me as an interesting portrait idea so i prepared all the elements for that maybe if we go quick through our um not quick but if we like finish our um [Music] if we have finished our review of the of the weekly challenge i can start working on this looks pretty cool it doesn't look very hard to do the i think the main thing is to select all of the elements by the way it's super hard to find um things that are photographed from the top down i think the artist has either photographed it himself or he has just taken like uh 3d pictures or created 3d pictures because super hard to find this kind of top-down perspective and also here you can see that for example if you look at the city or if you look at the of the car that the perspective is matching the angle of how distant it is from the middle of the image so that's done pretty good i i don't think mine will look that good because i don't have these kind of very precise resources but we can go close to that anyways let's go to our weekly challenge here which was to apply this lot and by the way if you if you wonder what kind of lut is he talking about if you look at the whoops if you look at our chat in the stream then the sticky chat note is the link to the lut pack one second which is this one here iconic city luts and i made three different packs this time and also one combined pack which is the pro pack with all of the luts in there and they have a little bit of topics here neon knight which is these neon things that the knight lutz and then the art style lutz which is um these mostly the skyscraper luts and the uh infrared luts which are a lot of fun to use and then the cinematic pack which mostly has the cinematic luts in there and then also some black and white luts which are really nice um too to use with your photos okay anyways let's go back to our challenge here this is the first one by damien pretty awesome let's open this up and then this is the original picture and at first i thought that he had applied a gradient to the image because that looks really really cool uh but he said no it's the actually original image so this is how it looks in without the lut on it and this is the lut version and it's really cool i think like this is kind of i think this is one of the neon lots right i guess yeah city neon 2 50 opacity so you reduced the opacity a little bit on that you can see down here maybe you have some original colors in there it's really awesome and it's also i actually instead of the dpi video i wanted to make a video about using too much color by the way let me know in the chat if you want to see this as a video on my channel so the premise of that tutorial was um you're using too much color in your pictures and then i'm talking about how for example in cinema they are using only two colors in most of the scenes and then i show you how to reduce the colors in your image to make an image more interesting and give it a more artistic style and even if you look on for example unsplash let's look there real quick on these pictures you can see that a lot of the pictures especially the nicer pictures are reduced in the amount of colors they use for example you can see here the amount of colors is used to just this green and also this pink here this peach pink which is not what scent is as a color it's more an artificial color but it still makes it look more interesting over here you have this like greenish blue and then you have the yellow and there is no other colors in there so this is often used to make pictures more interesting here you can see you have a lot of brown tones and then you have a little bit of blue tones in the shadow areas again only two colors in here basically um there's another one of course there's not too much to see here so that's easy here's another good example you have red and then you have green and the green is all the same over the leaves okay you have a little bit of a blue here but the blue is matching with the shadow colors and the orange of the bike is matching with the orange that you find in the lighter parts of the flower so again this is reduced in the amount of colors and because of that the picture is more artistic and is more has more of an expression so this is what the tutorial is about and i'm going to show you how to do that in the tutorial um let me know if that's interesting i was a little bit like maybe that's not enough but now when i talk about it i feel like actually it's it's pretty good it's pretty interesting because it's also i feel a lot of people ask me about that and it's kind of hard to do that um to do this kind of reduction and make the picture more interesting and give it more of an expression right okay let's go back to the review here what does the chat say by the way any no oh there we go full frame not full frame um i like the movie 1917 great color grading movie 1917. i don't know that movie is that a new movie or an old movie oh it's from 2019 isn't that done dunhurst or what is it called dun dun it has the same poster dunkirk wait a second let me open here a new one dunkirk ah that's actually different but you can see like you can see here from these colors this kind of eerie blue green and then you look here and you have also this kind of eerie blue green in that picture it's kind of a like an expression of like if if situation is kind of desperate and dystopian and like not that great you often have this kind of color look here and here it's kind of this like desaturated bluish green desaturated bluish green right so that's that's often a thing um because of course we transport also emotion through color right um you really have to look when you watch netflix or any other thing it's a really good way to learn about um colors and images and stuff like that and you will often see that for example in one scene um the colors are faded and kind of like darkish and depressing and then the character goes into another emotion and the colors are like getting warmer stuff like that for example the the the actor is stepping out into the outside or he's turning on a light and suddenly he he is in warm light right so that's a really important part of storytelling okay anyway so this is pretty cool very cool work uh damien i i really like the the gradient here you could use that as a book cover i think or like a design cover for something right really nice okay whoops oh no i closed the oh there we have it okay it's always good that i make this a sticky post because i would lose it otherwise there we go brooklyn bridge wow okay so this is the new version very nice a little bit like on the heavy side maybe but if you like that it's pretty cool and this is the original but you can see how with artificial cores it's getting more expressive and by the way you can also well with a lot you can't actually do that to paint in color i was i was saying you can actually paint this out here a little bit but you can't um this is the unedited photo yeah it's very nice i feel like it's if it has a little bit less saturation that would be better for this uh photo specifically here but if you like that it's pretty cool still so really nice did you do some other adjustments i don't think so right but very cool you can see how the sky and the city is now very much visually separated from the bridge the bridge almost looks like it's cut out and this is kind of painted in with artificial color so it's pretty interesting has a completely different look right very nice very cool okay let's go on to the next one oh tree okay interesting i find it interesting that you often apply my luts to two completely different pictures ah okay so because there is a lot of fog here as you can see the lut can't find the colors it is looking for so you can see that um it is turning into violet and you have these stronger pink colors down here in that area but it's not having this kind of classic infrared uh rather saturated look that you find online when you google infrared pictures so uh let's copy this over here real quick you can go in here and then um let's go here for this one for example i think this is what you applied and again like i said before for example try a curve adjustment because that's often very intuitive to use that and you can try a little bit let's see can we get anything more out of this maybe if we move this over a little move this down a little hmm well that's that's a difficult one let's see if we make it a little bit more vibrant does this do anything um well let's go with the color balance here okay so here you can see if i turn this and make it more green we get a more intense violet yeah i feel like this for example look at that i feel like that is maybe better it looks more like what you would expect from this kind of infrared image you see all the values down here that you have now and the the different kind of shades there's a little bit of this kind of faded like bluish violet and then some strong pink in front of that and the the pink is fading out into the sky into the fog so that's actually i think that's that's maybe a better um way because here it's very like non-existent the results because it's just not the colors in there that it's looking for um and when we now look when we turn off the luts you can see now that um through these adjustments what i've created is that here the green has been more intensified and also the brown has been more is more intense now and this is basically what it's based on for a park photo that you have these brown the blue values from the sky the brown values and the green values from the nature and this is what it's reacting to we can actually try here to also create um brightness and contrast adjustment and then make the higher contrast a little bit more brightness for these values down here you have to of course be a little bit careful not to overdo it because otherwise you get like strange like fragments and uh color banding and stuff like that let's see so you can see this also makes it a lot more intense and often this brightness contrast adjustment works different than the curve adjustment gives you often better results interestingly enough um in the picture you can see if i turn this on and off you get a lot more color it of course depends do you want that don't you want that i feel like this is already pretty cool um or we can just like turn it down a little bit like so for example that might be good depends on what you want to do with that right okay right so pretty cool thank you very much sharon very interesting did you also do some other effect here i feel like you did a little bit of a bevel effect as you can see like the lines they feel are like they are a little bit pressed into the pictures into the picture or is it like just my imagination you see like these these these white dots they seem to stick out a little bit of the surface hmm i'm not sure anyways thank you very much sharon um sabine oh okay this is a very slight adjustment here let's have a look here so this is the adjusted image very nice really like it very warm sun and a sand and nice uh blue sky a little bit of this aqua tone in here um with the city knight seven it's really interesting that you apply these like of course you can apply them to whatever you want but from the name i i like they are specifically made for a certain like source image but as you can see they can still work on that so this is the original image very interesting uh with some edit and affinity okay and this is what the lut applied interesting uh mode multiply ah multiply this is also something you can do by the way you should try it out with luts um to to change the blend mode what i mean by that is if you go in here you see we have this lut here and you have the blend mode down here so you can change this to other uh modes and this might give you really interesting solution resolutions not sorry results for example this one color burn that looks pretty interesting right it looks pretty cool um or this one linear burn it looks like a like a like a painting more right pretty awesome i mean this could be like a print on a cup for example or like on a on a shirt nice so yeah try with the blend mode you can get some really interesting unexpected results okay let's go back here thank you very much sabine pretty cool let's close these two ah and there's marcos oh this is already the last one okay um so warm here i have to close the windows in my room so there's no outside noise wow okay interesting very nice and this is the original picture yeah you can see there's a lot of these green values here and they are picked up and then turned into this kind of pink again with some adjustments uh with your um uh with your with your curve for example or uh the other adjustments you can like get different results what you can also do by the way let's copy this over here real quick in here new from clipboard let's apply a lot here it's probably this one yes it is okay cool so what you can also do if you want to is that you can for example i mean you can also do dodge and burn if you want to you can also go and for example say for the curve i want to push this down a little bit and then you can invert that layer in word so it's not visible anymore and now i can paint in these values onto different parts of the image um yes like let's go like this for example let's set this to white now and you can see now i can for example say i want to paint this in here into the back of the image a little bit and then maybe also a little bit over here and then a little bit over here and then maybe a little bit here and a little bit here i'm just doing like uh random stuff right now just to show you a little bit of an effect here and you can see now that i've done this uh that this is applying our curve to certain areas of the image right and so giving us different results in these kind of areas and with that for example i can make the picture a little bit like different from for example that it has a little bit more um detail in it and this also creates depth in the picture you can see like for example this one as it is right now is nice but it looks maybe a little bit flat because everything is very uniform but now if we paint in some different shadows and some different i didn't really paint in highlights but with the shadows you can see that we get a little bit more of depth and of surface structure in the image right uh and so this can help make the image also more interesting right okay that's it good there we go let's close this also wow okay what does the chat say first what what i mean what can you show us how to reduce the number of colors no it is in the first oh yes it's the first world war of course yes that's true 1917 that makes sense but not many colors used okay interesting first world war i mean ah okay okay yes yes [Music] okay uh should we should we what is the time so we still have an hour basically i didn't i didn't even i didn't really expect to go that quickly through uh all the review and the explanation today so we can now work a little bit on this kind of setup here right let's open this up i have prepared the picture but it did not cut out anything so far so we still have to do that um this is the lady i want to work with here let's crop this 4x3 so it is good for [Music] instagram by the way today i have i've uh i read a post that instagram is going to go more into the area of videos and shopping and messages which is really strange and kind of unexpected and i don't know why they're doing that it feels like uh whoops it feels like a 180 degree change from what they are doing right now i think they are maybe a little bit intimidated by what tick-tock is doing but i really don't feel like that's a good decision to do that um [Music] but maybe it's also that facebook feels a little bit too much competition from um from instagram and maybe this is why they want to shut it down or something i don't know that's kind of strange i don't know where instagram is going there we go okay so we have this and then basically i want to reduce like remove the shoulders here because the other one is kind of fading into the ground basically this is cut here maybe we can leave this for now and work on these details on these blocks um so this is a good question like hmm yeah we can actually like just draw out these help lines here how is he splitting up the head let's look at this so this is why it's good to take inspiration from other artists for your projects because you can see how they solve different issues artistically and then you can learn from that and apply to your own pictures and like learn for the next time you're doing that right so um this is why recreation of other art is a very important part of learning how to do art so this should be the same width here okay good all right so we have this and then do these blocks need to be the same size i don't think so right it can be any size okay so let's first take the camera maybe uh where's the camera here it is okay cool let's rotate this like actually i want to have it like this but the other way around maybe ah but i don't want to disturb the number uh let's make this transparent like so and then we can move this down here and let's see what we can do with that should that be here but then it's a little bit like maybe just keep it up so other here should this be smaller or not hmm there's always like a lot of artistic decisions going into these um works let's see how this is done here here we have an example with a camera and it's on top of the head not on top of the eye so that's really interesting and then the head is just behind that it's just cut okay that makes sense so it's basically going like this and then we still have to select this let's maybe create a mask for that and you can you can use the you can use the chat to ask questions and such don't worry let's make a selection here ah where's my selection window there we go see black and white border width here smooth it a little why is it so bad down here ah maybe because of the shadow hmm let me close the chat window so i can see the chat over here on the left anyone saying something no okay but please feel free to use the chat like for example with lutz what are you using luts mostly for and um what kind of luts are you using usually for your picture like what what kind of things are they doing to your picture what kind of things are you looking for um in a lot so apply this make a mask out of that so it's non-destructive and then maybe cut it here that looks pretty good with these like hmm well we can cut it here for now and then see in the future should i cut it straight maybe right so let's go here okay subtract this here a little bit all right so i can simply paint this out now there we go and we have this in the background here and so now basically it's also question of painting in the shadows [Music] but let's just block in the elements maybe i should work a little bit faster on that um just blocking in the elements for now and then we can get a little bit more precise afterwards so let's see what else do we have here to work with we have a compass uh we have a map this is the background by the way so this is the wrong map and then we also have the umbrella okay cool good so let's place these in here i will save this real quick [Music] um adventure face okay let's just call it like that for now uh let me quickly remove this here let's rasterize that and then rename that umbrella there we go and then i would simply copy out that part here so we don't have too much stuff here and then let's select this real quick that's the wrong layer ah come on okay anyways let's apply a mask here good i will refine that later i just want to block in some elements so i thought this could be like here on the side of the head maybe like so or in another way let's just put it here for the moment and then also we have this compass here let's maybe also rasterize this and then make a selection actually let's make the selection like this what just happened oh okay this is a quick trick to make a circle selection around an object is to just um use an ellipse and then control click it doesn't work right now control click this is what i meant and so you have a selection right now around that area and then you can create a mask so that's pretty easy and now you can of course delete the the ellipse you don't need that anymore deselect and now you have your what is going on right now ours is still big because there's still the other stuff around that so we could basically put this here if you want to that is kind of interfering with the umbrella though should i put the umbrella somewhere else maybe down here hmm i can make it smaller because we need to add some more color to everything and then we also have the map and the map is just um basically multiplied onto the skin and then maybe reduced a little bit from the details so it's not too intrusive here come on there we go that looks a lot better so you can see with the source range i'm reducing the areas that are lighter and only the darker areas are showing through and so with that and multiply i can have something that lets the skin still show through it's not too extreme and i can also like um for example reduce the opacity to make it less intense right and then we simply have to like paint this onto the face right on on a different and on a certain part of the face right um make the umbrella like a little hat i was thinking about that but then it probably looks like a yama car right so that's probably not like a you look that looks um not like i don't know maybe i don't know i know what you mean or maybe sideways so it's not like but still i mean i mean yeah why not as a little head on the side that could be interesting it's maybe a little bit too too uh too goofy too fun but still it could be interesting right okay so now that we have that we can think about the different blocks that we want to use here [Music] for the face right let's give me a rectangle here maybe put it like this and then have another one down here that's a little bit longer like so on the side oh yeah okay on the side yes yes yes okay let me look at the source here what is he doing i guess these different blocks here but well they are overlapping here on that area hmm oh we actually have to split up the head to make it a little bit bigger and smaller i didn't think about that to be honest hmm okay let's try this in one area to see how good that works and what we can do with that let's go with this area down here let's make a selection okay there we go why why doesn't the selection thing not work today oh it does it does it doesn't it just doesn't show up okay good so we have that area here let's copy this over is there really no all right okay okay um one second let's reduce some stuff here where's the map let's call this map here this is actually more complex than i thought it would be [Music] it looks so easy here it's not so easy when you actually do it are these parts actually bigger or do they just look bigger like here it stands out a little bit but with the nose it looks like the nose has exactly the same size and also the eyes have the same size so i think he's tricking a little bit also with the chin you can see like the chin is kind of the same also here also here so it's basically just happening here where the hair is i think he's pushing in some areas rather than making them bigger and the rest is just like this kind of shadow and light play it's not actually further away it's not actually smaller or bigger right let's copy this over real quick let's have a look here so if we look at these lines here it's actually a little bit different [Music] is it no it isn't no no they are on the same level look for the nose maybe maybe it's a little bit offset but not different size looks the same looks the same okay so basically we don't have to resize this man i thought this is gonna be so easy it looked so easy when i looked at it and it's not easy at all um i don't even know how to paint the shadow in here to make it look nice um hmm it would be a lot easier with the 3d model that already shows you the shadows hmm well that that wasn't a good idea okay uh would you consider participating in benny productions contest of medieval themed photography manipulation um but made on affinity photo i wonder if you could achieve oh interesting benny production medieval themed photo manipulation did he do a new contest or what let's have a look real quick no let's go to youtube one second is it a contest it says here speed art july theme intro lady no i don't have to sound sorry okay you can find all the info about participating on this link interesting unlimited photo loot with event elements really oh no this is just an advertisement this is affiliate link right yeah okay okay watch intro let's go last month okay use the use at least one of the provided photos okay interesting keep it in line with the current theme no more than one entry allowed no offensive content allowed interesting okay and he makes like a huge uh website for that too maybe i should do that too with my challenges if i do a composition challenge at least pretty awesome okay i will bookmark that i will check that out and see what i can do with that that would actually be an interesting video right um yes when is the end below you can watch the intro this or is it is it one month or what photo rules submit ah 24th of july so that is 20 days yeah i can try that pretty cool let's look at the resources that we get here uh download which is also a good idea by the way uh oh it's just two pictures okay interesting oh it's your hair it's just him and the text that's the resources what the hell this month there is just one photo oh it's just one photo you can download it here okay okay okay i understand so we have this picture of him interesting i wanted to do more like that anyways also with pictures of me or also i try to find new models on on facebook to work with them so let's see that's actually a nice resolution here what do we actually have let's see here details thousand seven hundred by three thousand that's good enough okay pretty cool and then yeah i can check out the video what he's doing let's see hmm i'm doing some sketching around that i'm by the way i'm gonna also gonna order a new uh wacom sketch pack so i can like paint more in the video and um yeah pretty cool we can do that because to be honest really honest right now i have no idea at this moment how i should do that shadow thing here other than using a 3d software that i'm not really good at using so um how would you do that it looks so easy here it's not easy at all i mean i understand how to draw in a shadow and make this highlight line but the thing is if you look at the picture oh i already closed it again sorry if you look at the picture here copy and then go here to new let's go here so the thing is you can see that this is getting smaller here but then not over here well of course that kind of makes sense right oh look at that so this is just a structure on top of the photo where this is getting darker and then there is a bright line here and then there's a dark line here let's give that a try okay so sorry this is like super experimental here right now what you're watching anyways so let's do this and then let's um convert to curves and then we want to move in this side here if i find the right tool there we go thank you very much so i want to move this in here and then basically fill this maybe with a gradient let's sample this color here let's sample this color here actually and then let's sample this color here a little bit darker but still skin shadow type color let's rotate the gradient no wait a second it has to be the other way around right let's multiply this color burn no linear burn maybe linear burn okay let's make a new layer i think this is too big so here we have our bright line and then let's go with just black here down here multiply no multiply is not the right one well it's actually not too bad i feel like the colors are off but otherwise this says i'm sorry it's like so so bad right now okay maybe i should not try things on live stream that i've never done before because this does not look good at all okay uh yeah i think it's it's kind of not super interesting to watch me try to figure this out i have no idea how to make these shadows and he uses a lot bigger lines here i probably kind of think he did he did that stuff with 3d software i'm not sure maybe he has a video of that it looks so easy it's not easy at all damn it okay interesting um what else should we do because this was a fail first time i think in my stream that completely didn't work out what i wanted to do um yeah what else do you want to do because this is not working um we could talk about ideas for the for the thing from from benny productions right maybe that's interesting should it be like should it be i mean is it horizontal or vertical what he wants to have probably more vertical right i guess i don't know probably better for the screen yeah let's go with this and then just put his image in here we can play around with that a little bit let's just come up with some ideas here and then i can work on that over the next 20 days if i find that there it is okay so here we have our dude i want to i want to make more stuff like get more his quality anyways in my channel although the way he's like kneeling here it kind of screams vertical but anyways before contest yeah alien yeah the last one the last month was pretty cool that was pretty nice so the idea is to be to do something medival here i mean i like what he's doing in his original thing with the with the like um how do you say volcano so that could be interesting uh of course also we can look at pinterest to get some ideas what we can do with that [Music] okay forest could be an idea dragon question is where we find a good dragon picture he could kneel on a lake man i should have brought my art board i can't draw right now that's that's the downside um and i don't think i have the driver installed for the artboard uh but let's okay let's go to unsplash here real quick and splash let's uh by the way let's go here and then i want to make a bigger resolution oh this is actually a big resolution already um let's go here like so and then i'm going to no sorry this was not what i wanted to do let's rasterize this real quick rasterize and then i'm going to go like this and this no what the why is this not snapping there we go snappy snap and again there we go okay good this is this is my my trick on how to do thirds you can see so now it snaps here so i have my thirds here and then i can simply snap this down here and then i stretch it out like so and i have my thirds here boom okay so this is an easy way to do that or any kind of other division all right and so now we can basically use our dude here just uh zoom in here and this we can use as a composition one basically right okay so let's go here lake i'm sure i'm not gonna find images that i'm looking for let's go for forest why is this big at the moment let's take this here copy no what's happening there we go okay so let's put it like this for example so the idea is there's a force in the background and then in the foreground let's say um let's put this like so give me a bigger brush make it harder okay like so then we have our dude here copy him flip him no that's the wrong flip vertically so a little bit like this you know what i mean so we have basically he's he's like kneeling on a lake side is this not rasterized let's rasterize this real quick there we go okay so this could maybe be a thing it could be interesting of course with some better color stuff like that this could be one composition where he's like kneeling there maybe there's someone in the water here maybe like a like a lady in the i don't know you know what i mean i don't have the right pictures here a little bit like this but different why is there no other versions what's going on here hmm usually it just success more versions but this doesn't there we go the hell what is going on sorry so this might be interesting as a theme like so he's kneeling there's a water there's like this um goddess or damsel or something swimming in the water here that could be one thing anyways did did that move down a little bit i feel like sorry that was the wrong one there we go so this could be one what is the chat saying one second trippy the lady of the lake ah yes yes lady of the lake that needs more time and preparation for the for the composition thing um no i'm not doing like i'm not doing the the challenge now i'm just thinking about different kind of ideas what could be done with that and the other one with the picture that looked nice and easy but it completely was not so that was a complete fail but well sometimes things don't pan out that's okay too um volcano we can do something like that right hmm i really feel more like this would be a scene because of his kneeling where he's like oh man this is not too bad here let's take this here in the background again stretch this out [Music] now you see the side to that but what is the reason why would he let's make it like this why would he kneel there you know what i mean what's the purpose of that [Music] hmm what could be another reason for kneeling like when he gets like this like he gets like how do you say when the queen does this with the sword but then we see him from the front what could be other reasons for him to kneel he could be a zombie zombie army in the background but where do we find all these zombies no yeah okay maybe not maybe that's not good for the stream i don't know if that's like by his sword does he kill her no not really maybe it's just like set or something you know or she's reaching something up to him or something i don't know she could hold something i don't know how to do that by the way if maybe i find a model that is doing that and i can photograph that let's find some more ideas here night kneeling so most of them are now this is nice just a landscape in the background kneeling in a hallway kind of useless kneeling defeated but he's not kneeling defeated from his body position he's like looking rather proud here from those stands right um snowy landscape he's also in choking outfits so you will probably have to like photo bash a armor around him there's like this kind of religious kneeling also hmm it is kind of like unfortunate that he's kneeling at the camera because then if he would like if it was from the side you could have an interaction with something else but if he's looking right at the camera what could you do because he's interacting with you as the spectator and then you can put stuff behind him but you can't really interact with him in that point right maybe he is like putting his sword into like if he's like kneeling on the on the head of a dragon and he's like pushing the sword into the skull of the dragon that could be interesting but like what would you do with that coronation finish blow with cold blood on the night from got what oh okay game of thrones hmm okay interesting um i mean this is kind of the only thing i can think about right now where he can interact with something in the foreground where he's kneeling we could also do like man i wish i had my drawing pad right now uh a thing where let's make the background here visible i like this pixel layer again you need kind of a model for that or something but let's say um you can have a like a throne here right like this and then kind of the the hand here of the king stuff like that i know horrible drawing but like with the mouse it's really hard so you can go like this and then you have a certain amount of interaction between um him and the f like oh the finger that finger is a little bit too long go like this so that could be a thing and then we have a hallway here and stuff like that behind him and this is just like the hands and you have maybe the legs here of the king just sitting there he's looking at that or something like that could be possible you could have like a sword here where he's like what is this called like um what is it called no accolade accolade i've never i've never heard that word interesting i didn't know that it's the word i i know a gaming studio that's called accolade i think but then i didn't know that's the word for for that kind of when you become a sir you know interesting man that is not easy if it was sideways it would be a lot easier to find some interesting things with the god ray but you see there's always an interaction where you have the perspective where the person is viewing right or how like he's looking right at the camera what can you do with that um and it's also like a completely frontal perspective it's not like viewing him from below or from top down so you have some kind of power dynamic it's just like completely from the front so hmm i mean you can probably like change his the position of the head and stuff like that [Music] um i have no idea sorry i really have no idea right now what i could do with that this is the only idea that came up with this is probably pretty hard to do unless i take my own photos to do that the volcano is nice but why is he kneeling there right what's the reason for that you could maybe go sci-fi let's make him a little bit smaller here and make a new layer and then say for example um let's say he is like on a platform right like this like in the in the air and then maybe behind him there's like a let's say there's like this this huge room on the side with uh like tons of people here whoa that's not good like so really big arena or something with tons of people on the side and he's just like kneeling like floating in the middle of that that could be interesting right that's wrong maybe some stuff behind him or such maybe he is kneeling in a in an arena ah let's go here could be kneeling like this on the ground of an arena that could be interesting like imagine the people not there right now of course because they are too distracting but that could be a thing just paint these dudes out here like so maybe there's a beast that he has just slain or something let's make him a little bit bigger here he's closer to the camera let's say like so that could be a thing maybe um what else lightsaber yeah if he has a lightsaber in his hand that could also be like a star wars scene or something right hmm no hmm [Music] like after a fight or such that could be an idea he could also be like a beggar or a monk like it i guess most people are gonna say okay this is a sword but maybe he's a monk who is kneeling and then maybe he is like that could be interesting wait a second um medieval village yeah this let's go like this here copy image let's go over here and let's go here for this part put this in here make a new group so i can like mask that mask to below okay like this and now what we need is a kneeling monk ideally from the front of course we're not going to find that right now there's one let's just take him okay never mind that's good enough so here's kneeling here let's rasterize this remove the background real quick bloop there we go that was too much tolerance there we go so that could be a thing like he doesn't have to be a warrior right he can be uh he can be a monk um kneeling here in the middle of the street that could be an idea so we have some sci-fi stuff we have some oh it's it's middle ages so i don't think we have gladiators in the middle ages so that's probably not a thing i like the manga idea because i think a lot of people are going to go with a warrior so that could be a thing he could be a leper what else could he be if he's not a warrior right i mean maybe a zombie would also be nice middle like medieval zombie kind of scene that would be interesting dragon slayer is still a possibility with that thing here let's look for dragon real quick no slain is this how you write slain how do you write slain there we go put that here that's wrong there we go so just have this could be in the foreground could be in the background doesn't really matter um which one is this it's down here no yes like this for example and then he's like kneeling somewhere close to that maybe like this or maybe like again putting this thing in this in the head of the dragon something like that could be interesting make this a little bit bigger like so yeah so we have some compositions right this is like out of the question right now let's look for a siege here the hell what is this what is going on here oh okay i know what's going on never mind okay um siege let's put this in here like so perspective is wrong but never mind so he's just kneeling outside of a city maybe outside of a fallen city like he's giving up with a broken wall um okay hmm like this but from the front what does the chat say slain slain out slain okay that's how you write that do you think ip is capable of doing the level of photo manipulation of photoshop probably not because uh photoshop is more sophisticated in in some regards but you probably can do really amazing things with affinity photo you can you can reach a really high level with that um too it has some things that are not there for example it doesn't have a 3d simulation for different layers and it doesn't have 3d lighting you can put on stuff things like that and and other things like the warping isn't as complex and and things like that that make stuff a little bit easier texturing isn't isn't really a thing in affinity photo um but affinity photo can still do a lot of things right so you can still probably do the same thing but you need a little bit like you need more skill to achieve the same thing because the tools are not as like sophisticated in many regards right but still pretty good pretty good software anyways what's the time oh okay i actually filled the time i think i couldn't fill the board until the time ends but i couldn't let's try to think about some other ideas i i've really problems with the way he's kneeling if this would be sideways there would be so many things you could do um but facing the camera what else can you do with that um let's just copy him down here and then draw this real quick with the wall so we have this in here too anyways okay good so basically i mean it's gonna look like crap but you have here the wall and then this is broken down like so just kind of blah blah blah here let's just like paint in some stones it looks a little bit like that you have the other wall here blah blah like that it looks bad and maybe that there's some houses behind burning all that kind of stuff and some maybe some corpses here or whatever and he's just giving up um that looks terrible but at least we have like sketched down the idea to kind of have an idea what that is that could be a thing um if he would be kneeling and there would be like a giant dragon head behind him he could be kneeling on a dragon head wait a second if he would be like we have this here of course this is then horizontal like so and then he's like kneeling on top of that dragon hat in the middle here but it's a horizontal composition then right and he's like the dragon lord and he's like just here boom and then maybe some light behind him to make everything brighter let's make a light disc here real quick like so put that behind him blur that 300 that's probably too much yeah that's maybe not too bad that's more interesting right now so that could be something that could be an interesting composition just as an idea all right what else a wolf he could kneel on a giant wolf's head you see if he would face any other direction than the camera directly away from the camera awesome he can interact with something behind him to the side he can interact with the side but looking at the camera you can interact with nothing at all that is like a really my biggest problem right now you can do so many compositions if you can interact with anything in the image but he's like in most cases kneeling for no reason just doesn't make sense this is like this makes sense so this is one i like but where do i find the dragon image that's a problem and this is pretty cool i think i can find images like this that are free to use the other ones are like why why is he doing that other than maybe the monk here that might be interesting [Music] maybe if he is kneeling let's take this one he's kneeling like this and then again we have this let's let's look for a volcano again one second volcano hello just doing something no yeah let's just take this doesn't matter right now okay let's just take this here and so this is like so damn it this is like so and here's where is he let's put this on top okay let's go like this and then we have this in front one second like it's just a normal landscape in front imagine this is going to be a landscape everything and then we have this picture here in the background covering everything and then where his sword hits you simply have uh the the ground opening up right let's make this orange here so the you know what i'm gonna do it like this the ground here is just like breaking open where he's hitting it with his sword like so right you know what i mean so that could maybe be an idea that gives a little bit more purpose why he's standing there like this right that could be a little bit more interesting maybe like this right that could be a thing okay so i actually uh filled up the screen with different concepts nine concepts i will think about that more 20 days and let's see what i can create with that i hope i'm not completely failing i will keep you updated in the next streams about that yeah that was a little bit strange strangest stream yet uh but at the same time super interesting thank you everybody everybody for watching today let me let me uh go to the live view here there we go all right so let's see what i can do with the benny production contest i will also watch his video to get some more inspiration from that and see what kind of like tools he's applying uh to to create that and well come up with some more interesting ideas maybe a time warp but it should be metabol right although medible can be a lot of different things right uh so let's think about that okay cool and you can also do the entries you can maybe also post that into the group if you want to to see what kind of ideas you have what kind of creations you can up come up with and i want to learn more about this anyway so this is pretty good as an exercise and as a like goal to work two wars it's pretty awesome um yeah so really looking forward to doing that and yeah that's basically it for today i hope that was kind of interesting today was really strange sorry for like the one was a fail i think this one was pretty interesting although i had a huge problem with the pose of him um but i mean a challenge should be challenging right should i by the way this is maybe before we go this is a good question should i make my challenges that i do in my facebook group more challenging than they are right now like to push the quality level a little bit and to push the skill level a little bit and not to keep them too easy but to really go a little bit more advanced and what things what people can do um with these things because i'm also thinking with my channel to go more into a direction where i push myself artistically and then i share with you what i'm learning in the process and i push you artistically to follow in that step maybe also learning from you for your tricks i was also thinking about maybe doing videos that are based on the input from the community so you can share your own tricks in the facebook community and then i pick up on them and make a video where i show you a trick and of course you yourself as the person who has suggested it um so yeah that could be possible it's one of the concepts i want to do because it's like right now is um i'm split between personally i like to do composites but then also i do these basic things on my channel like introduce introducing basic techniques and what you can do with the software in general and then there is also classic photo editing and adjustments like creating different looks and stuff with classic photography right and that's kind of it's it's three different directions and they kind of interfere with each other so i kind of want to figure out would it be better to go maybe focus more on one direction and also for the concept of the products and for the courses that i could do for you and for the streams i could do for you focusing on one area would make everything a lot more um sophisticated and better right because then i would have a community that has a certain interest in understanding around one topic and i can could provide knowledge courses products um posts challenges all around this kind of topic and not like say i make a composite but then i give you for example these luts for normal photos and then i i show you how to edit a design for a cover or something like that right so this kind of all over the place thing i have done so far um maybe focusing a little bit on a certain area would be a good idea i don't know in my opinion make them more difficult no pain no gain yeah i think so too right pushing a little bit harder um i think the idea with the materials is good and i really also like he's doing in this challenge i really also want to go more in the direction where i take my own pictures or even take pictures of my maybe not of myself i'm not sure if i am that foot organic but of models and then you can edit these photos yourself into composites or into photo adjustments stuff like that so um right now i'm working on different concepts for what the channel could be and of course i want to know your opinion as soon as i have finished writing the concept so i have a better idea of what i can do because it's a whole cosmos of things that has to fit together right because if i decide on one thing or the other the other elements of my business basically have to fit into that tool right so for example if i would make my channel about a certain topic but then i had no ideas about products or online courses or sponsorships or anything that would support that i couldn't do it it just wouldn't work right so i have to think about what could i do and the good thing with composites for example is and you can provide a lot of interesting things for that you can talk about you can make for example courses about how to photograph it so the composite fits together and to make the light set up and to build the um the elements you need for example the head gear the makeup stuff like that all of that could be interesting you can create uh overlays for the compasses that you can use for example different hair pieces that i photograph different flowers that are photographed other kind of stuff grunge overlays different kind of gradients and lots and all kinds of things that you can use to create better composites stuff like that so there is a lot of potential in that kind of area and on top of that i would have the ability to do for example maybe live workshops also selling artworks that are based on the like what i create um as composite so there's a lot of potential in that right if you make basic courses on how to use affinity photo like what is what is the difference between vibrance and saturation you can't really make a like a live workshop out of that right maybe you can i don't know um but yeah you know what i mean it it all has to fit together in a certain sense i have to think about that and then go into a certain direction uh yeah let's see okay anyways enough about that uh thank you very much for pointing out that challenge to me i will work more on that and keep you updated on my progress also show you a little bit in my next live stream and everything about the um the the challenge for the upcoming week on what i can do there and make it a little bit more challenging right okay thank you very much for watching and see you soon bye [Music] [Applause] [Music] foreign
Original Description
Get my Magnificent Sun Light Overlays: https://gumroad.com/l/kYsqj/givemeone
Let's have a look at Filter Forge and the cool effects it can create in and with Affinity Photo
Reviews, Live Editing Q&A
Support me on Patreon: https://www.patreon.com/oliviotutorials
Model: https://www.instagram.com/lumarinaluna/
Get my Black & White Super Styles: https://gum.co/UcsiA/FReebw
Includes Graphics from:
https://www.freepik.com/free-vector/happy-halloween-elements_10723918.htm
Watch on YouTube ↗
(saves to browser)
Sign in to unlock AI tutor explanation · ⚡30
Playlist
Uploads from Olivio Sarikas · Olivio Sarikas · 0 of 60
← Previous
Next →
1
 2
2
 3
3
 4
4
 5
5
 6
6
 7
7
 8
8
 9
9
 10
10
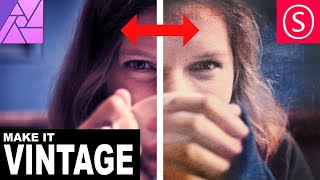 11
11
 12
12
 13
13
 14
14
 15
15
 16
16
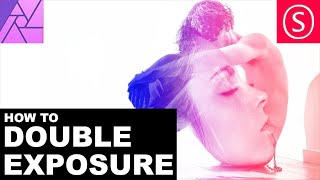 17
17
 18
18
 19
19
 20
20
 21
21
 22
22
 23
23
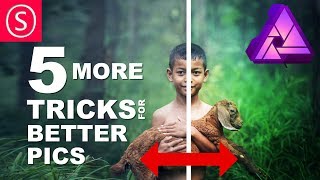 24
24
 25
25
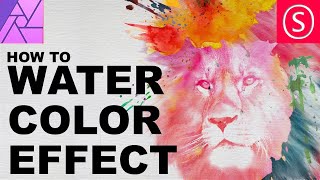 26
26
 27
27
 28
28
 29
29
 30
30
 31
31
 32
32
 33
33
 34
34
 35
35
 36
36
 37
37
 38
38
 39
39
 40
40
 41
41
 42
42
 43
43
 44
44
 45
45
 46
46
 47
47
 48
48
 49
49
 50
50
 51
51
 52
52
 53
53
 54
54
 55
55
 56
56
 57
57
 58
58
 59
59
 60
60

Remove breathing sound from your audio recording // Audacity
Olivio Sarikas
Noise Removal for Audio Recordings - fast & easy // Audacity
Olivio Sarikas
In the Bazar - NI Maschine Audio Sketch
Olivio Sarikas
Submarine Concerto - NI Maschine Audio Sketch
Olivio Sarikas
Affinity Photo - Creating a Photo Font
Olivio Sarikas
Affinity Photo - Rusty Metal Font Tutorial
Olivio Sarikas
Affinity Photo - How to remove things from a photo
Olivio Sarikas
Affinity Photo - How to replace a Sky
Olivio Sarikas
Affinity Photo - How to put Patterns on Clothing
Olivio Sarikas
Affinity Photo - Vintage Look Tutorial
Olivio Sarikas
Affinity Photo - Photo Letter Font Tutorial
Olivio Sarikas
Affinity Photo - Print Ready Tutorial
Olivio Sarikas
Affinity Photo - Grunge Maps Tutorial
Olivio Sarikas
Affinity Photo - White Teeth Tutorial
Olivio Sarikas
Affinity Photo - Frequency Separation Tutorial
Olivio Sarikas
Affinity Photo - Double Exposure Tutorial
Olivio Sarikas
Affinity Photo - 5 Tricks for better Pics
Olivio Sarikas
Affinity Photo - Realistic Fog
Olivio Sarikas
Affinity Photo - How to Match Color
Olivio Sarikas
Bokeh Balls Trick - Affinity Photo Tutorial
Olivio Sarikas
Affinity Photo - Remove Fog, Smog, Haze and Dust
Olivio Sarikas
Affinity Photo - Orange & Teal Look
Olivio Sarikas
Affinity Photo - 5 MORE Tricks for better Pics
Olivio Sarikas
Affinity Photo - World in a Light Bulb
Olivio Sarikas
Affinity Photo - Watercolor Effect
Olivio Sarikas
Affinity Photo - 5 Tricks for better Composition
Olivio Sarikas
Affinity Photo - Fur Text Tutorial
Olivio Sarikas
Affinity Photo - Skin Color & Tan
Olivio Sarikas
Affinity Photo - Oil Paint Look Tutorial
Olivio Sarikas
Histogram explained EASY & FUN - Affinity Photo Beginner Tutorial
Olivio Sarikas
Affinity Photo - Text in Perspective
Olivio Sarikas
Affinity Photo - Dramatic Sky Colors
Olivio Sarikas
Why Black & White Photography is amazing!
Olivio Sarikas
Affinity Photo - Stunning Black & White Photos
Olivio Sarikas
Affinity Photo - 5 Filters for Landscape Photography
Olivio Sarikas
Affinity Photo - Remove Shadows EASY
Olivio Sarikas
Let's Talk - Where we go from here :)
Olivio Sarikas
Affinity Photo - Realistic Image on a Screen
Olivio Sarikas
Affinity Photo - 4 Perspective Tools explained
Olivio Sarikas
Affinity Photo - 3D Text Effect
Olivio Sarikas
Affinity Photo - Tilt Shift done right
Olivio Sarikas
Affinity Photo - Blur Filters Explained - Part 01
Olivio Sarikas
Affinity Photo - Design Project: Enigma Lounge
Olivio Sarikas
Affinity Photo - Fake Colorized Look
Olivio Sarikas
Affinity Photo - Tiny Planet Tutorial
Olivio Sarikas
Affinity Photo - Change Day to Night - Tutorial
Olivio Sarikas
Affinity Photo - Neon Text Tutorial
Olivio Sarikas
Affinity Photo - Wood-burn Effect
Olivio Sarikas
Affinity Photo - NEON Portrait Look
Olivio Sarikas
Affinity Photo - Angel Wings Tutorial
Olivio Sarikas
Affinity Photo - Remove any Logo
Olivio Sarikas
Affinity Photo - Portrait Design - SUPER EASY!
Olivio Sarikas
Affinity Photo - Make a Planet
Olivio Sarikas
Affinity Photo - Brushes Explained
Olivio Sarikas
Affinity Photo - Design your own Brushes
Olivio Sarikas
Affinity Photo - Flame Soccer Tutorial
Olivio Sarikas
Affinity Photo - How to save a bad Shooting
Olivio Sarikas
Behind the Scenes - Special Episode
Olivio Sarikas
Affinity Photo - Cyber Demon Tutorial
Olivio Sarikas
Affinity Photo - Red Riding Hood Project EP 03
Olivio Sarikas
More on: CV Basics
View skill →


Related Reads
📰
📰
📰
📰
How I Built a Free Online Image & PDF Processing Platform with Vue 3 + FastAPI
Dev.to · IAMUU
I Built a Free AI-Powered YouTube SEO Toolkit With Zero Budget. Here’s What Actually Happened.
Medium · Startup
How to Create a Second Version of Yourself Inside Obsidian Using AI (Step-by-Step Guide)
Medium · ChatGPT
How to prepare for Spain civil service TIC exam using AI in 2026
Dev.to · David García
🎓
Tutor Explanation
