Jetson AI Fundamentals - S1E2 - Hello Camera
Key Takeaways
This video demonstrates the setup and use of the NVIDIA Jetson Nano with Docker containers and PyTorch for deep learning, as well as the configuration of a camera for live video and video recording. The video covers the use of SSH protocol for remote login, the creation of a directory for data, and the access of Jupyter Lab for project development.
Full Transcript
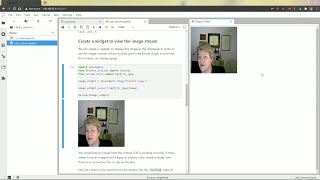
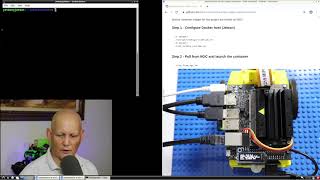
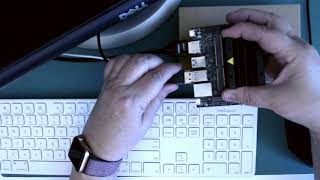
[Music] hello it's dana with nvidia's deep learning institute i'm going to share with you how to set up the docker container and the webcam for the free dli course getting started with ai on jets and nano this will prepare you for the classification and regression projects that are part of the course which i'll share with you in later videos in the dli course you'll use jupiter lab notebooks to build projects using the pytorch deep learning framework you don't need to know how to program to enjoy this course but the code is right there for you if you want to learn more and experiment you'll start with the resnet deep neural network model and train the model to recognize images that you collect with the notebook widgets and a camera it's a fun way to get started with ai and you can easily try different models and different data sets to create your own applications let's get started we need a computer with internet and a usb port and a jetson nano developer kit with jetpack 4.4 or later on the sd card i'm using a logitech c270 usb webcam you can use a csi camera but the webcam is much easier to position in a hands-free manner to collect the data so that's what we recommend next we need a data cable to connect the micro usb port on the nano to the usb port on the laptop it's important to use a data cable because there are cables designed to power devices that look the same but cannot transmit data we're using this cable connection to log into the nano remotely with ssh protocol we also need power and to download the docker container into the nano the first time we also need an internet connection for the nano i'm using the ethernet port but you can also use wi-fi if you have a compatible device one more thing see this little yellow caution tag on the heatsink as we put a load on the device it heats up and can get very hot especially when we use the gpu for training deep neural networks which we're going to do so please avoid grabbing the nano by these fins until they've cooled down completely i'm logged in to the getting started with ai on jets and nano course and at the first page and we can see here there's a welcome a setting up and then the projects and a conclusion here on the setting up let's take a look what we got there we've already gone through the setup so we'll move on to headless device mode this is where we have some instructions for actually downloading the docker container to get started in the course so the first thing to do is to open up a terminal in the case of windows that would be powershell for ssh into the nano which is already hooked up so on max mac or linux you'll want to open just a regular terminal but we'll use powershell on windows and the quickest way to get there if you haven't done it before is to use the search and type in win and there it is it's the first thing that comes up this came up giant because i've made the font a little bigger let's just reduce the size a little bit so we can compare what we're doing and i'm going to move this over as well so we can see it all in one page first thing to do is to ssh into the nano this is the way we log in remotely so i'm going to do a control c and a right click but i need to change the username to the one that i configured when i set it up which was nvidia for ease but yours may be different okay and it's asking for me a password that i also set up on the nano and i'm in this window now represents logged on i'm logged on to the nano so this is the nano right here next thing to do that it tells us to do let's first let's do it ls this is unix now so ls tells me what's there in the directory let's go ahead and clear the screen here next we want to make a directory for the data just copy paste and the directory is made if we do a list there it is this is the directory i think i'm going to change the color of this so that it shows up a little better you can do this with the with the properties and i'm going to change the color to black this works better for some of the linux stuff and we'll clear it to make it look right here again so now when we see it hopefully the the dark blue shows up a little better next thing i want to do is to download the docker container and run it and i have a command here that's a little bit generic in that it shows a tag and the tag needs to be the exact right one so i may want to go to this this page that shows all the different tags the very first tag that goes with jetpack 4.4 is going to be this one so i know i already know that i'm going to go ahead and do this command which is going to copy this long startup into a shell that i can start up again and again anytime i want to without typing all of this in and remembering what's there but before we do that let's take a look at what's actually in this command so docker is is the command to build run push docker repositories which are images for containers but all we have to do is do run because the the container is already built for us it's called dli and nano ai with some tag which is the version it's going to be run with nvidia so it'll work with gpus and this this line is important this is the volume remember we made the nv dli dash data directory which we just created over here this is on our nano this directory slash nv dli dash nano slash data is in the container what this volume command does is tie those two together so that they share space so anytime we're on the nano in the container using this directory anything we put here persists here once we leave the container we're setting this up for usb which is going to be on video 0 and we have to share the device that's on the nano with the container so we're telling it that it's there this is the name of the actual image and where to rec where to download it from once it's downloaded it'll persist on your nano in the 64 gigabyte drive under this name and when you run it it won't have to download again the first time the nano needs to be connected to the internet in order to download this image after that once it's there it just can start up okay so i'm going to do this little command to copy and create a little script okay and now if that's not right i'll need to edit this script okay i'm going to go ahead and clear before i start it up to run the container we'll just run our script and every time we want to run the container this is what we'll do dot slash docker okay i did a tab to just jump over dli run.shell and we're now inside the container this root nvidia desktop slash into dli nano this is actually inside the container inside the nano so if we do a list here we find this data directory this is actually the volume that matches the data directory we created while on the the nano before and we can see here that we've got the the different directories that are going to be part of the course so we're inside the course now that that's up and running we can jump to the course here by um clicking this this address and sure enough jupiter opens up i'm going to log in with dli nano and we're in this is where the notebooks are i'm going to go ahead and take myself off the screen so that we can see everything that's going on i have the jupiter lab environment open now and we see a couple of things one is the launcher page and to the left we have a file browser and a couple of different menus i won't go through everything but i'll show you a few little tricks as we go along first is on the launcher page you can open up a terminal and this terminal is in the container and on the nano so for example i can try our free dash m to see the swap and see that we have the four gigabytes of swap available to us and the two gigabytes of memory on the two gigabyte nano developer kit okay i can close that back up and if for some reason i lost my launcher i would be able to open up a new one with this little plus sign that's a good thing to know too okay on the left here we have the file browser and for this course we have a number of folders the classification folder has the classification notebook in it which is a project and the regression notebook is the other main project before we can go on to the projects though we need to make sure that the camera's working and one more thing the the data here the data is empty right now but that's where we've we're sharing a volume on the nano at with the container so that anything we put in this data directory will persist on the nano even when we close down the container so that's an important thing to remember as well so we don't have to recollect data that we've already done okay let's try the hello camera we have the usb camera because we're using the webcam so that's the one we'll open start out with a picture and a tip about shift enter for running cells that have code in them and that's what this kind of cell is we have content cells and we have code cells if you're if you haven't tried this before so if we want to run this little cell we can come up here to this triangle and run it and it will run in advance you see an asterisk showed up here while it was thinking and a little number appeared when the cell was complete with its run what we've got here is an output of the video number and location and it matches exactly what we're expecting it's just a test to see if it was live the next thing we're going to do is step through do this one more time here we're setting up the camera with jet cam this is the object that we're using going forward i'm not going to use this little button i'm going to revert to the keystroke shortcut which is shift enter it moves a little faster this way i'm going to read the camera it just read some picture that i it's going to gather and now we're going to show what it was that i it just picked first of all we'll look at the size that's 2 24 by 224 and three colors and here's the widget that's showing the image that was captured while i was talking we want video though so that's not going to do as much good okay so we'll do camera running and it's running but you can't see it because it's off the page but it is running but i'm going to fix that because i have a little trick i'm going to right click first i'll select with left click then i'll right click choose create new view for output and i have a new tab i can move that tab wherever i want it i'm going to move it to the right and while i'm at it i'm just going to hide this because i don't need that right now and this gives me a nice view for for looking at the camera widget even if i move beyond the picture in the notebook you can do this with any kind of live output that you want to keep track of as you move along works great for this okay now if i want to make it stop i can run this unobserved that's a method and it's sure enough it stopped i'm frozen fortunately with a smile and we can do this another way showing you that you can do this with a link and again we're back to video live and then i can unlink and i'm frozen again and link to unfreeze and that's all there is to it so the camera works we'll go ahead and close this it's giving me an option to save i'm going to discard it and we're back you can see back to where we were okay the camera's working great and we're up and running on the container so we're ready to move on to the project notebooks to learn more visit nvidia.com dli or email us at nvdli at nvidia.com
Original Description
Get started with the camera widgets in the free DLI course "Getting Started with AI on Jetson Nano". You'll learn to securely log in to your NVIDIA Jetson Nano and launch the course from a Docker container.
00:00:00 - Introduction - Setting up Docker container and webcam for DLI course
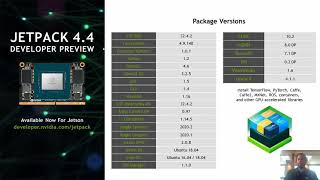
00:00:28 - DLI course overview
00:01:04 - Getting Started with AI on Jetson Nano
00:02:55 - Headless device mode
00:08:26 - Inside the container
00:09:30 - Inside Jupyter lab environment
00:14:28 - Conclusion
Getting Started with AI on Jetson Nano - https://nvidia.com/dli
Jetson AI Fundamentals - https://nvidia.com/jetson-ai-fundamentals
NVIDIA Developer Forums - https://forums.developer.nvidia.com
Watch on YouTube ↗
(saves to browser)
Sign in to unlock AI tutor explanation · ⚡30
Playlist
Uploads from NVIDIA Developer · NVIDIA Developer · 54 of 60
1
 2
2
 3
3
 4
4
 5
5
 6
6
 7
7
 8
8
 9
9
 10
10
 11
11
 12
12
 13
13
 14
14
 15
15
 16
16
 17
17
 18
18
 19
19
 20
20
 21
21
 22
22
 23
23
 24
24
 25
25
 26
26
 27
27
 28
28
 29
29
 30
30
 31
31
 32
32
 33
33
 34
34
 35
35
 36
36
 37
37
 38
38
 39
39
 40
40
 41
41
 42
42
 43
43
 44
44
 45
45
 46
46
 47
47
 48
48
 49
49
 50
50
 51
51
 52
52
 53
53
 ▶
▶
 55
55
 56
56
 57
57
 58
58
 59
59
 60
60

Ray Tracing Essentials Part 2: Rasterization versus Ray Tracing
NVIDIA Developer
Ray Tracing Essentials Part 3: Ray Tracing Hardware
NVIDIA Developer
Ray Tracing Essentials Part 4: The Ray Tracing Pipeline
NVIDIA Developer
NsightGraphics 2020 2 Release Spotlight
NVIDIA Developer
Ray Tracing Essentials Part 5: Ray Tracing Effects
NVIDIA Developer
Ray Tracing Essentials Part 6: The Rendering Equation
NVIDIA Developer
Ray Tracing Essentials Part 7: Denoising for Ray Tracing
NVIDIA Developer
Spatiotemporal Importance Resampling for Many-Light Ray Tracing (ReSTIR)
NVIDIA Developer
Announcing Cloud-Native Support for Jetson Platform
NVIDIA Developer
JetsonTV: Build your next project with NVIDIA Jetson
NVIDIA Developer
Nsight Compute Feature Spotlight: Roofline Analysis, Asynchronous Copy, Sparse Data Compression
NVIDIA Developer
Nsight Systems Feature Spotlight: OpenMP
NVIDIA Developer
Isaac Sim 2020: Deep Dive
NVIDIA Developer
NVIDIA Jetson: Enabling AI-Powered Autonomous Machines at Scale
NVIDIA Developer
NVIDIA Tools to Train, Build, and Deploy Intelligent Vision Applications at the Edge
NVIDIA Developer
Jetson Xavier NX Developer Kit: The Next Leap in Edge Computing
NVIDIA Developer
Synthesizing High-Resolution Images with StyleGAN2
NVIDIA Developer
NVIDIA Robotics: Isaac SDK and Sim 2020.1
NVIDIA Developer
Accelerating COVID-19 Research with GPUs
NVIDIA Developer
Visualizing 150 Terabytes of Data
NVIDIA Developer
Boosting Performance and Utilization with Multi-Instance GPU
NVIDIA Developer
Running Multiple Workloads on a Single A100 GPU
NVIDIA Developer
NVIDIA Nsight Feature Spotlight: GPU Trace
NVIDIA Developer
Spark 3 Demo: Comparing Performance of GPUs vs. CPUs
NVIDIA Developer
NVIDIA Jetson Nano Wins Edge AI and Vision Alliance Award
NVIDIA Developer
NVIDIA IndeX on Google Cloud Platform Marketplace
NVIDIA Developer
DeepStream SDK: Best practices for performance optimization
NVIDIA Developer
Efficiently Deploying GPU Accelerated 5G CloudRAN for Edge AI Inferencing
NVIDIA Developer
NVIDIA PhysicsNeMo - Accelerating Scientific & Engineering Simulation Workflows with AI
NVIDIA Developer
NVIDIA Deep Learning Institute Instructor-Led Training Available Remotely
NVIDIA Developer
Advancing AR Glasses
NVIDIA Developer
Blender Cycles: RTX On
NVIDIA Developer
Real-Time GPU-Accelerated Data Analytics of 250 million Flight Data Records of 737 Max grounding
NVIDIA Developer
Assessing Property Damage with AI
NVIDIA Developer
RAPIDS: GPU-Accelerated Data Analytics & Machine Learning
NVIDIA Developer
DaVinci Resolve Turns RTX On
NVIDIA Developer
RAPIDS with Plotly Dash : GPU-Accelerated Census 2010 Visualization
NVIDIA Developer
NVIDIA IndeX for arivis5D Cloud Platform
NVIDIA Developer
NVIDIA Backchannel: Behind the Scenes of Marbles at Night RTX
NVIDIA Developer
NVIDIA Backchannel: Sneak Peek into Marbles RTX in Omniverse
NVIDIA Developer
How to Create "Paint" in Substance Painter
NVIDIA Developer
Accelerate AI development for Computer Vision on the NVIDIA Jetson with alwaysAI
NVIDIA Developer
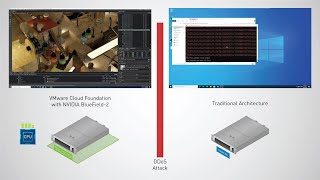
Securing Next Generation Apps over VMware Cloud Foundation with Bluefield-2 DPU
NVIDIA Developer
Accelerated Data Centers with NVIDIA and VMware
NVIDIA Developer
GPU-Accelerated Motion Blur in Blender Cycles
NVIDIA Developer
NVIDIA Clara Guardian Virtual Patient Assistant
NVIDIA Developer
Revolutionizing Supercomputing with NVIDIA UFM Cyber-AI
NVIDIA Developer
Inventing Virtual Meetings of Tomorrow with NVIDIA AI Research
NVIDIA Developer
Learning a Contact-Adaptive Controller for Robust, Efficient Legged Locomotion
NVIDIA Developer
Getting started with Jetson Nano 2GB Developer Kit
NVIDIA Developer
NVIDIA Jetson Developer Community AI Projects
NVIDIA Developer
Open-source projects on NVIDIA Jetson Nano 2GB Developer Kit
NVIDIA Developer
Real-Time Ray Tracing with Project Lavina
NVIDIA Developer
Jetson AI Fundamentals - S1E2 - Hello Camera
NVIDIA Developer
Develop Optimized Conversational AI Models with NVIDIA NeMo on DGX A100
NVIDIA Developer
Jetson AI Fundamentals - S1E4 - Image Regression Project
NVIDIA Developer
Jetson AI Fundamentals - S2E1 - JetBot Intro and Hardware
NVIDIA Developer
Jetson AI Fundamentals - S2E2 - JetBot Software Setup
NVIDIA Developer
Jetson AI Fundamentals - S1E1 - First Time Setup with JetPack
NVIDIA Developer
Jetson AI Fundamentals - S1E3 - Image Classification Project
NVIDIA Developer
More on: Tool Use & Function Calling
View skill →Related AI Lessons
⚡
⚡
⚡
⚡
AI - Understanding it the modern way
Dev.to · Riturathin Sharma
The AI Approval Gate: What Anthropic’s Mythos 5 Decision Means for Your Business
Medium · Cybersecurity
The AI Moat Paradox: The Better Models Become, the Less Models Matter
Medium · AI
170,927 AI Papers Reveal the Biggest Research Shifts of the First Half of 2026
Medium · Machine Learning
Chapters (7)
Introduction - Setting up Docker container and webcam for DLI course
0:28
DLI course overview
1:04
Getting Started with AI on Jetson Nano
2:55
Headless device mode
8:26
Inside the container
9:30
Inside Jupyter lab environment
14:28
Conclusion
🎓
Tutor Explanation
