Prompting HACKS no-one talks about
Key Takeaways
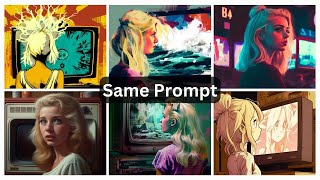
The video discusses advanced prompting techniques for Stable Diffusion, including concept bleeding, prompt editing, and variation seed, to create specific images with predictable results.
Full Transcript
in this video I'll expand on some Advanced topics we've seen before as well as covering new things that I haven't seen anyone use let's start with bleeding bleeding happens when something affects your result in an implicit unexpected or straight up incorrect way you may have noticed this with the aspect ratio where changing it can make stable diffusion follow your prompt better or worse for example for selfies I got the best results using a vertical aspect ratio and for this face close-up of a woman running I get better results on a horizontal aspect ratio compared to the vertical that gives me full body shots there are a few things that may cause this mostly related to model training to understand this better let's dive deeper into something I've slightly talked about before concept bleeding this is when a word or concept changes your results in an indirect way let's see some examples of what I mean in the generation if I add blue house to the prompt you would expect something like this but instead the whole image changes you can see it clearly in the image at the bottom right another example could be this album changing it to watermelon makes the whole scenario different sometimes it mixes with the aspect ratio like these running images that should be close-ups but they aren't for a reason that we will see now we need to know that AI doesn't really understand what stuff means it just knows that let's say out of 100 images described with the attack running in most of them there was a human with this position probably some hermotion a specific type of clothing Etc but if we look at the Google we will also see that the most running images are General shots from afar so it's likely that even if we humans understand that running is an action and it has nothing to do with distance to camera the AI could have created a slight tendency to create full body shots when asked for running images this will depend on each model and its training but all models and words have concept bleeding to a certain extent not all bleeding has to make sense there is implicit bleeding like running that makes sense that it creates full body shots because to show that someone's running you have to see their full body but there is also unexpected bleeding when a word and the results changes aren't really connected in a way that we understand for example this apple image I used before when I change the prompt to watermelon the expected results should be something like this right but instead we get a whole different table and scenario why well it's hard to know we should look at all images regarding watermelon and compare them to Apple images good news are that I'm gonna teach you how to find these concept bleedings and more importantly how to combat them looking at an example I saw on Reddit this random stranger was having trouble creating post-apocalyptic City Interiors as on results were cityscapes you can probably guess why first I'll put their prompt and generate to see what it does trying to choose the same model which I'm guessing was edge of realism we can see that as they say it's all cityscapes or at least exterior photos so let's use the same seat and change the prawn this time we can probably tell that the concept causing this is city as in order to show a city you usually would choose an exterior photo so let's take that out and generate again now we can see that with the word City out of the prompt it is a hundred percent of the times interior photos okay man that's nice to know but I still want the post-apocalyptic City with an interior point of view you know don't worry it's time to see how to combat concept bleeding and not only how to avoid it but also how to use it in your favor from the editing is the ultimate tool for this if the problem is that city is affecting the composition of the image then why not add the word City Once the composition has been decided that way we could create the interior first and then change what we could so it seemed like it is inside the city to do that we just approximate when the composition will be decided which is usually around step 3. let's generate and we can see that even though it kind of work in this case three is a little too early so let's try 8. now it created the whole room and then added a cityscape on the Windows let's do that once more to show it wasn't locked here we have the running prompt and image and we don't want to change the aspect ratio to fix it so let's try to do the same thing this is the image taking the concept out of the prompt so no running which it creates a close-up and then adding running at step 3 lets us create the close-up first to then make it look like she's running at the same time by changing minor aspects like adding motion to the hair same thing with the blue house and the watermelon how about removing the concept can we use concept bleeding to our advantage yep let's see first find a word with a strong and predictable concept bleeding like heterochromia we can see that usually these images are close-ups then we can add it for the first three steps and remove it before it starts affecting the eye color without the word without prompt editing and with prompt editing another bleeding related topic is something to be aware of if you've been generating images for a long time all problems may be bleeding into your new ones for example here I generated batches of different characters by dragging this into PNG info we can see it more clearly the first prompt of the badge was Aqua who is pretty well done but later on the same batch I tried to create ayanami Ray who is supposed to look like this but instead has some components of the last character I forced these examples using a one block but if you see that some of your old prompt components are getting into the new ones just restart the web UI user.bot file and now that we were talking about prompt editing let's get into this second tip things will go faster from now on I promise you normally use this when you're thinking of mixing stuff together as well as the things we've talked about before now there's a pretty cool way to use prompt editing that allows us to create really hard to describe images that would usually get lost in the prompt and that the stable diffusion wouldn't really understand the main idea for this is to create two completely different prompts the first prompt will Define the overall shape and composition of the image it should be a prompt with a predictable result for example I know what type of images The Prompt be with a bowl of soup will create knowing it we can now turn this composition into the next problem a whole a buff a down pretty much whatever you want I would suggest looking for the first prompt alone first without any prompt editing I interrupt the generation if it isn't creating a good composition as there's no need to let it finish once you find the prompt that gives you what your looking for at this second part at the step that you think fits what you want usually this works best at less than 25 percent of the total steps this is as powerful as your imagination allows you to be my imagination aimed that great so I made this example taking a flower pot prompt and changing it completely to fireworks at step 9 changing a donut for a portal like these two cases or getting an ice cream cone to be a Minecraft mountain some of this you can create prompting normally but it is usually really really hard for example I tried a normal prompt for the fireworks generation and all I got was this some other stuff I experimented with using prompt editing was changing a word strength mid prompt instead of completely erasing it it can work but I haven't found a real use for it also I've tried this with loras and to my disappointment it didn't work I thought it could be really cool to avoid this over baking of Lawrence but turns out loras don't really care about prompt editing they just do whatever they want let's go to number three seed variations this is the little tick you have on the right of the ReUse seat icon once you activated you will find these four parameters it serves as a way to create variations of your result it will create a new noise and mix it with the original one you have the effect of this new noise will be weaker or stronger depending on the variation strength and the variation seat is the seat of this new created noise then the resize seed sliders do some weird stuff by cropping the noise and whatever but I don't think it matters much first the main use for it would be to create variations of an image that you found unlike by freezing the seat and iterating over it with this parameter depending on how much you like the original image you can go higher or lower I usually stay at the less than 0.2 like this I also like using it with scripts if I have a prompt that makes me consistent good images I can activate this put it at like 0.15 strength go to scripts and make it generate a bunch of different cheats I would put just random all the time but for tutorials sake I'll put seat one two five after a while you will have the number of images you wanted with the respective variations based on your batch number I put it at 4 because that is what my GPU is comfortable with try keeping the resize sliders at zero or at least match your input size if you know a way to use these Sliders in a different manner please let us know in the comments thank you and for the fourth tip we have spray I have talked a little bit about this before and it can be pretty useful I think break in all caps would be like telling stable diffusion hey stop reading pause take a deep breath and start reading again from this point you know that up here says X Out of 75 well this isn't the max length of your prompt if you keep going it will go up to 150 and then further and further these limits are chunks unstable diffusion separates prompts by chunks how this works on a technical standpoint I have no idea I just know that you can use this to get better color positioning and sometimes making stable diffusion understand your problem better if they are getting too complex adding break before you add a new color on your prompt usually helps to avoid the stable diffusion putting colors whatever it wants like in this case you can see that even if I set green hair or blue eyes it all gets lost and it's just red or orange the result with gray however are much better at understanding where each color goes in this other example it didn't do as good of a job but it is still better than not using it you can also use break if you feel like stable diffusion is ignoring a part of your prompt here I looked for a pretty difficult image and they prompt that long which made the stable diffusion ignore its own Parts there isn't any dogs for example and the wings are usually white instead of black having break you can see that it tried harder to put everything I asked for in the image and the results are way more consistent last but not least and another word that when used in all caps that's a weird effect I'm not precisely sure on how this works as all the information I could find online was this yeah I I think it makes one generation for each time you add ants to the prompt and then it tries to mix all of them into one single image if you use a high batch size you can actually see this happening here I use four and so we have four of the same image here three and here too matching the times I used and in the prom but I still have no idea how it chooses to mix them together going wild with this can be tough so be careful after a lot of experimenting I found two main cool ways to use this one is to create weird designs and it is really good at that honestly mixing donuts and grounds creating this or an ice cream and a dress I don't know to be honest whatever you imagine play with it it is fun oh and this worked with Laura's too like here I mix the controller and Melania from Elden ring by the way yes you can actually achieve similar results using prompt editing but I personally think it is better than for example the vertical Bar Method because it is important to know that by adding two dots and a weight like for example 0.4 without any brackets by the way you can tell stable diffusion which part of the end should be prioritized which gives you good controllable stuff and it is the main reason why I prefer this method the other cool uses for environment setting for example here the prompt was a woman holding wine then I added and a wild forest to change the background here I prompted for a woman dancing underwater but it always creates these splashes under her which may makes no sense unless you're in the SpongeBob Universe I think and underwater deep ocean for example actually changed the scene better even if we are losing some of these cool lighting effects but we can't recover those later it may not always work but this is something to keep in mind for sure as thanks for staying until the end of the video and while you go see this video down here this is an extra tip you can drag an image to your positive prompt and the metadata will automatically be added then just click this blue icon right here hope the video helped see ya
Original Description
Ai art Stable Diffusion prompting secrets! Some cool advanced prompting techniques.
Create exactly what you need today. Using BREAK, AND, Variation Seed, Concept Bleeding and Prompt Editing.
(Tried slowing down the pace of the videos a little. Please tell me if you like this better in the comments! TY!! )
------------- Links used in the VIDEO ----------
Unlimited AI images, models and more!!!: https://civitai.com/
------------- Useful links ----------
Easily create prompts: https://promptomania.com/prompt-builder/
Stable Diffusion guide: https://blog.openart.ai/2023/02/13/the-most-complete-guide-to-stable-diffusion-parameters/
Look up tagged images: https://lexica.art
SD prompt and features: https://github.com/AUTOMATIC1111/stable-diffusion-webui/wiki/Features
------------- Social Media ----------
-Instagram: https://www.instagram.com/not4talent_ai/
-Twitter: https://twitter.com/not4talent
This prompting techniques allow for more accuracy when prompting. But do you want full control? watch this:
https://youtu.be/9mYeHTTJ7Is
Make sure to subscribe if you want to learn about AI and grow with the community as we surf the AI wave :3
#aiairt #digitalart #automatic1111#stablediffusion #ai #free #tutorial #prompting #sd #digitalart #artificialintelligence #AND #BREAK #PromptEditing #VariationSeed
0:00 Intro
0:10 Tip 1 Bleeding
0:36 Concept Bleeding
1:10 Why does it happen
1:55 Unexpected Bleeding
2:20 Finding Concept Bleeding
3:10 Combat Concept Bleeding
4:12 Using it to our adv.
4:32 Prompt Bleeding (IMPORTANT)
5:10 Tip 2 Cool P.Edt
6:13 Examples
6:35 Other failed experiments
6:53 Tip 3 Seed Variations
8:06 Tip 4 BREAK
8:46 Colors with BREAK
9:06 Complex prompts w BREAK
9:28 Tip 5 AND
10:06 Weird Designs w AND
10:32 Weigth Control AND
10:42 Background Changes w AND
11:14 Extra TIP :3
11:24 Ty 4 watching
Watch on YouTube ↗
(saves to browser)
Sign in to unlock AI tutor explanation · ⚡30
Playlist
Playlist UU81KZMuh7RWo21Kk0CaS7eA · Not4Talent · 8 of 33
1
 2
2
 3
3
 4
4
 5
5
 6
6
 7
7
 ▶
▶
 9
9
 10
10
 11
11
 12
12
 13
13
 14
14
 15
15
 16
16
 17
17
 18
18
 19
19
 20
20
 21
21
 22
22
 23
23
 24
24
 25
25
 26
26
 27
27
 28
28
 29
29
 30
30
 31
31
 32
32
 33
33

Why your AI art prompts are FAILING and how to FIX them #shorts #part1 #ai #stablediffusion
Not4Talent
The ONE WAY to beat Concept Bleeding #shorts #part2 #aiairt #ai
Not4Talent
The better AI art generator? #shorts #ai #aiairt #stablediffusion #midjourney
Not4Talent
This are some must have models for stable diffusion 1.5! #shorts #ai
Not4Talent
STOP making BORING AI art
Not4Talent
Get FULL creative control over Stable Diffusion | Install + all models
Not4Talent
Easiest sketch to AI concept 🤯 #shorts #ai #aiarchitecture #controlnet #aiairt
Not4Talent
Prompting HACKS no-one talks about
Not4Talent
Next level AI art Control | My workflow
Not4Talent
Best Tools and extensions for STABLE DIFFUSION AI art
Not4Talent
sketch to final "time-lapse" #ai #aiairt #stablediffusion
Not4Talent
This ControlNet model is INSANELY useful!
Not4Talent
fix bad faces, super easy #stablediffusion #face #aiairt
Not4Talent
Create consistent characters with Stable diffusion!!
Not4Talent
LORA training EXPLAINED for beginners
Not4Talent
MONEY with AI art | ft. DupDub
Not4Talent
This prompting technique is so fun! #aiairt #ai
Not4Talent
Ultimate Guide to HANDS with Stable Diffusion! (Any pose you imagine)
Not4Talent
Complex INTERACTIONS with MULTIPLE characters | Stable Diffusion
Not4Talent
No one uses this CN model and they should! #controlnet #stablediffusion #aiairt
Not4Talent
I spent 3800$ on a new PC to use AI... Do I regret it?
Not4Talent
Full FACIAL EXPRESSION control for Stable Diffusion (+Lora Pack)
Not4Talent
Unlimited CONTROL with SLIDERS! (SPECIAL loras changed the game)
Not4Talent
Create CONSISTENT ENVIRONMENTS with AI (from multiple angles)
Not4Talent
Add characters to ANY environment with Stable Diffusion
Not4Talent
PIXEL ART with StableDiffusion + Tileset workflows??
Not4Talent
BREAK Posing Limitations with Stable Diffusion!
Not4Talent
Extreme perspectives with Stable Diffusion and Photoshop / Full workflow
Not4Talent
Why I am learning to DRAW as an "AI BRO"...
Not4Talent
Get instant-feedback on your art! (and learn faster) #digitalart #art #learningtodraw #ai
Not4Talent
Practice composition and storytelling, the fun way #art #ai #aiairt
Not4Talent
Can AI be a TOOL for ARTISTS? My workflow + Pros & Cons
Not4Talent
UPSCALE any image for FREE with AI | Stable Diffusion
Not4Talent
More on: Advanced Prompting
View skill →


Related AI Lessons
⚡
⚡
⚡
⚡
5 prompt engineering techniques to get the best out of a legacy project
Dev.to · Marco Coelho
The Real Reason Prompt Engineering Isn't Going Away
Dev.to AI
Common Prompt Engineering Mistakes and How to Avoid Them
Medium · ChatGPT
Day 5: Prompt Engineering Basics (For DevOps & Cloud Engineers)
Medium · AI
Chapters (22)
Intro
0:10
Tip 1 Bleeding
0:36
Concept Bleeding
1:10
Why does it happen
1:55
Unexpected Bleeding
2:20
Finding Concept Bleeding
3:10
Combat Concept Bleeding
4:12
Using it to our adv.
4:32
Prompt Bleeding (IMPORTANT)
5:10
Tip 2 Cool P.Edt
6:13
Examples
6:35
Other failed experiments
6:53
Tip 3 Seed Variations
8:06
Tip 4 BREAK
8:46
Colors with BREAK
9:06
Complex prompts w BREAK
9:28
Tip 5 AND
10:06
Weird Designs w AND
10:32
Weigth Control AND
10:42
Background Changes w AND
11:14
Extra TIP :3
11:24
Ty 4 watching
🎓
Tutor Explanation