The Best Way to Annotate Images for Object Detection
Key Takeaways
Demonstrates image annotation for object detection using Roboflow annotation tools
Full Transcript
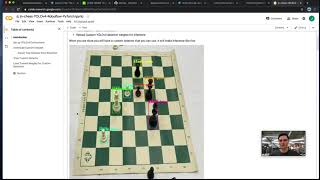
computer vision models are only as good as the data you provide them and an essential part of providing good data is having good labels today we're going to walk through how to annotate images for object detection models so that you can create higher performing models simply by creating higher quality data i'm joseph from roboflow and i'm going to take you through seven techniques that you can apply so that you can have the highest quality data possible okay so first things first we're going to be building a model that does chess piece detection okay so for this example i'm going to be labeling chess piece images now what do i mean when i say chesapeake's images i mean that i have a series of images here that are chess pieces on a chess board and what i need to do is i need to label these images with bounding boxes so that my model can learn how to create and understand and predict what a given piece is and where it is on the board okay so let's dive in step number one is deciding good labels to use that means that determining the ontology like what should one piece be labeled versus another piece in our chess problem here we need to determine do we want to label everything as say pawn do we want to say white pawn black pawn why should we do one versus another tip number one create image labels that are as specific as possible for the problem you're solving creating specific specific labels in the context of our chess problem might mean that we're gonna say i have white pawns and i have black pawns i have white kings and i have black kings etc the reason you want to create specific labels is you can always combine together labels but if you ever want to split something out you have to re-label everything think about it if you want to teach a model to recognize cars you might say oh i could label everything vehicle but then what if in the future you're like i want to recognize a truck versus a sedan versus a semi well maybe from the outset you should have thought about what you want to do at three or six months time and label things as car truck and semi and then you could always merge together those classes into just one class called vehicle but to split that class back out you would have to create all new labels so for our first tip creating very specific label names in this case i'm going to use white pawn black pawn white king white rook etc now let's go ahead and create some of these labels so i can demonstrate what i mean and i'll go ahead and go right here and this will be my white pawn i'll go ahead and label all of these so i've made all the white pieces and notice i have specific classes for each of them now i'm going to do the same thing for my black pieces there we go okay so i've labeled this image and notice i've created very specific label names each of my classes are individually named per each color now this makes it so that in the future if i wanted to for example just train a model to recognize peace i could merge all these labels into one and just call it peace if i want a model to just do pawns i could merge together the white pawn and the black pawn data set into a label just called pawn etc but this gives me the flexibility to also have a model that recognizes white pawns that are distinct from black pawns so that's tip number one use specific label names okay now tip number two is to create tight bounding boxes now what do we say when we mean tight bounding boxes now an example of a bad bounding box would be a label like this so notice how this label does a good job it encompasses the entirety of for example my white night piece however this box is quite loose and by loose i mean there's a lot of space around it now this isn't good because in computer vision we want our models to be very precise and learn exactly what makes up an object and not confuse that object with things in the background so when we say create tight bounding boxes we mean i should go in here and make this bounding box be just right on the edges of this piece now to be clear you do not want to create a bounding box that cuts off part of the piece a box like this is actually perhaps worse than a loose bounding box you want it to basically be tightly wound around the piece or the object of interest so a box like that is pretty tight now we can do another one here let's create a really tight box here around my pawn just like that white pawn so i'll fill in the labels for the rest of these pieces with really tight bounding boxes but not boxes that omit part of the object of interest so as tight as possible without cutting out part of the object let's do it okay great i've created a series of very tight boxes for each of my pieces now tip number three i've actually been following this tip in my prior two tips tip number three is that you need to label all of the objects of interest meaning i if i want to teach my my model to recognize black pawns i can't just label some of the black pawns on my image i need to label all of the black pawns that are visible this is because we need the model to learn what a black pawn looks like and what a black pawn doesn't look like and so if we only label the black pawn sometimes it will confuse our model the model won't know that a black pawn always looks like as it does if we only label it some of the times in fact you actually see on this image i didn't label my white queen so i need to label all of my objects of interest so i'll add my label here white queen great so tip number three is to label all of the objects of interest okay now tip number four tip number four is how to handle objects that are blocking view of other objects so we call this occlusion occlusion is when one object is in front of another object the tip for occlusion is label occluded objects as if you could see them in their entirety now to be fair this tip depends a bit upon the problem that you're solving there might be rare circumstances where you don't want to label as if you could see the entirety of the object but in general in most use cases you do and so it's okay to have bounding boxes that overlap in fact it's preferred if there's two objects that are visible and so for tip number four label occluded objects okay so in this example here you'll notice that i have some objects that are in front of other objects just like the first image my white queen is blacking part of my white bishop i should label both of these as if i could see them in their entirety so here i'll label my white bishop just as if i could see all of it white bishop and then i will also label my white queen now following tip number three i need to label all of my objects that are viewable in this given image so i'll go ahead and do that i'll label all of my objects of interest okay so i've labeled all of my objects of interest even the occluded ones so so far we've said label specific objects create tight bounding boxes label the uh all objects of interest and label occluded objects now what is tip number five tip number five is label the entirety of an object so don't cut off part of the object when you're labeling so we kind of mentioned this when we were talking about tight bounding boxes but you don't want a label like this you do want a label that includes the entirety of the object so that's tip number five now tip number six and now there's only two more tips so tip number six is to create clear labeling instructions i write down my labeling instructions and i share them with my team you should too clear labeling instructions creates reproducibility so that other people can learn from and see what you've done and how to label things the best way possible now tip number seven is use good labeling tools so here i've been using roboflow for labeling all of my images which helps me make sure of keeping track of which images i've labeled as you can see here the shaded ones i've already labeled and the on shaded ones i have yet to label and i could even see all of my images in my data set here of my training set my validation set or even my unannotated ones so i know that i need to go through and label each of these images in addition and by the way if you want this data set but you want it to be done and fully labeled it's available for you on public.roboflow.com i have already released the final version of this label dataset so you can build your own chess piece detector okay so in summary when it comes to labeling images for computer vision there's seven key tips that we've talked about so far one create specific label names that was tip number one tip number two create tight bounding boxes but don't cut off part of the objects tip number three label the entirety of an object or all objects label all objects tip number four label occluded objects and tip number five was label the entirety of an object tip number six create clear labeling instructions that you can share with your team or outsource labeling services and tip number seven use good labeling tools if you want to scale up your labeling operations reach out to us at roboflow and we can connect you to services that will label your images for you just drop a link in the comments or reach out to us and we'll be able to help you out that's it for now be sure to like and subscribe to our youtube channel so you can see more videos like this and tell us what other videos you want to see thanks so much
Original Description
Annotating data the right way is an easy way to improve model quality. Here, we walkthrough seven actionable tips on how to label images for computer vision problems like object detection.
Seven Tips: https://blog.roboflow.com/tips-for-how-to-label-images/
Annotate images for free: https://roboflow.com/annotate
✅ Subscribe: https://bit.ly/rf-yt
Watch on YouTube ↗
(saves to browser)
Sign in to unlock AI tutor explanation · ⚡30
Playlist
Uploads from Roboflow · Roboflow · 52 of 60
1
 2
2
 3
3
 4
4
 5
5
 6
6
 7
7
 8
8
 9
9
 10
10
 11
11
 12
12
 13
13
 14
14
 15
15
 16
16
 17
17
 18
18
 19
19
 20
20
 21
21
 22
22
 23
23
 24
24
 25
25
 26
26
 27
27
 28
28
 29
29
 30
30
 31
31
 32
32
 33
33
 34
34
 35
35
 36
36
 37
37
 38
38
 39
39
 40
40
 41
41
 42
42
 43
43
 44
44
 45
45
 46
46
 47
47
 48
48
 49
49
 50
50
 51
51
 ▶
▶
 53
53
 54
54
 55
55
 56
56
 57
57
 58
58
 59
59
 60
60

YOLOv3 PyTorch Notebook Tutorial
Roboflow
How to Train YOLOv4 on a Custom Dataset (PyTorch)
Roboflow
How to Train YOLOv5 on a Custom Dataset
Roboflow
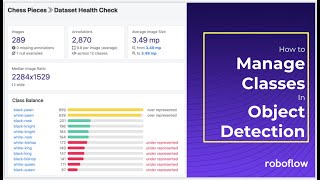
How to Use the Roboflow Dataset Health Check
Roboflow
What is Mean Average Precision (mAP)?
Roboflow
How to Use the Roboflow Model Library
Roboflow
How to Train EfficientDet in TensorFlow 2 Object Detection
Roboflow
How to Train YOLO v4 Tiny (Darknet) on a Custom Dataset
Roboflow
Ask the Roboflow Team Anything - Episode 1
Roboflow
Exploring The COCO Dataset
Roboflow
Community Spotlight: Improving Uno with Computer Vision
Roboflow
Mosaic Data Augmentation - Deep Dive
Roboflow
Hands on with the OAK-1
Roboflow
Glenn Jocher: What is New in YOLO v5?
Roboflow
How to Use Amazon Rekognition Custom Labels and Roboflow to Build an Object Detection Model
Roboflow
An Interview with Brandon Gilles, Luxonis Founder and OAK Chief Architect
Roboflow
How to Train a Custom Mobile Object Detection Model (with YOLOv4 Tiny and TensorFlow Lite)
Roboflow
Tackling the Small Object Problem in Object Detection
Roboflow
Fast.ai v2 Released - What's New?
Roboflow
Teaser: Roboflow Train (1-Click Computer Vision AutoML)
Roboflow
How to Train a Custom Resnet34 Image Classification Model
Roboflow
How to Label Images for Object Detection with CVAT
Roboflow
Deploy YOLOv5 to Jetson Xavier NX at 30 FPS
Roboflow
Elisha Odemakinde Hosts Roboflow ML Engineer, Jacob Solawetz
Roboflow
Getting Started with VoTT - Computer Vision Annotation
Roboflow
How to Manage Classes in Object Detection (Rename, Combine, Balance)
Roboflow
How to Train YOLOv4 on a Custom Dataset in Darknet
Roboflow
Is Grayscale a Preprocessing or Augmentation Step in Computer Vision?
Roboflow
Getting Started with Image Data Augmentation
Roboflow
Glenn Jocher: Image Augmentation in YOLO v5 and Beyond
Roboflow
GA Hosts Roboflow - Healthcare and AI
Roboflow
How do self driving cars know when to stop?
Roboflow
What is PASCAL VOC XML?
Roboflow
AutoML Showdown: Google vs Amazon vs Microsoft
Roboflow
How is computer vision changing manufacturing?
Roboflow
The Alphabet in American Sign Language
Roboflow
Luxonis OAK-D: Computer Vision on Device
Roboflow
How to Train a Custom Faster R-CNN Model with Facebook AI's Detectron2 | Use Your Own Dataset
Roboflow
TensorFlow vs PyTorch: Fireside
Roboflow
Occlusion Techniques in Computer Vision
Roboflow
A Customizable Web Application for Your Computer Vision Model
Roboflow
Model Tradeoffs and the Future of Computer Vision
Roboflow
Designing an Augmented Reality Board Game App
Roboflow
YOLOv4 - Advanced Tactics
Roboflow
How to Use CreateML and Build a Computer Vision iPhone App | AR Object Detection
Roboflow
Fireside Chat: Computer Vision in Agriculture
Roboflow
Scaled-YOLOv4 Tops EfficientDet: Research Rundown
Roboflow
What is Image Preprocessing?
Roboflow
Building a Community of Creators with BlkArthouse and Von Deon
Roboflow
How to Train Scaled-YOLOv4 to Detect Custom Objects
Roboflow
Intro to Computer Vision: Fireside
Roboflow
The Best Way to Annotate Images for Object Detection
Roboflow
The Computer Vision Process: Fireside
Roboflow
How to Annotate Images with Your Team Using Roboflow
Roboflow
Introducing the Roboflow Object Count Histogram
Roboflow
How Fast is the M1 at Machine Learning? Benchmarking Apple's M1 and Intel's Chips
Roboflow
CLIP: OpenAI's amazing new zero-shot image classifier
Roboflow
How I hacked my Nest camera to run custom models
Roboflow
Getting Started with the Roboflow Inference API
Roboflow
Transfer Learning in Computer Vision | What, How, Why
Roboflow
Related Reads
📰
📰
📰
📰
The Role of 3D Cuboid Annotation in Autonomous Vehicle Perception
Dev.to AI
Vision AI: Transforming Business Operations with Computer Vision AI
Medium · AI
Vision AI: Transforming Business Operations with Computer Vision AI
Medium · Machine Learning
Cloud-Optimized OpenCV + A Special Surprise Announcement on OpenCV Live
OpenCV Blog
🎓
Tutor Explanation