How to Train a Custom Resnet34 Image Classification Model
Key Takeaways
This video demonstrates how to train a custom ResNet34 image classification model using the FastAI and PyTorch frameworks, with data pre-processing and augmentation using RoboFlow, and model training with early stopping and fine-tuning.
Full Transcript
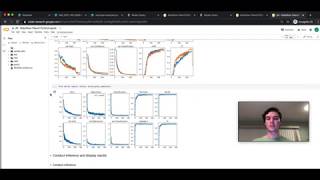
hey guys it's jacob from roboflow have you ever wondered can a computer tell the difference between a daisy and a dandelion well today we put those philosophical musings to the side and we get hands-on with training a custom image classification model to tell the difference between a daisy and a dandelion today in order to do that we'll be training our custom image classification model in fastai with underlying pi torch framework and we'll be using a resnet 34 model um before we get into the fun stuff which will be when we dive in to the modeling here and actually writing the code to train our model the important thing is to nail down our data set so here you can see i have pictures of dandelions and daisies and we have about 1700 of these images and before we port these into the collab notebook which we'll be using for training we will be using roboflow to use data management pre-processing and augmentation so we can make sure that our data set is in its best state before importing it into the model and sending it through the model so here we have our flowers classification data set this has already been loaded into rebel flow you can use this by going to roboflow's public datasets and copying the same one if you want to follow along directly with our tutorial otherwise you can go ahead and upload your own data um this is very quick and easy to do if you have uh your images in a folder structure um where each folder has the images class but there's more details on that in the blog below um so kind of diving into our data set here we have um over 1800 images these are all daisies and dandelions and we've split them automatically into a train valid and test of 70 2010 and you can see here that we have uh some options where we can basically [Music] like add pre-processing options and augmentation object options to our data set um to make it larger so here we have some augmentation options that we can do before we make our data set version all of these might be of use but certainly things like rotation uh cropping and blurring this is all to kind of simulate the ways that uh your images might manifest themselves differently than they are in the training set so they might be slightly rotated they might be slightly zoomed in or out they might have a different exposure all these things that you can simulate with augmentation so in this augmented version i've made a number of augmentations here you can see there's crop rotate brightness all these things and we're generating five images per base training image so this this gives us a larger data set will prevent our model from overfitting and you can go ahead and take your data in here make some steps um and then when you're ready you can go ahead and hit generate um to generate a new version and this will uh basically send your images uh into our back end where all the pre-processing and augmentations will happen and a new version will be will be formulated for you so we'll go ahead and give that a second to run here and when it's done you'll receive a link which you will be able to port into the co-lab notebook which i have linked below and you can just import your data in there and everything will automatically uh match up so you can get rate started with training you don't have to worry too much about uh the exact way you're gonna parse data structures and stuff to get your your data into the model um so okay so here we go we've uh now got our uh dataset version created and you can go ahead and here and you hit show download code and this will give us a curl link once the files are zipped uh and then the curl link is what we can then import into the colab notebook for uh data set load so here we go here's an example curl link uh the keys are blacked out but i've got i've already gone ahead and put that into the notebook and downloaded my data um so now we'll we'll just kind of go ahead and jump into the notebook and jump into the training routine okay so now diving in um here you can see we have this notebook for you rebel flow image classification and in order to train our image classification model we're going to be using fastai fastai is essentially a deep learning framework that sits on top of pi torch and makes things really quick and easy to use and uh if you want to learn more we've got blogs on that too so you can go ahead and check out fastai okay we went ahead and installed that then we're gonna import here from fastai.vision everything um that will give us all kinds of libraries and different codes that we'll need to uh to um train our model here's a place here where you import your links so this is where you'll put your data set link uh to train your own custom model on on your own for your own classes um but i've gone ahead and put mine in there and we can go ahead and just check right here what data.class is um well first we have to set up the data set so this logs it into fast ai and resizes it to 224 that's the input size for uh the resonant model that we're going to be using and it normalizes it according to imagenet stats so uh resnet is pre-trained on imagenet so you want to make sure that you um kind of normalize your your images to the same mean and standard deviation um that's present there uh so now we can go ahead and take a look at data.classes so here we have daisy and dandelion are the two kinds and we can use this line of code dot show batch to uh kind of look and make sure that uh it is indeed the case that our data set has loaded incorrectly into the fast fastai training framework so here we can see we've got dandelion daisy daisy dandelion okay looks good looks like it loaded in fine now we'll go ahead and set up our fastai resonant model so here you use the createcnn function to load in a model from the torchvision library so actually we'll jump over here real quick and take a look at that um so this is torchvision's classification model library um there's all kinds of models here so this tutorial is really um more than just a resonant 34 model you can use any of these so you've got resnet34 here that's what we're using but you've also got bigger resonant models and a little bit smaller ones too um so all these models are pre-trained on imagenet so they already have kind of like a broad view of the way to uh formulate uh features from pixels and you can take these pre-trained weights lift them off the shelf from torch vision bring that through fast ai and then use the training procedure that i'm gonna walk through here in the video um but uh here you go you got a resonant 34 that's the one we're using today but you can also branch off if you want to do a little dense net a little google net little mobile net these are all options there's also object detection models in here too but kind of outside of the scope of today's video we're just doing a classification here okay so we'll go ahead and download that so now we're actually going to torch vision and taking that model down and we can also visualize our network here by looking at learn so this prints out all the different layers that are in our our model so pretty nice right you don't have to build that on your own uh the researchers have already done that for you and posted to torchvision so stand on the shoulders of giants download it and let's let's get going okay so now we're going to go ahead and jump into training uh there's two things that i i'm adding here in the training that i think are are quite useful you know rather than just the the plane off the shelf uh so we've got an early stopping callback this means that uh if your model hasn't improved on validation loss for at least 20 epochs and it's just going to cut off training so you don't have to worry about running it for too long to make sure that you're getting the best model the other one is save best model so based on validation loss best model that comes out is going to be the one that gets saved so you can load that back uh later and uh okay so now moving along we're going to go ahead and make sure that our device is hitting the uh kuda drivers you can make sure that that's the case by going up here hitting change runtime type making sure you're hitting the gpu there um but yeah we're hitting the cuda drivers and we're going to go ahead and uh call this method to start training i have 50 coded into the the notebook but we're just going to do one here for youtube um so okay so now we just kicked off training our data set has been loaded in it's gonna go through passing the model um important to note here that we're training on the frozen resonant model so here we're not actually back propagating through all of the layers we're just back propping through the last layer and that last layer will kind of tune in based on the features that are coming out of the base model and then we'll move forward and train on the whole network okay so after one epoch we've gotten a 7.6 error rate that's pretty good for just one obviously that will continue to go down if you uh train for more epochs and here we just loaded in that best model and we're going to unfreeze so unfreeze is basically now we're opening up the network to be back propagated through all the parameters not just the last layer and we're going to find the appropriate learning rate so the learning rate is uh the way to think about it is basically it's the um amount that you're actually updating the weights after you get the back propagation signal and you don't want to set this too high otherwise you might kind of like branch off way off the loss function into some unknown land but you don't want to have it too slow otherwise your model won't really learn anything with any speed um so i have this function here to to get your optimal learning rate for you um so you don't have to worry about setting that yourself and then again here i'm just going to do one epoch so we're doing one epoch unfrozen model now we're kind of fine tuning through the resnet um and there we go looks like we got our error rate down even further now we're at six and a half percent um so model's getting even better but again like i said that that should get better um with more epochs i've seen this one go as low as like a four percent error rate or so okay so now we've loaded back in the best model from all our training our model has been trained um here we can go ahead and start to do a little introspection on our model uh this plots the confusion matrix so this kind of shows how the model's getting confused looks like it's confusing dandelions for daisies on occasion a little bit more than it confuses daisies or dandelions um that might be for whatever reason that the data is manifesting itself but that that can be useful especially if you have a lot more classes to see where where the confusion is coming from another also nice thing that fast ai gives us is uh it plots the images in our validation set that are the hardest for our model to understand um this can be really useful um to just kind of get an idea in your data set if your data is healthy in quality um and just give you an idea what what what what is the model struggling with um so here you can see that we predicted daisy but this is really a dandelion and this one is really tough right i mean that hardly looks um like a dandelion it really could be kind of either one it's hard to tell so maybe you'd want to actually throw that out of your data set but okay now um finally to kind of wrap up we're going to use our trained model and we're going to do inference on test images and this is something that you could deploy into production in an application so now you you have your train model you're ready to go um that that's all it took just you know a few minutes and a little bit of data management with roboflow to get uh get a trained classification model um with state-of-the-art technology um so okay there we go we're seeing inference here uh looks like it's doing all the dandelions first and getting most of them dandelions and paging through here oh there we go we saw an error there was a daisy but it was supposed to be a dandelion and going a little further down we'll get into the daisy area yep here are the daisies looks like the model is uh kind of doing well on uh inference across all the images in our test set so now you have uh have a model and we've trained the computer to understand the difference between daisies and dandelions if we can do that what what can't we teach it to tell the difference between so now lastly just to kind of wrap up the notebook here we're going to take a look at our saved models so that's in bestresnet34.pth so that's pi torch model and you can go ahead and hear it download that out of google collab import wherever you want you can put in your google drive put it in your amazon s3 keep it on local you can export it into onnx you can export into torch script um you can kind of take this model and deploy it wherever you like the rest of where the inference happens and how the application is built is is up to you but i hope you um learned a lot here in our tutorial on how to train a custom uh image classification model with resnet34 and uh you can take this model uh wherever you like and make classifications with it uh wherever wherever you like and so uh if you enjoyed today's video i would be very appreciative if you would subscribe below and uh go ahead and check out roboflow for your data set management data set pre-processing data set organization and data set augmentation and hopefully these techniques will allow you to form some of the best models in the game and stay tuned for for future tutorials so thanks so much for watching today and we'll see you again soon
Original Description
In this video, we train a custom classification model using Resnet34 implemented in the fastai and PyTorch Frameworks.
You can use this tutorial with any of the classification models in the torch vision model library, so really this is a general tutorial for:
* How to train a custom Resnet18 image classification model
* How to train a custom Resnet50 image classification model
* How to train a custom Resnet101 image classification model
* How to train a custom Resnet152 image classification model
* How to train a custom Squeezenet image classification model
* How to train a custom VGG image classification model
Corresponding Blog
* https://blog.roboflow.com/how-to-train-a-custom-resnet34-model
Corresponding Dataset
* https://public.roboflow.com/classification/flowers_classification
Corresponding Colab Notebook
* https://colab.research.google.com/drive/1mVISoBYTDk3Q9D5VmviTkYD28WlFW-Jk#scrollTo=miSJjgU6PZ5Z
Happy training!
Watch on YouTube ↗
(saves to browser)
Sign in to unlock AI tutor explanation · ⚡30
Playlist
Uploads from Roboflow · Roboflow · 21 of 60
1
 2
2
 3
3
 4
4
 5
5
 6
6
 7
7
 8
8
 9
9
 10
10
 11
11
 12
12
 13
13
 14
14
 15
15
 16
16
 17
17
 18
18
 19
19
 20
20
 ▶
▶
 22
22
 23
23
 24
24
 25
25
 26
26
 27
27
 28
28
 29
29
 30
30
 31
31
 32
32
 33
33
 34
34
 35
35
 36
36
 37
37
 38
38
 39
39
 40
40
 41
41
 42
42
 43
43
 44
44
 45
45
 46
46
 47
47
 48
48
 49
49
 50
50
 51
51
 52
52
 53
53
 54
54
 55
55
 56
56
 57
57
 58
58
 59
59
 60
60

YOLOv3 PyTorch Notebook Tutorial
Roboflow
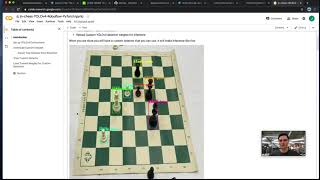
How to Train YOLOv4 on a Custom Dataset (PyTorch)
Roboflow
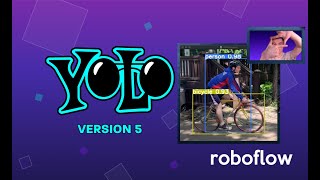
How to Train YOLOv5 on a Custom Dataset
Roboflow
How to Use the Roboflow Dataset Health Check
Roboflow
What is Mean Average Precision (mAP)?
Roboflow
How to Use the Roboflow Model Library
Roboflow
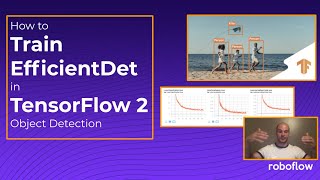
How to Train EfficientDet in TensorFlow 2 Object Detection
Roboflow
How to Train YOLO v4 Tiny (Darknet) on a Custom Dataset
Roboflow
Ask the Roboflow Team Anything - Episode 1
Roboflow
Exploring The COCO Dataset
Roboflow
Community Spotlight: Improving Uno with Computer Vision
Roboflow
Mosaic Data Augmentation - Deep Dive
Roboflow
Hands on with the OAK-1
Roboflow
Glenn Jocher: What is New in YOLO v5?
Roboflow
How to Use Amazon Rekognition Custom Labels and Roboflow to Build an Object Detection Model
Roboflow
An Interview with Brandon Gilles, Luxonis Founder and OAK Chief Architect
Roboflow
How to Train a Custom Mobile Object Detection Model (with YOLOv4 Tiny and TensorFlow Lite)
Roboflow
Tackling the Small Object Problem in Object Detection
Roboflow
Fast.ai v2 Released - What's New?
Roboflow
Teaser: Roboflow Train (1-Click Computer Vision AutoML)
Roboflow
How to Train a Custom Resnet34 Image Classification Model
Roboflow
How to Label Images for Object Detection with CVAT
Roboflow
Deploy YOLOv5 to Jetson Xavier NX at 30 FPS
Roboflow
Elisha Odemakinde Hosts Roboflow ML Engineer, Jacob Solawetz
Roboflow
Getting Started with VoTT - Computer Vision Annotation
Roboflow
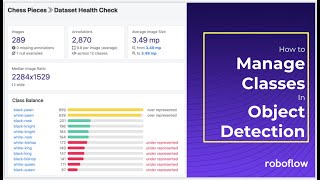
How to Manage Classes in Object Detection (Rename, Combine, Balance)
Roboflow
How to Train YOLOv4 on a Custom Dataset in Darknet
Roboflow
Is Grayscale a Preprocessing or Augmentation Step in Computer Vision?
Roboflow
Getting Started with Image Data Augmentation
Roboflow
Glenn Jocher: Image Augmentation in YOLO v5 and Beyond
Roboflow
GA Hosts Roboflow - Healthcare and AI
Roboflow
How do self driving cars know when to stop?
Roboflow
What is PASCAL VOC XML?
Roboflow
AutoML Showdown: Google vs Amazon vs Microsoft
Roboflow
How is computer vision changing manufacturing?
Roboflow
The Alphabet in American Sign Language
Roboflow
Luxonis OAK-D: Computer Vision on Device
Roboflow
How to Train a Custom Faster R-CNN Model with Facebook AI's Detectron2 | Use Your Own Dataset
Roboflow
TensorFlow vs PyTorch: Fireside
Roboflow
Occlusion Techniques in Computer Vision
Roboflow
A Customizable Web Application for Your Computer Vision Model
Roboflow
Model Tradeoffs and the Future of Computer Vision
Roboflow
Designing an Augmented Reality Board Game App
Roboflow
YOLOv4 - Advanced Tactics
Roboflow
How to Use CreateML and Build a Computer Vision iPhone App | AR Object Detection
Roboflow
Fireside Chat: Computer Vision in Agriculture
Roboflow
Scaled-YOLOv4 Tops EfficientDet: Research Rundown
Roboflow
What is Image Preprocessing?
Roboflow
Building a Community of Creators with BlkArthouse and Von Deon
Roboflow
How to Train Scaled-YOLOv4 to Detect Custom Objects
Roboflow
Intro to Computer Vision: Fireside
Roboflow
The Best Way to Annotate Images for Object Detection
Roboflow
The Computer Vision Process: Fireside
Roboflow
How to Annotate Images with Your Team Using Roboflow
Roboflow
Introducing the Roboflow Object Count Histogram
Roboflow
How Fast is the M1 at Machine Learning? Benchmarking Apple's M1 and Intel's Chips
Roboflow
CLIP: OpenAI's amazing new zero-shot image classifier
Roboflow
How I hacked my Nest camera to run custom models
Roboflow
Getting Started with the Roboflow Inference API
Roboflow
Transfer Learning in Computer Vision | What, How, Why
Roboflow
More on: CV Basics
View skill →


Related AI Lessons
⚡
⚡
⚡
⚡
Cloud-Optimized OpenCV + A Special Surprise Announcement on OpenCV Live
OpenCV Blog
When the Camera Becomes an Exam Proctor: Building an AI-Powered Exam Monitoring System with…
Medium · Python
When the Camera Becomes an Exam Proctor: Building an AI-Powered Exam Monitoring System with…
Medium · Deep Learning
When the Camera Becomes an Exam Proctor: Building an AI-Powered Exam Monitoring System with…
Medium · Cybersecurity
🎓
Tutor Explanation