How to Train YOLOv4 on a Custom Dataset in Darknet
Key Takeaways
Trains YOLOv4 on a custom dataset using Darknet in Google Colab
Full Transcript
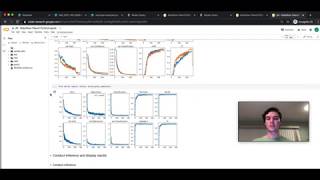
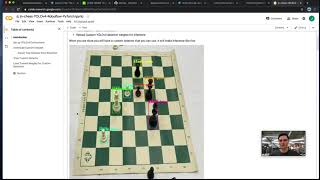
hey everyone this is jacob from rebel flood today i'm going to show you how to train yellow b4 to detect your custom objects within google colab and within the dark net framework training yellow v4 is easy the only thing we need to do is show the network the objects that we wanted to detect so in order to train yellow before today we're going to take a few simple steps the first one is to gather our data set organize it and export it into our collab notebook once we have the data in our colab notebook we will make and build darknet after we've made and build darknet for training we'll write a custom training configuration file with a custom training configuration file we'll be able to specify the size of the network specific to our data set in order to train on our custom objects then we'll kick off training and this may take a while but then we'll eventually have our trained network once we have our trained network we'll make inference on custom objects to show you that the network is working and so before we dive in today i want to show you a little bit about what yellow v4 is so yellow v4 is a state-of-the-art object detector object detection is the task of taking an image and finding objects in it by locating it with bounding boxes so now today we'll be using yolo before which is a state of the art network really for a state of the art in terms of its speed to accuracy ratio so these networks have been trained to be as small and efficient as they possibly can while achieving the highest accuracy that they possibly can this chart here is a map of network performances on the coco data set the coco dataset is a large data set of containing multiple different kinds of objects for a for a detector to detect and it's considered kind of the gold standard general task for these detectors to learn here in this graph you can see that you have yellow b4 up here in green which is achieving a higher accuracy compared to other networks at a faster fps which means a faster inference time the nice thing about faster reference time too means a smaller network which is quicker to trade which is easy for us to get started with to get started on training and figuring out how to tune our own custom networks based on this base network so today i'll show you how to take the network that has been trained on the coco data set which is just a general data set and to fine tune it into your own custom objects so you can train a network that can detect anything that you want to in the world just by using supervised training data via a labeled object detection data set so now that's the next step is to get your labeled object detection data set so in order to get started i've gathered a data set of raccoons which i've labeled with bounding boxes around each racoon and today i'm going to show you how to load that data set into rebel flow and to use roboflow to create and manage your data set versions before exporting the data into the collim notebook for training so today if you were to get started with this you would just log into rebelflow roboflow.com and you would go ahead and create an account or sign in i'm just going to sign in here and in order to load your data in you just go up here and you hit create data set i'm going to call this raccoons youtube and i've already made one of those so i'll make another one with an annotation group raccoons the other thing here is to specify the data set type which is object detection so here we go we've created a new data set and here you can go ahead and drag and drop in whichever files you might have we support pretty much every kind of annotation format at rebel flow so you'll be able to load in um whatever format you have whether it be pascal lock or roboflow dark net already or or coco json or whatever format you have it will will load in here so we can go ahead and select our files um i'll go here to downloads where i have my data set and i will load in this raccoons cocoa data set so here we can see our data set is loading in and you'll know if this is working if you can see the bounding boxes are drawn around your objects so here we can see a bounding box is drawn around each raccoon then we'll go ahead and finish upload here and we're going to split our data set into three different sections of date so the first one is training which will show our model to teach it to detect our custom objects then we're going to show it our validation set which is basically the network will check how it's doing against the validation set but it won't actually be tuning using it and then at the very end we'll run inference on our test images which is images that the network has never seen not even to check its performance like it does in the validation set so we'll go ahead and uh upload these images here and here we're actually loading the images into the roboflow cloud for future processing and one thing to do one thing to note is if you don't already have a labeled data set i'll link some labeling tools below so you can get started with drawing bounding boxes around your objects after you've gathered your images so now that we have our data set in here we can go ahead and use rebelflow to create robust data versions of our data which means that we can actually augment our data set to be larger than it initially is so there's two different things we can do here we can make pre-processing steps or we can make augmentation steps pre-processing steps are initial steps that are applied to all sections of your data whether it be training or testing and these basically standardize your data set in some way that makes it easier for for the network to learn from or some way that you suspect will make the easier for the network to learn and perform on so today for pre-processing steps we have a few auto filled here we're going to resize our images to 416x416 the resolution you're passing into the network is a very important thing to pay attention to it specifies how large the image is coming in and it will always help the network do better if you provide a larger image but it will take longer time to train and it will also take a longer time to inference so you have to keep these things in mind as you're resizing your images then other things we can do is augmentation steps this actually generates more data from our original training data and so it means we can make a larger training set by augmenting by doing some uh deterministic uh changes to our images so it's an example of some of these changes that we can do to make new images from base images is to crop or we can flip or we can rotate um so today i'll do a few i'll just do a little crop which kind of simulates zooming in and out and i'll do a um i'll do a blur here in case the camera is a little bit blurry and another one we might want to do is let's say brightness maybe it's a little bit darker brighter of a day to detect raccoons so we can make this augmentation step as well so there we go we have a few different augmentation steps here and we can choose how many images we want to generate from our base images so here we go we'll um go ahead and hit three here and we can generate and create a new data set version so this is all to get started on just getting our data organized and set up and in a place that we can export it into the co-lab notebook of course if you already have this done you can just jump ahead to the part where we actually start getting into the co-lab notebook and writing the code so the format you want to choose here for export is yolo darknet yolo darknet is going to be the dataset format that yolov4 is going to consume during training so we need to make sure to specify the right dataset format to go into the network that we're heading into so we can choose yellow darknet here and we can go ahead and hit show download code so i'll go ahead and do that here with my data and this will zip up the data and post it to a link where you can simply just correlate into the notebook so you go here's your data link it's important that you keep this private since it has some private keys but i've already went ahead and loaded mine into the notebook so we'll go ahead and just jump in there and and dive into training so here we go switching over to the yolo v4 darknet collab notebook um written here for you and delivered by roboflow um i will go ahead and show you the steps to go ahead and train on your custom data so the first thing is we need to make sure that the network can leverage the gpu that google collab provides for us for free so the first thing you need to do to make sure that has happened is go over here to run time and you can go to change runtime type and you can go ahead and put gpu there to make sure that you're actually leveraging the gpu resources available to you so i've already gone ahead and done that and to check and make sure that that's the case you can go ahead and here and check your cuda drivers and also check nvidia smi so nvidia smi will give you a quick peek into the gpu underneath google code app so here we can see that i received a tesla v100 so this is actually pretty rare i have almost always received tesla p100s from google collab but today you have the pleasure of watching me train yolov4 on a tesla v100 this is this is a real rare experience with google collab so um there are some variables you can set here based on the gpu you provide but i've tried to make a make file that's general enough it should be able to work on any gpu you receive from google call lab so the first step here is to cd into content and to remove the dark net folder we're going to go ahead and reclone that i've already done this but normally you would just be executing these in sequentially and then we're going to actually remove the make file and we're going to make our own makefile based on the one that i provided here in the notebook makefile basically specifies the commands needed that the computer needs to build the dark net application on the on the base uh collab configuration so it changes based on gpu based on cpu based on if you have coo dnn based on if you have a lot of things that hopefully you don't have to worry about because we've just kind of written it automatically in the notebook and these are things you might get familiar with more if you just keep diving in deeper and deeper after this tutorial but for now you should be able to just run this next cell which is to basically exclamation point make so this makes the dark net framework so this is where it's actually building the c code application based on the specifications you made in the makefile so here you're gonna see a lot of uh strange uh c printouts which um i'm personally a python guy so i uh don't often build things in c um but uh every once in a while we'll find ourselves down there um to build things like like the dark net framework so um i guess you know while this is building i could go on a little bit of a tangent of what the dark net framework is so it was uh originally written by this guy pj reedy and his phd to train custom object detectors and to basically beat the best uh object detection benchmarks on the coco data set in terms of performance to speed and so now it's kind of still left over and being iterated on by by new people here this yellow v4 version is published by alexey b in the dark net framework where they're actually writing their own c code to make back propagations and stuff which means you don't you don't have a native framework like pytorch or tensorflow to do all the neural net calculations but that's probably more than you ever wanted to hear about darknet so we'll uh we'll go ahead and move along when this uh when this finish finishes building so once that finishes building uh the next thing we're gonna do is we're gonna download pre-trained weights um so these are weights that have are pre-trained on the coco data set for yolo b4 and the yolo v4 format and that means that the network's already been kind of tuned in to identify certain kinds of objects so that means you can kind of start you don't have to start completely from scratch identifying what an object is it already kind of has an innate sense and then you can tune it in to understand the things that you want to be teaching it um so now this is where we would go ahead and download our data set so i guess one thing is i'll go back to the data set and kind of show you a little bit what's in there um so these are all just pictures of raccoons so uh this is where we're actually downloading in the individual image files with the annotation files attached and the annotation file just defines the box where the object is located and you can use rubiflow to kind of get a good sense of what your training images might look like so there we go i've already downloaded my raccoon data set in here and here we're just going to write some code to kind of uh basically tell darknet where our data set is so we need to can make like files that basically say this file is here this is the training set this is the validation set um again things you can hopefully just um abstract around since we've already written it for you okay so now the next step is to write a custom training configuration file so this is actually where we're going to specify the shape of the network based on our custom data set the main thing here is to take the yolov4 config and then to tune that in based on your custom number of classes and for how long you want to train it for so these are things that kind of will automatically write themselves in the file based on your data set coming in from roboflow but if you want to dive in yourself you can kind of look through here and see what we're doing so basically we need to change the shape of some of the layers based on the number of classes and we're going to tell it how many iterations we want to train it for so darknet talks in terms of iterations not epochs iteration is just the number of times that it's going through a batch and you can also specify the batch size so if you're getting a gpu out of memory error you want to actually just shrink your batch size and if you wanted to go faster try making your batch size a little bigger but i should have presets in here for you so you can just kind of use use what was here and and it should work for you fine um so the next part is to um here we can go ahead and take a look at the file that we've written so here you can see it's actually defining uh the network layers as we're going through here this is the yolo um state-of-the-art network format and um yeah again for the most part you can dive in there as much as you want or just kind of abstract over it and move on to the next step so here we're going to actually kick off training so we point to a few important things we're going to point to our data backslash object.data this is where we have those data files which basically have the the routes to our training data and then we're going to also point to the config that we just wrote this is the custom config based on the data and the other thing we point to is the pre-trained weights to kick off from and that's sort of the main three ingredients that are going to go through into training and so now we'll go ahead and take this off um as this is kicking off you'll see a few things that will print out your environment variables so you want to check for things like huda foodie nnn that the gpu is getting hit so kind of check that top area to make sure everything is set up and then you'll see the network actually build um and then it will start provisioning memory into your gpu which will start loading your images into batches and starting to kick off trading so one nice thing that i've done here is i've actually removed a lot of the print statements from training because the normal dark net framework will just send you uh like like like a ton of prints um about all the losses in all the different regions of the network um but here we just kind of send a few base metrics from training the first one is the average loss which you want to see the average loss kind of slowly start to decrease as training continues and then every thousand epochs or thousand iterations rather it will print out an map calculation so also link below a little blog on what map is if you want to know a little bit more on that metric but basically you want to see loss go down and map go up and as you're running in your experiments you can try to optimize for those metrics um so now this is going to take quite a long time to train so i'm actually going to take off for a little bit and i'll go ahead and just fast forward this video okay so training has completed i uh stopped it a little bit early here so we'll see how the test inferences look but uh you can see here that uh our training has converged all the way down to um through a thousand iterations here and we're already at 1.2 average loss so that loss function has gone down a lot since the beginning and we see here that we got a map of 84.5 percent so that's a really great map uh it was a pretty long training job um as yours will probably be as well but that's a small price to pay for a custom tune detector to detect your custom objects so if you want training to go a little faster there's a couple of options you could do you could go ahead and check out our yolo v4 tiny how to train youtube video so rebel flow how to train yellow before tiny that's a little bit smaller network we'll train a little bit faster and we'll infer a little bit faster um another option is to check out rebel flow how to train yolo v5 that's in the pi torch framework and pi torch is going to run a lot faster than uh the dark net framework is going to run so you can also consider going out and checking out those videos if you want a little bit faster training time so now moving forward the yellow yellow v4 tutorial we've trained our network and we're going to use our train network to make test inference now so here's a little utility function to display images and then we're going to look at our backup directory so the backup directory is where weights are going to save during training so here you can see um where weights have saved and there should be a few different ones it'll checkpoint every 1000 iterations and then it will trade it will checkpoint the last weights no matter when you stop training and then it will also checkpoint the best weights and the best weights are based on the map calculations so it will kind of use your validation set to take a guess at where the best weights uh to pull from are so you know if you get best weights you definitely probably want to use those um so next we'll copy in our class names so we can use those for inference and then this script here just does some imprints where it calls your weights so here i've got the last weights coded in but i'm going to switch those for the best um and then uh here i have the script to just take a random image from your test data set and run it through just so you can get an idea of how your detector is so when you kick off training it will rebuild the network in deploy time you can kind of have this already pre-built so you can just be doing inference on the edge um there we go there's a raccoon that didn't get detected um makes sense that was kind of a weird image so let's try another one so there you go you can see here that our detector has learned how to detect raccoons they're it's drawing a box around a raccoon that is in the test set so it's an image that it has never seen before um so then lastly um another thing you can do is you can download these weights um so you can um download them and then deploy them in other instances so i i forgot to write this in there but i'll write it live so from google colab import files and then you can do files download and then to download you'll just go ahead and pick the location of the files that you want to download so i'll go ahead and pick the best weights and we'll do download here backup backslash these weights and that will go ahead and download it down into your local file store so you can put it up on on the cloud wherever you want deploy it to the next location and then most importantly you don't have to kick off training again now so once you have these weights from the darknet framework there's a few things you can do after that so you can convert to openvino um and then that's to deploy on nvidia or um intel hardware um and then uh you can also convert uh to pi torch um there are repos for that if you go to pytorch um then you can deploy uh i'm say like in video frameworks um and then you can also uh convert to tensorrt um there are repos out there for that and all these things are available just kind of like google uh yellow before dark net to wherever you want to get and since this network's been out there since may or so um a lot of these repos conversion repos have popped up so you can take your trained weights and bring them out for deployment uh wherever you would like so that's all for today for our video i hope you enjoyed watching and stay tuned like and subscribe below for more future training videos and computer vision videos and thanks again and thanks for watching the roboflow youtube channel see ya
Original Description
✅ Subscribe: https://bit.ly/rf-yt-sub
A video of how to train YOLO v4 to recognize custom objects in Google Colab in the Darknet framework. In this video we will take the following steps to train our custom detector:
1) Gather and process our dataset
2) Load dataset into Google Colab
3) Build Darknet framework in Google Colab
4) Write custom YOLO v4 training configuration
5) Train custom YOLO v4 detector
6) Use trained YOLO v4 detector for inference
7) Export YOLO v4 weights
Label your images:
https://blog.roboflow.com/getting-started-with-cvat/
Corresponding training blog post:
https://blog.roboflow.com/training-yolov4-on-a-custom-dataset/
Colab Notebook:
https://colab.research.google.com/github/roboflow-ai/notebooks/blob/main/notebooks/train-yolov4-tiny-object-detection-on-custom-data.ipynb
What is MaP?
https://www.youtube.com/watch?v=oqXDdxF_Wuw
Watch on YouTube ↗
(saves to browser)
Sign in to unlock AI tutor explanation · ⚡30
Playlist
Uploads from Roboflow · Roboflow · 27 of 60
1
 2
2
 3
3
 4
4
 5
5
 6
6
 7
7
 8
8
 9
9
 10
10
 11
11
 12
12
 13
13
 14
14
 15
15
 16
16
 17
17
 18
18
 19
19
 20
20
 21
21
 22
22
 23
23
 24
24
 25
25
 26
26
 ▶
▶
 28
28
 29
29
 30
30
 31
31
 32
32
 33
33
 34
34
 35
35
 36
36
 37
37
 38
38
 39
39
 40
40
 41
41
 42
42
 43
43
 44
44
 45
45
 46
46
 47
47
 48
48
 49
49
 50
50
 51
51
 52
52
 53
53
 54
54
 55
55
 56
56
 57
57
 58
58
 59
59
 60
60

YOLOv3 PyTorch Notebook Tutorial
Roboflow
How to Train YOLOv4 on a Custom Dataset (PyTorch)
Roboflow
How to Train YOLOv5 on a Custom Dataset
Roboflow
How to Use the Roboflow Dataset Health Check
Roboflow
What is Mean Average Precision (mAP)?
Roboflow
How to Use the Roboflow Model Library
Roboflow
How to Train EfficientDet in TensorFlow 2 Object Detection
Roboflow
How to Train YOLO v4 Tiny (Darknet) on a Custom Dataset
Roboflow
Ask the Roboflow Team Anything - Episode 1
Roboflow
Exploring The COCO Dataset
Roboflow
Community Spotlight: Improving Uno with Computer Vision
Roboflow
Mosaic Data Augmentation - Deep Dive
Roboflow
Hands on with the OAK-1
Roboflow
Glenn Jocher: What is New in YOLO v5?
Roboflow
How to Use Amazon Rekognition Custom Labels and Roboflow to Build an Object Detection Model
Roboflow
An Interview with Brandon Gilles, Luxonis Founder and OAK Chief Architect
Roboflow
How to Train a Custom Mobile Object Detection Model (with YOLOv4 Tiny and TensorFlow Lite)
Roboflow
Tackling the Small Object Problem in Object Detection
Roboflow
Fast.ai v2 Released - What's New?
Roboflow
Teaser: Roboflow Train (1-Click Computer Vision AutoML)
Roboflow
How to Train a Custom Resnet34 Image Classification Model
Roboflow
How to Label Images for Object Detection with CVAT
Roboflow
Deploy YOLOv5 to Jetson Xavier NX at 30 FPS
Roboflow
Elisha Odemakinde Hosts Roboflow ML Engineer, Jacob Solawetz
Roboflow
Getting Started with VoTT - Computer Vision Annotation
Roboflow
How to Manage Classes in Object Detection (Rename, Combine, Balance)
Roboflow
How to Train YOLOv4 on a Custom Dataset in Darknet
Roboflow
Is Grayscale a Preprocessing or Augmentation Step in Computer Vision?
Roboflow
Getting Started with Image Data Augmentation
Roboflow
Glenn Jocher: Image Augmentation in YOLO v5 and Beyond
Roboflow
GA Hosts Roboflow - Healthcare and AI
Roboflow
How do self driving cars know when to stop?
Roboflow
What is PASCAL VOC XML?
Roboflow
AutoML Showdown: Google vs Amazon vs Microsoft
Roboflow
How is computer vision changing manufacturing?
Roboflow
The Alphabet in American Sign Language
Roboflow
Luxonis OAK-D: Computer Vision on Device
Roboflow
How to Train a Custom Faster R-CNN Model with Facebook AI's Detectron2 | Use Your Own Dataset
Roboflow
TensorFlow vs PyTorch: Fireside
Roboflow
Occlusion Techniques in Computer Vision
Roboflow
A Customizable Web Application for Your Computer Vision Model
Roboflow
Model Tradeoffs and the Future of Computer Vision
Roboflow
Designing an Augmented Reality Board Game App
Roboflow
YOLOv4 - Advanced Tactics
Roboflow
How to Use CreateML and Build a Computer Vision iPhone App | AR Object Detection
Roboflow
Fireside Chat: Computer Vision in Agriculture
Roboflow
Scaled-YOLOv4 Tops EfficientDet: Research Rundown
Roboflow
What is Image Preprocessing?
Roboflow
Building a Community of Creators with BlkArthouse and Von Deon
Roboflow
How to Train Scaled-YOLOv4 to Detect Custom Objects
Roboflow
Intro to Computer Vision: Fireside
Roboflow
The Best Way to Annotate Images for Object Detection
Roboflow
The Computer Vision Process: Fireside
Roboflow
How to Annotate Images with Your Team Using Roboflow
Roboflow
Introducing the Roboflow Object Count Histogram
Roboflow
How Fast is the M1 at Machine Learning? Benchmarking Apple's M1 and Intel's Chips
Roboflow
CLIP: OpenAI's amazing new zero-shot image classifier
Roboflow
How I hacked my Nest camera to run custom models
Roboflow
Getting Started with the Roboflow Inference API
Roboflow
Transfer Learning in Computer Vision | What, How, Why
Roboflow
Related AI Lessons
⚡
⚡
⚡
⚡
When the Camera Becomes an Exam Proctor: Building an AI-Powered Exam Monitoring System with…
Medium · Python
When the Camera Becomes an Exam Proctor: Building an AI-Powered Exam Monitoring System with…
Medium · Deep Learning
When the Camera Becomes an Exam Proctor: Building an AI-Powered Exam Monitoring System with…
Medium · Cybersecurity
Your Face Is About to Become Your Phone Number
Dev.to AI
🎓
Tutor Explanation