Vision Transformer Quick Guide - Theory and Code in (almost) 15 min
Key Takeaways
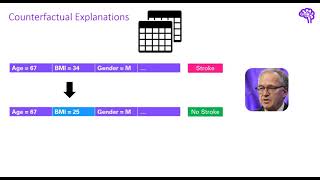
The video provides a quick guide to Vision Transformers, covering the theory and code implementation using PyTorch, and discusses the differences between Vision Transformers and CNNs, as well as the use of knowledge distillation to improve efficiency.
Full Transcript
the theory and code for vision Transformers in 15 minutes this is a quick guide to give you all the details you need to know at the end I also quickly talk about some differences between cnns and vision Transformers let's get started here you can see the Transformer architecture which you might or might not have seen the vision Transformer is simply an extension of the Transformer for image data it's important to note that we will only make use of the left part which is the encoder the right part the decoder is mainly used for sequential generative applications like generating text such as in jet GPT the vision Transformer was presented by Google research in the paper on the left called an image is worth 16 by 16 words this was in 2020 so this video is a bit late to the party but recently was the first time I actually used this model in practice and I thought I make a short summary video about it I applied to Vision Transformer on a medical imaging data set and wanted to compare it against CNN's if you're familiar with the Transformer it's straightforward to understand the vision transform so let's have a look let's quickly zoom into the encoder part again in the first step the inputs are transformed into numeric vectors or embeddings embeddings are amazing because they let you project data into a vector space where similar data is embedded to similar vectors here's a nice example with images of traffic signs that show the alignment in the embedding space on the right in the classical Transformer the inputs are specific tokens that are transformed to embeddings typically these are words how do we get these input embeddings for images in the vision Transformer this is done using image patches this can be understood as transforming an image into a sequence because originally the Transformer was designed for sequence tasks let's see this in action taking this image as an example we first patch it into for example 16 by 16 pixel tiles then we pass each of the patches through the first component of the Transformer encoder which gives us embeddings each of the red bars here represents one of these vectors so what is this block in the Transformer encoder that generates these embeddings in practice it's simply a fully connected neural network this means each of the color values is put into neurons and passed through some linear layers the output is an embedding of course we will implement the simple Vision Transformer from scratch to better understand all of the details if you are in a hurry don't worry there are plenty of libraries that have implemented these models already before we however go ahead and implement this first part let's quickly talk about how we can perform the patching efficiently our input image consists of three color channels red green and blue we also have a specific width and height plus potentially a batch Dimension if we have more than one image so how do we rearrange the image on the top into patches of a specific patch size on the bottom which we will use as input for the Transformer to do this most of the implementations make use of inops which stands for Einstein operations this is a package that lets you rearrange multi-dimensional arrays and tensors in various ways the reshaping can be expressed through the following syntax the different colors indicate the dimensions of our input denser in Brackets you put multiplication of two integer values you can actually see that my visualization is not on point because for example if the patch size is 16 you would reshape to 16 times 16 times 3 which equals a vector of size 768 but this was a bit difficult to visualize this form of rearranging is what you need if you make use of a fully connected layer if you use a conf layer however you can arrange it slightly different and keep the squared patches now let's go ahead and implement this first component okay so this is the notebook and this is mainly based on these four blog posts regarding vision Transformers inopsis usually not installed so we will simply install it here and then here is the data set I Define the compose object which simply transforms all images into the same size and then after that transforms them to tensors and the images look like this the data set is this Oxford pet data set and it consists of different pets and has 37 classes and we don't have too many data points and all the patching and this is mainly based on one of the implementations from above for this we can define a pytorch module called patch embedding which does exactly this reshaping that I've just described and after that it applies a linear transformation which gives us these embedding vectors and so here is an example we take a sample data point from the data set the original shape is one which is the batch Dimension three color journals and then 144 times 144 and this is after applying the patch embedding transformed into 324 patches and each of them have a dimension of 128 which is the embedding size now let's quickly talk about the CLS token CLS stands for classification here typically at the end of a network you want to gather all of the information into one representation and use it for classification as the Transformer is a sequence to sequence model you will have several outputs at the end so what's the best way to get a single Global representation this brings us to the concept of the CLS token but what exactly is this token as you can see on this overview there are vectors that result from each of the patch images and there's one additional input which is exactly this class token you can see it as a dummy input that is later filled with information gathered from all other inputs initially it's filled with random values and then these values are adjusted so it's a learnable vector eventually it serves as a global feature extractor that represents the entire image and can be used for Downstream tasks to all of the input images a positional embedding is added and this brings us to the next concept like in the traditional Transformer the vision Transformer also makes use of position embeddings the reason for this is that the attention in the Transformer is positioned independent positional embeddings make the model understand where each patch is placed in the original image of course we could just give the patches a number and add this information to the inputs for NLP tasks however it turned out that using play numbers is first of all not very efficient as these numbers could become quite large and secondly that very large numbers might be rare in the training set which makes it difficult to learn this positional information positional embeddings were presented in the attention paper and they have some nice properties instead of numbers they are vectors and what's nice is that the distance between inputs is consistent for different lengths these vectors are constructed as a mix of sine and cosine functions but I won't go into the details in this video in the vision Transformer we have a fixed size number of patches and therefore don't need all of these advantages instead we can simply learn positional vectors to have less inductive biases one more nodes positional embeddings are typically added on top of the input embedding vectors and not concatenated in the implementation the positional embedding is simply a learnable parameter Vector per patch with a specific Dimension like shown here and the pretty much last component of the vision Transformer is the actual Transformer encoder from this image we can see which components need to be implemented namely the multi-head attention block the normalization a feed forward Network and finally residual connections on the left we can see that this block is repeated n times let's quickly go over each of these components multi-head attention is the scale dot product attention mechanism of the Transformer and allows to share information between the different inputs as you can see on this image it has three inputs which are queries keys and values there is a pytor to implementation of the multi-hat attention block so no need to implement this from scratch so this is the implementation of attention as I said we use multi-hat attention from torch and then we have a linear transformation for each of the keys queries and values and our input image simply or or input patch goes through each of them and then we apply attention and return the attention output the normalization Block in the Transformer is layer normalization layer Norm normalizes all inputs in a layer for each individual sample there are several reasons why a layer norm and not the more popular batch Norm is used mainly because Transformers are made for sequences for the normalization we use prenorm which is a module that I found in one of the implementations it simply takes some function which can for example be attention and then apply Slayer Norm just before the function is applied this is a quite useful block because you simply wrap your function in this normalization and then the normalization is applied before you function this one is straightforward it's just a linear layer that takes the attention-weighted vectors as inputs and transforms them for the next layer or output so here we have the linear layer actually we have two of them and in between we have the gaussian arrow linear units which is the activation function that is used and we also have dropouts in between to avoid overfitting finally residual or skip connections are used at different places in the Transformer these connections are mainly to improve the flow of information for example to avoid Vanishing gradients which means that the training signal is lost during back propagation we can now simply block all the components together to get the final version of The Vision Transformer so here's just a residual block and this block works as follows you specify a function and then this function is wrapped and you can add the inputs before and after the function and concatenate or actually add them here okay so this is the full vision Transformer module and as it says here not all of the parameters are like in the original implementation I've left out some dropouts and norms and also have only four layers a smaller image size a different patch size and stuff like that and this is just to simplify my architecture a little bit because then the training will be faster and here we can find the patch embedding we've defined before so this patches and transforms the in input image into these patch vectors and this is then used here in the forward function so the input to that is an image and then we have the position embedding which is a learnable parameter as well as the CLS token which is this dummy token for the global representation which is also learnable and those are both added to the input first of all the CLS token is just an additional token and we repeat it for as many batches as we have so each batch gets one token and then the position embedding is added to each of the of the tokens within one batch image and then the last component is that we pass through all of the Transformer layers and here I make use of the blocks I've defined before so the multi-headed tension is wrapped in a normalization and then we have some residuals around this and then we have the feed forward block which is also wrapped in normalization and again residuals and that's basically it and if we have the architecture on the right now you see that's exactly how one of the Transformer blocks looks like and finally we have the heads so this takes the classification token which is at position 0 here and uses the classification token to perform predictions by passing it through another linear component which we call head here and then we have the outputs which is the output dimension for example the number of classes I think it also makes sense to quickly outline some of the differences between Vision Transformers and the very popular cnns and especially when to use which architecture cnns have a strong inductive bias namely translation in variance this comes from sliding the learnable kernel over the image Vision Transformers on the other hand are like all Transformer models pretty flexible and have no strong bias because of the inductive bias cnns are also less data hungry whereas Vision Transformers need to learn all of the underlying rules of the data one of the commonly reported statements in the literature is that you should stick to cnns if you have viewed data and use the vision Transformer only if you have access to millions of images otherwise cnns will most likely perform better CNN's learn in a hierarchical way through a growing receptive Fields Vision Transformers always have access to all of the components of the image and therefore have a more Global way of learning there is a paper that compares these two models in case you're interested in further details it's called division Transformers see like convolutional neural networks and it's linked below plus there is a blog post on this paper where I found this nice plot and I encourage you to check it out because there many other interesting visualizations of this type finally a nice property of vision Transformers is that they come with baked in interpretability it's possible to visualize the attention weights which results in a so-called attention map that highlights the input regions with the highest influence in the last part of this video I quickly want to talk about some of the extensions that have been developed for the vision Transformer first of all there is the swin Transformer where swin stands for shifted window this architecture can also be found in the native pytorch Library the key component of the swin Transformer is to produce a hierarchical representation this is done by iteratively merging the patches as the network gets deeper another difference is that the attention mechanism is applied in Windows which is more efficient than the global attention here is where the shifted window gets relevance by Shifting the attention window it's also possible to learn information between Windows this is visualized on the image below there are some more details for this architecture and I've linked another blog post below the data efficient image Transformer is another popular variant as mentioned before the vision Transformers are quite data hungry and this model is an attempt to make the architecture more efficient by using knowledge distillation knowledge distillation means that you use another model that teaches the Learned concept to a student model for this date uses an additional distillation token as you can see on this image it is quite similar to the class token but the key difference is that the objective is to predict the label of a teacher model instead of the true label this teacher model is typically a confinet because it teaches the inductive bias to the student as a result the prediction performance on smaller data sets becomes much better if these variants were not enough yet there is a great collection with many other models on GitHub which is linked below as well that's it for this quick introduction I hope this video was packed with useful information and helped you in some way I hope to see you next time have a wonderful day [Music]
Original Description
▬▬ Papers / Resources ▬▬▬
Colab Notebook: https://colab.research.google.com/drive/1P9TPRWsDdqJC6IvOxjG2_3QlgCt59P0w?usp=sharing
ViT paper: https://arxiv.org/abs/2010.11929
Best Transformer intro: https://jalammar.github.io/illustrated-transformer/
CNNs vs ViT: https://arxiv.org/abs/2108.08810
CNNs vs ViT Blog: https://towardsdatascience.com/do-vision-transformers-see-like-convolutional-neural-networks-paper-explained-91b4bd5185c8
Swin Transformer: https://arxiv.org/abs/2103.14030
DeiT: https://arxiv.org/abs/2012.12877
▬▬ Support me if you like 🌟
►Link to this channel: https://bit.ly/3zEqL1W
►Support me on Patreon: https://bit.ly/2Wed242
►Buy me a coffee on Ko-Fi: https://bit.ly/3kJYEdl
►E-Mail: deepfindr@gmail.com
▬▬ Used Music ▬▬▬▬▬▬▬▬▬▬▬
Music from #Uppbeat (free for Creators!):
https://uppbeat.io/t/92elm/jasmine
License code: SMTWRWLNGHZHH0OC
▬▬ Used Icons ▬▬▬▬▬▬▬▬▬▬
All Icons are from flaticon: https://www.flaticon.com/authors/freepik
▬▬ Timestamps ▬▬▬▬▬▬▬▬▬▬▬
00:00 Introduction
00:16 ViT Intro
01:12 Input embeddings
01:50 Image patching
02:54 Einops reshaping
04:13 [CODE] Patching
05:35 CLS Token
06:40 Positional Embeddings
08:09 Transformer Encoder
08:30 Multi-head attention
08:50 [CODE] Multi-head attention
09:12 Layer Norm
09:30 [CODE] Layer Norm
09:55 Feed Forward Head
10:05 Feed Forward Head
10:21 Residuals
10:45 [CODE] final ViT
13:10 CNN vs. ViT
14:45 ViT Variants
▬▬ My equipment 💻
- Microphone: https://amzn.to/3DVqB8H
- Microphone mount: https://amzn.to/3BWUcOJ
- Monitors: https://amzn.to/3G2Jjgr
- Monitor mount: https://amzn.to/3AWGIAY
- Height-adjustable table: https://amzn.to/3aUysXC
- Ergonomic chair: https://amzn.to/3phQg7r
- PC case: https://amzn.to/3jdlI2Y
- GPU: https://amzn.to/3AWyzwy
- Keyboard: https://amzn.to/2XskWHP
- Bluelight filter glasses: https://amzn.to/3pj0fK2
Watch on YouTube ↗
(saves to browser)
Sign in to unlock AI tutor explanation · ⚡30
Playlist
Uploads from DeepFindr · DeepFindr · 50 of 56
1
 2
2
 3
3
 4
4
 5
5
 6
6
 7
7
 8
8
 9
9
 10
10
 11
11
 12
12
 13
13
 14
14
 15
15
 16
16
 17
17
 18
18
 19
19
 20
20
 21
21
 22
22
 23
23
 24
24
 25
25
 26
26
 27
27
 28
28
 29
29
 30
30
 31
31
 32
32
 33
33
 34
34
 35
35
 36
36
 37
37
 38
38
 39
39
 40
40
 41
41
 42
42
 43
43
 44
44
 45
45
 46
46
 47
47
 48
48
 49
49
 ▶
▶
 51
51
 52
52
 53
53
 54
54
 55
55
 56
56
Understanding Graph Neural Networks | Part 1/3 - Introduction
DeepFindr
Understanding Graph Neural Networks | Part 2/3 - GNNs and it's Variants
DeepFindr
Understanding Graph Neural Networks | Part 3/3 - Pytorch Geometric and Molecule Data using RDKit
DeepFindr
Node Classification on Knowledge Graphs using PyTorch Geometric
DeepFindr
Understanding Convolutional Neural Networks | Part 1 / 3 - The Basics
DeepFindr
Understanding Convolutional Neural Networks | Part 2 / 3 - Wonders of the world CNN with PyTorch
DeepFindr
Understanding Convolutional Neural Networks | Part 3 / 3 - Transfer Learning and Explainable AI
DeepFindr
How to use edge features in Graph Neural Networks (and PyTorch Geometric)
DeepFindr
Explainable AI explained! | #1 Introduction
DeepFindr
Explainable AI explained! | #2 By-design interpretable models with Microsofts InterpretML
DeepFindr
Explainable AI explained! | #3 LIME
DeepFindr
Explainable AI explained! | #4 SHAP
DeepFindr
Explainable AI explained! | #5 Counterfactual explanations and adversarial attacks
DeepFindr
Explainable AI explained! | #6 Layerwise Relevance Propagation with MRI data
DeepFindr
Understanding Graph Attention Networks
DeepFindr
GNN Project #1 - Introduction to HIV dataset
DeepFindr
GNN Project #2 - Creating a Custom Dataset in Pytorch Geometric
DeepFindr
GNN Project #3.2 - Graph Transformer
DeepFindr
GNN Project #4.1 - Graph Variational Autoencoders
DeepFindr
GNN Project #4.2 - GVAE Training and Adjacency reconstruction
DeepFindr
GNN Project #4.3 - One-shot molecule generation - Part 1
DeepFindr
GNN Project #4.3 - Code explanation
DeepFindr
Machine Learning Model Deployment with Python (Streamlit + MLflow) | Part 1/2
DeepFindr
Machine Learning Model Deployment with Python (Streamlit + MLflow) | Part 2/2
DeepFindr
How to explain Graph Neural Networks (with XAI)
DeepFindr
Explaining Twitch Predictions with GNNExplainer
DeepFindr
Python Graph Neural Network Libraries (an Overview)
DeepFindr
Friendly Introduction to Temporal Graph Neural Networks (and some Traffic Forecasting)
DeepFindr
Traffic Forecasting with Pytorch Geometric Temporal
DeepFindr
Fraud Detection with Graph Neural Networks
DeepFindr
Fake News Detection using Graphs with Pytorch Geometric
DeepFindr
Recommender Systems using Graph Neural Networks
DeepFindr
How to handle Uncertainty in Deep Learning #1.1
DeepFindr
How to handle Uncertainty in Deep Learning #1.2
DeepFindr
How to handle Uncertainty in Deep Learning #2.1
DeepFindr
How to handle Uncertainty in Deep Learning #2.2
DeepFindr
Converting a Tabular Dataset to a Graph Dataset for GNNs
DeepFindr
Converting a Tabular Dataset to a Temporal Graph Dataset for GNNs
DeepFindr
How to get started with Data Science (Career tracks and advice)
DeepFindr
Causality and (Graph) Neural Networks
DeepFindr
Diffusion models from scratch in PyTorch
DeepFindr
Self-/Unsupervised GNN Training
DeepFindr
Contrastive Learning in PyTorch - Part 1: Introduction
DeepFindr
Contrastive Learning in PyTorch - Part 2: CL on Point Clouds
DeepFindr
State of AI 2022 - My Highlights
DeepFindr
Equivariant Neural Networks | Part 1/3 - Introduction
DeepFindr
Equivariant Neural Networks | Part 2/3 - Generalized CNNs
DeepFindr
Equivariant Neural Networks | Part 3/3 - Transformers and GNNs
DeepFindr
Personalized Image Generation (using Dreambooth) explained!
DeepFindr
Vision Transformer Quick Guide - Theory and Code in (almost) 15 min
DeepFindr
LoRA explained (and a bit about precision and quantization)
DeepFindr
Dimensionality Reduction Techniques | Introduction and Manifold Learning (1/5)
DeepFindr
Principal Component Analysis (PCA) | Dimensionality Reduction Techniques (2/5)
DeepFindr
Multidimensional Scaling (MDS) | Dimensionality Reduction Techniques (3/5)
DeepFindr
t-distributed Stochastic Neighbor Embedding (t-SNE) | Dimensionality Reduction Techniques (4/5)
DeepFindr
Uniform Manifold Approximation and Projection (UMAP) | Dimensionality Reduction Techniques (5/5)
DeepFindr
More on: CV Basics
View skill →


Related AI Lessons
⚡
⚡
⚡
⚡
I Spent Weeks Looking for a Research Gap Before I Realized I Was Searching the Wrong Way
Medium · AI
ICMI 2026 Reviews [D]
Reddit r/MachineLearning
Workshop submission for main conference paper under review [D]
Reddit r/MachineLearning
Kept context-switching between arxiv, OpenReview, GitHub, and HuggingFace for every paper, so I built this. Chrome extension + website with everything inline, plus citation graph + SPECTER2 neighbors. 3M papers, free, feedback welcome [P]
Reddit r/MachineLearning
Chapters (19)
Introduction
0:16
ViT Intro
1:12
Input embeddings
1:50
Image patching
2:54
Einops reshaping
4:13
[CODE] Patching
5:35
CLS Token
6:40
Positional Embeddings
8:09
Transformer Encoder
8:30
Multi-head attention
8:50
[CODE] Multi-head attention
9:12
Layer Norm
9:30
[CODE] Layer Norm
9:55
Feed Forward Head
10:05
Feed Forward Head
10:21
Residuals
10:45
[CODE] final ViT
13:10
CNN vs. ViT
14:45
ViT Variants
🎓
Tutor Explanation
