YOLOv5 + Roboflow Custom Training Tutorial
Key Takeaways
The video demonstrates how to use YOLOv5 with Roboflow for custom training, including seamless integration between Roboflow's annotation and dataset management tools, and active learning with YOLOv5's advanced state-of-the-art object detection model. The tutorial uses tools such as YOLOv5, Roboflow, Google Colab, and Tesla P100 GPU.
Full Transcript
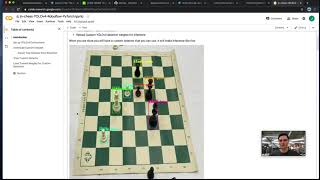
hey everyone this week i'm excited to share the news of roboflow's brand new partnership with yolo v5 now you can use our seamless integration between roboflow's annotation and dataset management tools including active learning with yolo v5's advanced state-of-the-art object detection model in this video we're going to dive in and see just how easy it now is to train your own custom machine learning model with these two tools [Music] [Music] let's first talk about why we're so excited to be partnering with ultralitics and yolo v5 and that is that we believe this is going to support our mission of democratizing computer vision at roboflow it is our strongly held belief that computer vision will transform every industry for the better but in order to do that you have to put it into the hands of every developer and in order to do that you have to make it easier to use yolo b5 is about that same sort of democratization and making computer vision something that anyone can use not just machine learning experts in fact it's already become one of the most popular repositories on github we wrote about all these things in our announcement blog post of this partnership i'll link to this in the comments below and you can read more about what this partnership's all about what it entails how you can get started uh and some some helpful links but the important bit i think is at the end in that yolo v5 is just the first model that we're partnering with we're really excited to support the entire open source ecosystem around computer vision this can't just be about one company or one model if we want computer division to be everywhere it means working together as a community to create a movement around computer vision so stay tuned because this is just the beginning but let's dive into this particular partnership and how you can get started using it to train your own computer vision models to get started just go to the yolo v5 github repo which i'll post a link to in the description below while you're down there why not take a second to like this video and subscribe to our youtube channel to get more great computer vision content once you're on the repo scroll down to the tutorial section and use the train custom data tutorial from here you can either scroll through and learn about what we're about to do or just dive right in by clicking on the yolo v5 custom training notebook at the top of the file this opens a colab notebook which is google's hosted jupyter notebook platform that gives you free gpus to use and an interactive code editor so the first thing that you want to do is go to file and then save a copy and drive this will copy the open source notebook onto your own google drive so that changes you make will be able to be used by yourself later and be stored inside of your own google drive privately so i'll go ahead and name this youtube tutorial yolo v5 in my own google drive now i can scroll down to this gray code cell and when i hit shift enter it's going to go ahead and run the code in that cell so this is going to clone the yolo v5 repo it's going to install the requirements and then it's going to print out information about the environment like i said google is going to give us a free gpu to use here and this is how we can learn what type of gpu they gave us so here we can see they assigned us a tesla p100 gpu with 16 gigabytes of video ram and that's going to be more than adequate to train this custom yolo v5 model next we're going to jump into roboflow to set up our data set there's a few steps to this but i'll walk you through all of them you just need to click this link to kick you into roboflow and get walked through the entire process so this knows that we came through the yolo v5 tutorial so it's going to tell us what we're about to do first we're going to upload our data set to a new project in a public workspace then we're going to label any unannotated images and finally we're going to copy and paste a snippet back into the notebook so if i go back to that other tab i can see that there's a cell here that has some commented out stuff that says your api key here your project here your version here and what verbal flow is going to do is give us a snippet with those things filled in that we can paste back to the other side roboflow is going to host our data set for us so that our jupyter notebook can access it roboflow is completely free for public projects so that means if you're willing to share your data back publicly with the community you can use all of our most advanced features completely for free this is subsidized by business users who need to keep your their data private who have to pay for the service but for the sake of this tutorial you need to select a public workspace so that we'll be able to use all the advanced features that we're going to try so once i select public i can then come into my project and i'm going to upload new images to get started i just create a new project i'm going to create an object detection project called chess pieces because that's what we're going to train a model to identify so here i'm going to say that the thing that we're annotating our pieces and i'm going to leave the other settings like the license the same once i create the project i'll be able to add images and optionally annotations if they have them so if i just upload my images here i can use roboflow to label them but if i already have a data set meaning that i've labeled with another tool or i've gotten this data set from another source i might already have some annotations so here i have annotations of chess pieces in voc xml format that describe where the pieces are and i'll go ahead and drop those into the project as well which will annotate them and then we'll use roboflow to convert them for the proper format for yellow v5 so once i've dropped in all of my images and optionally my annotations i just click finish uploading and it'll ask me whether i want to add them to my training validation or testing set if you don't know what this means usually the default is the right option to use and this will put them mostly in the training set but reserve some for your validation and testing sets if you need to know more about this we have some great content which i will also link to below once i click continue this will upload the images to my account and it'll take me to the annotation view so if you noticed one of those images that i uploaded didn't yet have an annotation uh here if i click on it i can see that it has a white bishop that i need to label i'll show you how the other images were labeled in just a second but here i just come in and i click white bishop which it knew was one of the classes because it detected it from the other annotations that i uploaded and then i'm done now all my images are annotated so if i go into my training validation or testing set i can see all of the images there if i blow them up i can see how they're labeled so these came from the xml file and it shows that each board has all of the pieces labeled on it now i'll go ahead and click generate a new version so this creates a point in time snapshot of my project that i can use for training a model in this case we're going to use that snapshot to train yolo v5 i'll go ahead and leave all these settings the same it's a best practice to leave auto orient on and resize stretch 2 on you might want to change the size though this is what we'll use for the size of the model yolo v5 can work with 416x416 or 620x620 or bigger and bigger sizes as well the trade-off is the time and memory usage while you're training we'll leave all of the augmentations off for yellow v5 but you might want to experiment with them on your own this will let you modify each image to give your model more training data to go off of but for yolo v5 it's often not necessary because they actually do those as part of the training process some other models really benefit from added augmentations though so i'll go ahead and click generate and what this is going to do is it's going to export those images in the right format to use so i'll just call this version tutorial and then i can click export so these images have now been hosted and they're ready to use and i just need to tell it what format i need and so for yellow v5 i click yolo v5 and show download code so this is going to go ahead and zip them up for me for use in my particular collab notebook and give me the snippet that i need to paste back so if i just go ahead and copy this here and it blinks out my api key but it's actually behind there when you copy paste which we'll see that in a second and i'll revoke my key afterwards once i go back into my notebook i just find this cell with the commented out area where i'm supposed to copy paste my stuff back in i paste in my code snippet from roboflow which references my account this project we just created and the format we exported it in and it downloads it into this notebook because roboflow is hosting this for us so if i go into my data sets folder of my jupyter notebook over here i now see that i have a chess pieces folder which has a trained valid and test set and inside of those are my processed images and my annotations now in yellow v5 format so if i open that up that's now a text file instead the xml that i started with and it has them all formatted properly for what are training script is going to expect that's the only thing that i need to change in this notebook in order for it to train so if i come down here and i run my train dot pi um with the default settings and again you might need to update this input size of the model to match what you resize them to it'll download the weights and it'll kick off training um we can see here that uh this is processing all my images and now we're off to the races so i'll let this run for a little bit and come back and in a few minutes we'll see how our model did with only um about 12 images to train off of it's going to be pretty uh overfitting pretty hard but we'll see what we can do with just this few number of images and we'll visualize our results in just a moment all right we're back and maybe i didn't even need to pause the video at all because training only took about two minutes remember we only uploaded 12 images and we only ran through those images 149 times each so that means there wasn't really much for the gpu to do and not much for the model to learn off of that's reflected in this pretty poor score of seven percent mean average precision you should get a much higher score with a better data set but in terms of showing you how the custom training process works with roboflow this is enough to suffice but in fact you will want to gather much more than one example per class like we had on some of our data set but let's scroll down and see how we can use these trained results below so if we use detect.pi this will run our saved weights on our test images and then we'll be able to visualize them so here i will go ahead and visualize our results so you can see it's predicting pieces looks like it's predicting too many pieces on this one test image which is all that we have um but it predicted something nonetheless you can see that it's got some boxes around individual pieces so that's all there is to it um you can train a model now with roboflow and yellow v5 by just copy and pasting one code snippet into a jupyter notebook uh if you train something cool let us know and if you don't have a data set yet and want to find one to use you can just go to universe.roboflow.com and as i mentioned earlier everyone who's willing to contribute their data set back into the into the public domain uh to help the community is uh sharing their data set on a robofull universe so you can use these as inspiration for projects to try or as the starting point for your own model happy training and really excited to see what you come up with
Original Description
Roboflow has partnered with Ultralytics to streamlining YOLOv5 on your custom dataset. With a single code snippet you can use Roboflow to manage, label, and host your datasets for use with your custom YOLOv5 model.
Resources:
📢 Announcement: https://blog.roboflow.com/yolov5-partnership/
🧑💻 YOLOv5 Repo: https://github.com/ultralytics/yolov5
📓 Custom Training Tutorial and Notebook: https://colab.research.google.com/github/roboflow-ai/notebooks/blob/main/notebooks/train-yolov5-object-detection-on-custom-data.ipynb
🖖 Train/Test Split: https://blog.roboflow.com/train-test-split/
💻 Project Templates: https://roboflow.com/templates
📓 Learn more about YOLOv5 and other Computer Vision models with Roboflow Notebooks: https://github.com/roboflow-ai/notebooks
00:00 - 2:03 Partnership Intro
2:04 - 3:38 Tutorial Intro
3:49 - 9:24 Prepping Our Dataset
9:25 - 11:16 Training
11:17 - 11:58 Trying Our Model
11:58 - 12:30 Free Datasets
Watch on YouTube ↗
(saves to browser)
Sign in to unlock AI tutor explanation · ⚡30
Playlist
Uploads from Roboflow · Roboflow · 0 of 60
← Previous
Next →
1
 2
2
 3
3
 4
4
 5
5
 6
6
 7
7
 8
8
 9
9
 10
10
 11
11
 12
12
 13
13
 14
14
 15
15
 16
16
 17
17
 18
18
 19
19
 20
20
 21
21
 22
22
 23
23
 24
24
 25
25
 26
26
 27
27
 28
28
 29
29
 30
30
 31
31
 32
32
 33
33
 34
34
 35
35
 36
36
 37
37
 38
38
 39
39
 40
40
 41
41
 42
42
 43
43
 44
44
 45
45
 46
46
 47
47
 48
48
 49
49
 50
50
 51
51
 52
52
 53
53
 54
54
 55
55
 56
56
 57
57
 58
58
 59
59
 60
60

YOLOv3 PyTorch Notebook Tutorial
Roboflow
How to Train YOLOv4 on a Custom Dataset (PyTorch)
Roboflow
How to Train YOLOv5 on a Custom Dataset
Roboflow
How to Use the Roboflow Dataset Health Check
Roboflow
What is Mean Average Precision (mAP)?
Roboflow
How to Use the Roboflow Model Library
Roboflow
How to Train EfficientDet in TensorFlow 2 Object Detection
Roboflow
How to Train YOLO v4 Tiny (Darknet) on a Custom Dataset
Roboflow
Ask the Roboflow Team Anything - Episode 1
Roboflow
Exploring The COCO Dataset
Roboflow
Community Spotlight: Improving Uno with Computer Vision
Roboflow
Mosaic Data Augmentation - Deep Dive
Roboflow
Hands on with the OAK-1
Roboflow
Glenn Jocher: What is New in YOLO v5?
Roboflow
How to Use Amazon Rekognition Custom Labels and Roboflow to Build an Object Detection Model
Roboflow
An Interview with Brandon Gilles, Luxonis Founder and OAK Chief Architect
Roboflow
How to Train a Custom Mobile Object Detection Model (with YOLOv4 Tiny and TensorFlow Lite)
Roboflow
Tackling the Small Object Problem in Object Detection
Roboflow
Fast.ai v2 Released - What's New?
Roboflow
Teaser: Roboflow Train (1-Click Computer Vision AutoML)
Roboflow
How to Train a Custom Resnet34 Image Classification Model
Roboflow
How to Label Images for Object Detection with CVAT
Roboflow
Deploy YOLOv5 to Jetson Xavier NX at 30 FPS
Roboflow
Elisha Odemakinde Hosts Roboflow ML Engineer, Jacob Solawetz
Roboflow
Getting Started with VoTT - Computer Vision Annotation
Roboflow
How to Manage Classes in Object Detection (Rename, Combine, Balance)
Roboflow
How to Train YOLOv4 on a Custom Dataset in Darknet
Roboflow
Is Grayscale a Preprocessing or Augmentation Step in Computer Vision?
Roboflow
Getting Started with Image Data Augmentation
Roboflow
Glenn Jocher: Image Augmentation in YOLO v5 and Beyond
Roboflow
GA Hosts Roboflow - Healthcare and AI
Roboflow
How do self driving cars know when to stop?
Roboflow
What is PASCAL VOC XML?
Roboflow
AutoML Showdown: Google vs Amazon vs Microsoft
Roboflow
How is computer vision changing manufacturing?
Roboflow
The Alphabet in American Sign Language
Roboflow
Luxonis OAK-D: Computer Vision on Device
Roboflow
How to Train a Custom Faster R-CNN Model with Facebook AI's Detectron2 | Use Your Own Dataset
Roboflow
TensorFlow vs PyTorch: Fireside
Roboflow
Occlusion Techniques in Computer Vision
Roboflow
A Customizable Web Application for Your Computer Vision Model
Roboflow
Model Tradeoffs and the Future of Computer Vision
Roboflow
Designing an Augmented Reality Board Game App
Roboflow
YOLOv4 - Advanced Tactics
Roboflow
How to Use CreateML and Build a Computer Vision iPhone App | AR Object Detection
Roboflow
Fireside Chat: Computer Vision in Agriculture
Roboflow
Scaled-YOLOv4 Tops EfficientDet: Research Rundown
Roboflow
What is Image Preprocessing?
Roboflow
Building a Community of Creators with BlkArthouse and Von Deon
Roboflow
How to Train Scaled-YOLOv4 to Detect Custom Objects
Roboflow
Intro to Computer Vision: Fireside
Roboflow
The Best Way to Annotate Images for Object Detection
Roboflow
The Computer Vision Process: Fireside
Roboflow
How to Annotate Images with Your Team Using Roboflow
Roboflow
Introducing the Roboflow Object Count Histogram
Roboflow
How Fast is the M1 at Machine Learning? Benchmarking Apple's M1 and Intel's Chips
Roboflow
CLIP: OpenAI's amazing new zero-shot image classifier
Roboflow
How I hacked my Nest camera to run custom models
Roboflow
Getting Started with the Roboflow Inference API
Roboflow
Transfer Learning in Computer Vision | What, How, Why
Roboflow
More on: CV Basics
View skill →






Related Reads
📰
📰
📰
📰
How to Self-Host Nextcloud: A Complete Setup Guide
Dev.to · stack_versus
Is OneOpen Annotator a Practical Free Alternative to Roboflow?
Medium · Machine Learning
How Vision AI Is Transforming Industrial Operations with Existing Cameras
Medium · Machine Learning
Agentic vision: Building visual intelligence with Amazon Bedrock and MCP servers
AWS Machine Learning
Chapters (6)
2:03 Partnership Intro
2:04
3:38 Tutorial Intro
3:49
9:24 Prepping Our Dataset
9:25
11:16 Training
11:17
11:58 Trying Our Model
11:58
12:30 Free Datasets
🎓
Tutor Explanation
 DeepCamp AI