How To Create An Amazing eCommerce Website with Wordpress - 2017 | FREE Theme
Skills:
Tool Use & Function Calling70%
Key Takeaways
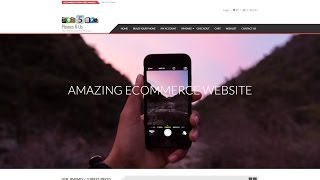
This video tutorial demonstrates how to create an e-commerce website using WordPress and the Optimizer WordPress theme, with features such as WooCommerce plugin installation, product management, and website customization.
Full Transcript
Welcome, welcome. Today I'm going to be teaching you how to make this amazing e-commerce website absolutely free with no knowledge of coding or anything required. No experience, nothing. As you can see, it's a fruit website. All fruit 50% off. Have our fruit yummy. Our description, it was $9.30. Now it's just 93. That's simply stunning. We can click on this and see that we have a description of it. We can add it to the cart. Fruit yummy has been added to your cart. And we can go ahead and scroll down and see our product description. And also, this is a great feature I've added. What you may also like, so if they're going to buy this, we also want to be, you know, encourage them to buy something else in a similar product. And companies like Amazon have started to do this. If we go to amazon.com and we click any item, they're going to do this to us. So, I'm going to go ahead and scroll down and right here, frequently bought together. So, basically, if this is working for Amazon, we kind of want that on our website, too. All right, let's go ahead and scroll back back again. Keep scrolling down. And we have our divider right here. This sort of brings feel this. I mean, it brings like flavor and content to your website. You want to let them know what you're about. So, obviously, we're about fruit. It gives a sort of flavor to our website. And this is about us. So, all fruits handpicked from Mexico. As you can see, it looks very well. And this is our highlight area where we want our our best products or our products for sale on. So, orange is from Africa, Kiwis from Mexico, avocados from Berlin. And let's go ahead and keep scrolling down. And now we have our widgets area where we include our map, our Facebook like box, our subscriptions, and our follow us. And of course, this is our header. And we have all of our pages up here. Our home shop, checkout cart. You can go visit our shop page. Now, you can see we have all of our items listed right here. And it looks amazing. Of course, I don't have a lot of products up there because I'm just doing this for tutorial reasons, but you can add thousands. Uh, if you do have thousands, I feel bad. It's going be a lot of work, but don't worry. Once it's done, it's done. You'll get there. Okay, great. So, let's go ahead and get started. First, let's go on over to HostGator. and we want to go to hostgator.com and we want to go ahead and click on get started now. All right, great. So, we have three plans right now. We have the hatchling plan, the baby plan, and the business plan. I always recommend the baby plan because with the baby plan, you can get unlimited domains rather than just one domain. So, let's go ahead and click on sign up now. All right. So, this is where you're going to enter in your domain. So, if it's uh deliciousfruits.com or if it's the most amazing delicious fruits ever.com, you're going to enter it here. Now, I'm I have this ritual in my videos. I'm going to see if this is taken or not. I love Kylo Ren. Let's go ahead and see if this domain is taken not. It's still available. I've made a few videos and it's still available. Maybe we'll see how long this goes. Okay. I love Kylo Ren. All right. Now, we want to go ahead and scroll down or we can just do other callerclub.com. Something like that. We go ahead and scroll down. Now, we don't want these privacy protections. Make sure to uncheck these. We want the baby plan. And it's up to you if you want to do monthtomonth, if you want to pay every three months, every six months. It's strictly up to you. For this video, I'm just going to do one month. And here you're going to enter in your username. I'm going to do Han Solo 999. And our security pin, you're going to enter in a small password. So, if you have issues or something, you're going to call HostGator and give them that security pin. This right here is your email. You're going to enter and you're you need to confirm it because you're going to get some very important documentation in there, which includes a um username and password for your C panel. and you're going to enter in your first name, your last name, and over here on this side, you're going to enter in your credit card information. And if you use PayPal, you can just click on PayPal and pay with PayPal on the next page. So, let's go ahead and keep scrolling down. Now, for additional services, I don't recommend any of these because a lot of uh these features WordPress can do by itself. So, it's a little bit unnecessary. Let's go ahead and uncheck these boxes. Okay, let's keep scrolling down and we're coming to our total right here. So, as you can see, oop, I added one too many right here. Okay. Well, I'll just go ahead and uncheck that one right there. Okay. So, let's go back down back to where we were. And I have a better coupon code than this. So we can see right here I have a coupon called called quick feeb 30. You can see the price here goes from 26 and it drops down quite a bit. So that's another way to save money and keep scrolling down. And once you're done with all this information you can go ahead and click on I have read and then click on checkout. And once you click on checkout, you'll be brought to Hold on, let me get there for you guys really quick. That's is why I love Last Pass. I just everything goes in automatic. It's simply amazing. So once you put your checkout right here, you'll be brought to this page and it'll say, "Congratulations. Welcome to HostGator." And you're going to be entered into the HostGator family. Congratulations. You are now part of the team, part of the family. And before we go to any of this stuff right here, you want to check your email because they're going to send you your C panel information. So, let's go ahead and do that. You're going to go to your email. This is mine. And it'll either be from sales, it'll be from no reply, it'll be from, you know, domain at HostGator, whatever it's from. Go ahead and open it. And you'll get an email sort of like this where it'll say your username, the domain you purchased, and the password. So this is not your HostGator account. It's your basic C panel account. So now you have two passwords. Okay. So once you're here, you're going to go ahead and click on this link. And this will take you to your control panel. And once you've entered in this information, your username and your password. So your username and your password, then you're going to go ahead and click log in. All right, great. We've successfully been logged in into the control panel. So before we begin, let's go ahead and take a look at our progress. So we got hosting done. Got our domain done. Now we're going to install WordPress and then we're going to create our website. Sounds good, right? Let's go ahead and do that. So, let's go on down right here. You have a bunch of options. I know it looks a little overwhelming. Don't worry, it's nothing crazy. It's it's all ads and stuff like that. We're going to go ahead and scroll down. Keep scrolling. Now, you see where it says software and services right here, and it says quick install. We're going to go ahead and click on quick install. All right, great. So, at this page, we want to go ahead and install WordPress. This is basically what we use to create the website. It's very simple. Anybody can use it. No knowledge of coding. So, go ahead and click on install WordPress. And we want to go ahead and install WordPress for free. These are all crazy. Yeah, we don't want to do that. Let's just go ahead and install WordPress for free. Okay, great. Now, we're at this section right here, and we want to go ahead and click right here, and we need to find the website where we registered. And I have a lot, as you can tell. So, I'm just going to grab Han Solo Fan uh right here. Do not put anything or else it's going to install hanolofan.com dash onto that. And you don't want that because that will look awful. So, make sure this is blank. Now, enter in your email, your blog title, and put howdy admin user Daryl. You know what? No, I'm Han. I'm Han. Han. Yeah, Han Solo. Han Solo. Yeah, there we go. Okay. So, then you're going to enter your first name and your last name. Once you're finished, click on install WordPress. Click on no thanks. I'm a web designer. I know they always do that. Okay, great. So, it says up here, your install is complete. Click here to view your notifications. And right here, you can click this little arrow. And now it says your new username, which is Han Solo 03, and your password. So, this is for WordPress. This is not for your cPanel. This is not for HostGator. This is for logging in on your WordPress. Now, where it says admin area, if you click on this and it goes to some random website or goes to some empty page, just be patient and wait. Maybe maybe wait one or two hours or even three hours because sometimes it takes that long. So, I'm going to go ahead and click on this. All right, welcome back. I had to wait maybe an hour and a half, two hours, and it's done. Now, we're going to enter our username and our password from the previous page. And let's say you close that page. Let's say you don't know where it is. You can go to your email and inside of your email, you'll get an email like this from WordPress. And they'll go ahead and tell you of your username and password. Okay? So, just go ahead and enter that here. I'm going to click on remember me. And I have my uh Last Pass extension. It's an amazing program. I recommend everybody get it. It saves all the passwords so you never ever have to remember a password. Anyways, it's amazing. Okay, so before we begin, let's take a look at our progress. We've installed WordPress. Done. Congratulations. So, last we need to do is create our amazing website that we saw. So, first let's go to our users and let's just go ahead and change that crazy password that we had. So, you're going to go on users and click on your user. Uh, if you want, you can change the theme of this. I'll do blue this time. I think last time I did red. I think I'm gonna do blue this time. And once you're done, go ahead and scroll down. Scroll down. And you see where it says new, new password. Go ahead and click on generate password and enter something in. So, I'm going to do um Han Solo 99. And it considers it a weak password. That's fine. confirm the weak use of password and then I'm going to go ahead and click on update profile. So now my password's changed and my app LastPass wants to remember this because it knows I changed it. Sure, why not? Okay, great. So once we're done, we need to do the most important thing, but let's go visit our website first. All right, it looks ultimately boring and terrible. Let's go ahead and change this, shall we? Let's go ahead and do it. So, let's go back to our dashboard and under appearance, we want to go to themes. And I spend hours looking for themes, guys. I really do my research and I always look for new talents. I try to look for new people uh creating new themes by going to latest. However, we're going to install something that's very popular and very well known. And I only want the best. I always only want the best. So, under popular right here, I want to go ahead and install a theme called the optimizer. So, the opt Let's go see if it just shows up like this. The optim. Let's give it time. The optimizer. Here it is right here. Sorry, my internet's uh pretty slow today. I don't know why. So, it's called optimizer. We want to install optimizer right here. So you guys can see optimizer and it's very high rated. Uh everyone's rating it has more than 100 reviews on it. And let's just go ahead and click install. And once we've done that, you want to click on activate. All right. Now let's go ahead and take a look at our website. So go back up here where it says howdy and click on visit site. And now this is our new website. And as you can see, it looks a little better, but still has a lot of work to be done. Okay, great. Now, a little research about this theme right here, Optimizer WordPress theme. If you guys ever need some sort of um help or anything with this theme at all, you can just go to um WordPress.org. And as you can see, this has 20,000 plus in active installs and it's very highly rated. And if you ever need help, if you want to change something because the thing with WordPress, you're going to probably run into some errors and it's very frustrating when you do because you don't know how to fix things. So right here, you click on view support form and everybody right here has had issues or something they wanted done specifically and they didn't know how to change. So this is where you would need to go in case that happens. However, we don't need to go there because I'm going to show you how to do everything. So, let's go ahead and go back to our website right here. And now, first what we're going to do is we're going to install some plugins. Now, plugins are something where you add to your website and it gives it feature. It gives it content, gives it something that it usually doesn't have. So, right here under plugins, go to add new. We're going to install a few plugins. So, one is one of the most popular ones we're going to install, and this will allow us to sell things online is the Woo Commerce. The Woo Commerce plugin. As you can see right here, uh it has over 1 million active downloads. So, let's go ahead and click on install now. And we want to activate this plugin. All right, great. So, this is the starter. This is basically introducing us to Woo Commerce. So, let's go ahead and follow through these steps. They say it's optional. However, I do recommend to do this right now. So, let's go and click on let's go. So, the WooCommerce plug-in is going to install our shop page, our cart page, our checkout, and my account page for us. That's fine. Let's go ahead and let it do that. So, right here, we're going to click on click on continue. All right. So, where is your store based? Where are you selling things from? I live in California. I live in Los Angeles. I can just go ahead and type in California. And it comes up right here. United States, California. Click on that. Which currency? I want a dollar. Which weight? If you want to do pounds, grams, ounces, I'm just going to stick to pounds. And units to be used for product dimension, centimeters, millimeters. I'm just going to leave it as just inches. And once I'm done, click on continue. So, shipping tax, will you be will you be shipping products? If yes, do you want to charge tax or no tax? Uh, this part is strictly up to you and however decide you run your business. So, let's put right here. Yes, I'll be charging sales tax. And they actually have um a feature where you can click yes right here and say I live in California. They'll tell you the rate of the tax. Actually, I think it's 9% now. I don't think they've updated this. I don't know. I really don't know. I think it's 9%. Maybe it went down. I don't remember. So, uh you can do this if you'd like. However, right now, we're just going to put um I'm going to go ahead and just uncheck this. We can do this later in our um our plugins page. So once we're done, just click on continue. And do you have a PayPal email address? I do. And mine is going to be drilson 03@mail.com. This will enable it so we can make payments through PayPal. Once you're done right here, go ahead and click on continue. And now it wants us to create our first product. Okay. Go ahead and put allow or no thanks. Basically, Woo Commerce wants um to collect data and usage information to help them. It's strictly up to you. I'm going to put no thanks because this is a tutorial video. Uh it says it wants us to create our first product. We're not going to do that yet because we have to install some other plugins. So, I want to go return to the WordPress dashboard. All right, great. So, now let's go back to our plugins and let's go click on add new. All right. Right here, we're going to enter Facebook like box. So, you can see I do a lot of searches on it. And I want to go ahead and install this one right here with 100,000 downloads. Click on install now. Once I'm done, I'm going to activate the plugin. All right. Great. So, next we're going to install another one. Click on add new. And this is our contact form 7. And as you can see, it has 1 million active installs. This is basically when someone goes to your contact page, it autofills everything for you, making it very easy for you and making everything look much better than it would be. So once you're done, go and click on install now and activate the plugin. Okay, great. And if you're a Twitter fan or if you want to do a uh you know follow me on Twitter, I recommend doing this plugin. So over here, type in Twitter box. All right. And there's a lot of several ones you can do. Um this one is actually by Twitter itself. So I rather do this one. However, it doesn't look like it has good reviews. But we're just going to go ahead and against our own judgment, we're going to go ahead and do this one instead. Install now. Maybe we'll regret it later. I don't know. I don't use Twitter too much, so we'll see how that works. Go and click on activate plugin. All right, it looks like we're ready to go. So, let's go to our website right here and visit our site and take a quick little synopsis of it. As you can see now on the top right up here, we have cart, check out my account, sample page, and shop. So, we've actually added something to our website already without even knowing it. So, first we want to do is we want to go ahead and add in some products. That's the first thing we're going to do. So, up here, we're going to go click on dashboard. And over on this side under products, we want to click on add product. Now, Woo Commerce is actually very helpful. They're going to go ahead and run us through everything pretty much. So, over here, we want to put our product name. So, I'm going to sell uh kiwis or kiwi fruit. Next, if you have a short little you want to talk about it or something about your product, you want to go ahead and put it over here. For example, if you sell furniture and it's leather or something like that, or if you sell computers and it is a amazing i7 with a water cooler installed, then you want to put that over here. So, I'm going to go ahead and just put in some dummy text like I always do. So, dummy text generator, and I'm going to go ahead and put this in right here. I'm just going to go ahead and just uh Yeah. All right. So next, if you scroll down, we have this product data right here. We have simple product, group product, variable product, external affiliate product. So we want to install a simple product. And is your product virtual or is it downloadable? In our case, it's not because we're selling fruit. So I'm not going to check marks those. If you do check mark those, it's going to show something a little different. So now you have different features on the left side. You click uncheck it. Downloadable. And you can go ahead and add your file to this. Spend some time to look over this information. You know, you add your file right here, your file URL. Um, I don't know what you're selling. So, I'm going to go ahead and it is not downloadable. And I just have a basic regular product. So, right here, you're going to enter in your screw number if you have a screw number for your store. If you don't, just don't put anything. So, let's just say our Kiwis are originally $5. However, I want to sell them now for $3. And you can actually set a sale schedule. So, right here you see schedule. You can click on it and you can put the dates from. For example, I wanted on the sale to start on the 22nd and I want it to end on the 23rd. So, basically, when you start this on the 22nd, the sale is going to start. It won't start before that. So, if you're interested in that, that's something to look after. Okay? But for now, I'm just going to go ahead and press cancel because I just want to give these prices right away. Now, on the left side right here, given these tabs right here. So, under inventory, you're going to see if this is in stock or not in stock. If it's not in stock, you're going to put out of stock. If it's in stock, you're going to put in stock. Okay. Next, we have our shipping. So, does this weigh? How much? You want to give your inches, you want to give the width, the height, all that information. If you're selling something very small, I wouldn't really put anything. If you're selling furniture, you might want to enter this information in. Okay. Now, linked products. This is uh very important. As I discussed earlier in the video about Amazon selling uh what you may also want, we're going to add that in here. However, we're going to add in a little later because we don't have any products yet to upsell. Okay. Attributes right here. Uh, we're going to leave this blank. We don't want to add any custom product attributes. Advanced. So, this is purchase note right here. And let's say if they buy something, you're going to automatically sell this to them. You're automatically going to say, "Hey, congratulations on the product. Congrats." And if you're ever um curious to know what these do, you can see this little arrow right here. And the arrow will tell you, "Enter an optional note to send the customer after purchase." So, after they buy it, they're going to get this little purchase note. Okay. All right. So, now let's go back to our general. So, it's it's originally $5, but we're going to go ahead and sell it for $3. And now, another quick um uh thing I want to mention, if you put in nothing here, if you just put in um 00, then it's just going to say read more or it's just going to say like uh it's just going to act like it's a blog or a post. It's not going to act like it's an actual item. Okay. So, under product short description, we're going to say the kiwis are so delicious and amazing. Okay, now that we entered this in, um, we want to set our product image. We want to be able to show people what this looks like. So, under set product image, you're going to click this and you're going to go ahead and upload your file. So, basically the picture of the kiwi or whatever picture that you want, you're going to upload it. I have a lot that I already made that are already uh sort of for this. So, I'm going to go ahead and upload all of them. You're going to enter your images um just like this. So, right now, as you can see, very slowly, we're entering our product images. Now, you want to take your own pictures when you do this because if you're selling something online and if this product, if that image is not yours, um you could get a little slap on the wrist for it. But I just would be safe and just make sure you take your own pictures for your own products and your own images. You don't want to really take pictures from another website and then try to upsell them because then you're kind of stealing their products. And I mean, if since you're selling something, it's kind of an issue. But if you're not, like if it's just a blog, eh, you know, it's not really a big issue. It's not a big deal. All right, so we've uploaded all of our products and now we can see that I talked about kiwis. So I want to upload this picture as a kiwi. So se product image. All right, so it looks like uh Twitter. I don't want to tweet this. No, not really. All right, so it looks like we're ready to go. I've published my first item. I'm going to go ahead and click on publish. All right. And now we can go ahead and we're going to close these really quick. I want to go ahead and click on preview changes. All right. There is our first product. Congratulations. We are on our way to sell a bunch of items and make money. So, as we can see right here, a product description. I put the dummy text. And then below that, I talked about the kiwis are so delicious and amazing. It's important to know where um where the font will show because I entered in the dummy text in the beginning and that's going to show up on the product description. Okay. And also since we made it on sale, it says right here sale. And you can pin it, you can do, you know, Twitter it, whatever you want to do. And the $5 is crossed out and now the $3 is showing. Okay, so that's our first product. Congratulations. I want to make a total of six products for this tutorial just to sort of give the website content. I know your website might have thousands or uh 10 or 20. I just got done with a furniture store and they had probably 10,000 items. So, this took a lot of time. So, if you want to enter in a new product, click on this right here, add product. And now we're given another product to put in. So, as you can see right now, you're just going to go through and enter in all of your products and make sure everything looks good. So, I'm going to go ahead and just cherries. I'm going to go ahead and enter in some uh products right here. I'm going to put $3 on sale for $1. Delicious cherries. Okay. And I'm going to go ahead and set the product image. Actually, I'm going to do raspberries. Let's do raspberry. Okay. And I'm going to publish this. All right. So, now I'm going to enter in a new one. So that was number two. Avocados and I'm just going to say hold on silver three now one and delicious or amazing Mexican avocado. I mean are they I don't are those from Mexico? I don't even know. I I I I don't know. I don't know. Let's see right here. All right. So that's number three. Click on add product again. We'll go and close this. I have a little error with the plugins. Okay. And let's go ahead and enter in um Mexican fruits and just go ahead and add this in on sale for three. Now it's $1. Um the best. And then I'm going to go ahead and set product image. Uh let's put these mangoes up there. They look delicious. Okay. All right. So, we're now on number five. Add product and then enter this in. This is probably the hardest part about running an e-commerce is actually putting up your um your products on the first time because it does get a little tedious and you have to do it and it's sort of annoying, but once you're done with it, it's um it's very rewarding. And um thank god for auto correct. As we can see I'm not good at typing. All right. Now we're on the last one finally I think. Right. Yeah I think that's our last one. All right. So last one. Do oranges. And then I'm going to enter this on sale for let's just say $100 and now it's on sale for 10. What a deal, right? Yeah. Oranges are so good for you. All right, set product image. Publish this. All right, so we added in our products. Great. I have six products to sell now. So now it looks like we're ready to do some work. I'm going to click on visit site. And I want my products to be on this front page right here. But I also want it to be on our shopping page. So if we go to our shop right here, I want them to be there, too. So as you can see, we have six products now. And it looks very good. And they're all on sale right here. And you can simply purchase these by clicking add to cart. Add to cart. Done. It's that simple. Add to cart. Add to cart. Add to cart. We want to make it as easy and user friendly as possible. So if I click on view cart now, there you go. All the products are in there. We can see our Mexican fruit, our kiwis, our avocados, and our super fruits. And also we can add in coupons later. And you just go to proceed to checkout. But before we do this, I want to go back and I want to edit our front page and make it look amazing and beautiful. So to do that, we're going to click on customize. Now guys, this theme has a specific own style of customize. It has its own little uh program that does it. It's not like a basic program. They've designed a specific one to uh work with it. Uh I'm going to go ahead and uh No, I don't want I guess start the tour. I don't really have a choice. You're going to have to read through this. Don't worry, we're going to just end the tour. Yeah. So, we want to go on our homepage now. And now we see we have these options right now. And we're just going to go ahead and just scroll down the list. We're just going to go from the top to the bottom. Okay. So, let's go ahead and get started. Now, basic. So, we have our site layout. You can click on this. We want to keep it at full width. I like the full width. It looks good and professional. Basic style. So, the site background color, uh, we can leave it at white or you can change it. Change it to, uh, purple. That doesn't look good. See that? That's part of the background. So, we want to leave it as white to sort of blend in. That looks better. The site background image, we're not going to use a background image here because we're going to have this slider right here full width and we're going to have just white text showing our products. Now, a fixed background image, we're not going to worry about that because we're not adding in a background image. a site content text color. So, we can see we can sort of um you know edit this however you want it. It depends on your theme. Uh if you like a purple and yellow theme, it depends on your website. However, I'm going to leave this black. I want to make sure all my text is visible on this white background. Other text background. I'm going to go ahead and leave this uh blue. This is actually for your search right here. Um all these little like uh these small little uh marks right here. Other text element color. I want to leave this black. I want all of my text black. Later on, you're going to see that it's very difficult to see text when they're white. When you have white backgrounds or something like that. Okay. So, it looks like we finished this section. Now, to go back, just click on basic style. All right. Now, we're going to basic fonts. Now, this is basically how you want your site to look. What theme do you want it to bring? So, I'm selling a fruit store. I have a fruit store which I'm selling products. I wanted to sort of give it a cute theme. You know, I want to make it look more user friendly and I think more women would be on this site than men. So, I want to make it sort of look cute and good. So, we're going to scroll down and I chose a font called The Girl Next Door. This is my font for my for my website. So, you can see it's sort of um it's it's cute. It looks good. Okay. And let's say I want to change this. I want to change it to 20 pixels. So, you see that it's gotten bigger. Now, we can make it even bigger by typing in 30. It's really up to you how big you want it to be. I want it 20 pixels. All right. And now, for our heading menu, which is up here, we're going to also change the font. And I want it the girl next door. All right. And just change this to all subsets all. And I want all of these in uppercase. Yes, I do. So, as you can see now, our menu has changed. Our fonts have all changed. Everywhere you look, it's changed. Correct. Looks good. All right. So, right here, click on basic fonts. And now, site identity. A site icon. So, what is a site icon? A site icon is something you see when you visit a website. on the top left up here. You see this little L on this browser up here and the W for WordPress? That is your site icon. So, whatever you upload, that's what's going to show when someone visits your website. Okay. So, let's go ahead and select the image. And I'm going to go ahead and choose my logo. And it's going to give you a little place to crop as you can see right here. And as you can see on the right side, it shows you a preview with what it's going to look like. So, I want it to look like that. Okay. Crop image. All right. Great. Done. Once we're done here, click on save and publish. Okay. Great. So, we've done our first section. Congratulations. We're getting very close to finishing this website. I know it doesn't look like it now, but trust me, we're getting there. All right. Now, let's go to our header section. Headers are really old and outdated. I don't like headers. It's like putting something above here. It looks bad. I don't know. In the 1990s, they did that. It was a big thing. But I don't know. I don't really do it for any of my websites I make. But we're going to click on header. And we want to leave this as transparent, a transparent header color. Now, we can go ahead and show you what this looks like. So, I click on this little white. And I'm going to click on green now. So, now it's all green. I don't like the way that looks. I want to leave it as white. Now, for a header background color, you can actually change this too. And it's not going to show up on this page. It's going to show up on our other pages. So, for now, go ahead and click on blue. And I'm going to show you what that looks like right now. So, I'm gonna click on save and publish. And now, I'm going to go ahead and click on my account. Let's go to a shop. So, you see this header color right here? That's what I added in. This is the header right here. So, I added in a blue color because my want my theme, I want a sort of white and blue theme. Now I'm going to go back to our page by clicking on howdy. And now let's go ahead and keep working our way down this list. So I'm going to click on header because we finished this header section. Now we're at site sites title and logo. Now for our menu right here, howdy. You're going to put the name of your website. You're going to put whatever you want. So I'm going to enter in greatfruits.com. And for a tagline, I'm not going to put anything. I just want to see grapefruits.com. That looks delicious, right? And for our family right here, I want the growext. That's my font, the one I've decided to choose for everything. Now, you can see the fonts change drastically. And I want to leave this as all. And we want to change the size of this. It's a little too small, right? So, right here, it's at 36 pixels. Let's do 50. Is that good? 60. 80. 80 80 looks good. That looks good. Now it looks pretty big. I like the way that looks. Site title color. We're going to go ahead and leave this as default or we can just change it to white. Black. See that we changed it. But I want to leave it as white. Okay. All right. Good. So now let's go ahead and click on site title and logo again. It's going to close it. And now our menu right here. Our menu right here. We can change the the the font of this right here. I'm sorry, the size. So, we want to make it bigger. Let's say you want to get 20 pixels. But if you make it too big, like 80, it's going to look terrible. See that? So, you want to kind of uh do a trial and error thing right here. You want to see, okay, 22, 23, uh 25. I'm going to go ahead and leave it at 20. And once we're done here, you're just going to go ahead and click on save and publish. And now, we're going to go to our front page right here. Click on front page. And now we're going to do the slider which is the landing page which attracts all the attention and that really determines a lot about your website also like your bounce rate everything like that. So first we have our um our image right here. We want to go ahead and change this image. So right here you're going to click on change image. And you want to make sure you get a big picture. So this one right here is 1920 x 1080. It's a good size picture. You don't want something very small or it's going to look bad. Okay. So, I'm going to go ahead and enter this picture in and click on choose image. All right. So, now you see the picture. It's looks good. And now the website looks good. And if you need help with pictures, you can always go to unsplash.com. And this website is a website where people post amazing HD pictures for free. And you can download them for free. You can simply give them credit or not, however you want to do it. And up here, you can type in food. Maybe you're selling something for food. And as you can see right here, we have some pictures of delicious food. So, this is something that you can do for your website on the background. We got p looks like is that pizza? I don't know that pizza. I don't all sorts of good stuff here. All sorts of good stuff. Okay. So, that's a website you can go to is unsplash.com. All right. Let's go back to our website. And I want to go ahead and edit this content right here. I advanced, strong, reliable. No. So, I'm going to go ahead and click on edit content. Now, I want to change this. I want to do healthy. What should I do in the middle? Healthy. Uh, help me out here. Okay. I'm going to do uh good. Yeah. Good. Ah, that's so boring. Healthy. Healthy. Delicious. Amazing. All right. And also right here, see this little box right here? That's actually the image they gave us stock. So, I'm going to go ahead and take that off. I don't really want that. Okay. And once we're done, you're going to put in uh a tagline right here. Something about your website saying um you know, we are uh here we go. We I'll take it out of caps. Actually, I'll leave it in caps. Why not? We have been selling fresh fruit from the deepest parts of South America since 2000. Okay. Delicious. Okay. All right. Go ahead and click on save and close. And our slide text color. If you want to change this text color, you can do that by tweing that or purple. Okay. Okay, I'm going to go ahead and leave it as white. Now, for our button one and our button two, click on button one. And now it says demo. As you can see, it's not going to say demo for us. We're going to go ahead click on buy now. We're going to make this our buy now button. Or we can do shop now. I don't know what's Shop now. A little bit less aggressive, right? Shop now. For a button link, we're going to come back to this once we make a uh a product that you want to link to. But basically the the button link is when they click on this they're going to go to our shop and they're going to be able to shop. Okay. Now the button style you can change this to however you like it. There's a lot of them they have. So they have the flat, the flat big, the hollow, the rounded, and the rounded big. I like the rounded big. I like the way this looks. So I'm going to go ahead and leave that like that. And um yeah, I think that looks good. For button two, I'm not going to have a button two. I don't want one. I just want one button that they click on it, they go to the shop right away and start shopping. I don't want to distract them. I thought about doing an about us or something like that. It's there's no point to do that. You're going to distract your audience. You want them to buy bye-bye. Okay. So, right here under download, just backspace and under the link, backspace it, too. Now, it's gone. Now we only have one button and you can sort of change this content in this box right here with this option. As we scroll down, slider content box width. Now you can see you can sort of change how you want it to look. Let's just go ahead and leave it at that. And now content box vertical position. If you want to change it, you want to move it up, we can see right here, we can bring it up like that. You bring it down. I'm just going to go ahead and leave it like that. Okay. And you can actually uh left side this, you can center it, however you like to create your business website. Okay. So, I think we're done here. Click on save and publish. And now, let's go ahead and scroll up and click on slider front page widgets. Now, we're going to go ahead and add in a lot of content right here. And we're going to make this look amazing. So, we're going to go ahead and click on front page widgets. And I see this little add a widget. Go and click there. All right. Now, you want to select post widget. All right. So, it says our work. We're not going to this is that's not going to work. We're not going to do that our work with those three things. We're going to make this our product page. So, right here, you want to type in um all products 50% off. summer sale. So, all products 50% off summer sale. And there's different layouts you can choose. Actually, there's only one in four. They want you to buy their pro theme. They they say, "Oh, we can make it look better." Just don't listen to them. We're not going to spend any money uh on their on their theme. However, they are this is an amazing theme. Don't get me wrong. So, right here, just click on layout one post types. Click on this. And now you see where it says products Woo Commerce. You're going to go ahead and click on that. And now we can see that our products are now on this page right here. This looks good. We can go ahead and do layout four. And that's how layout 4 looks. All right. You know what? I'm going to leave it at layout four. And I'm going to go ahead and get rid of this nasty sidebar we have here. We don't need the sidebar. It's uh it's just taking up room for our products. But before we do that, let's keep going down. Number of posts, I want six. The title divider is this right here. You see this little diamond right here? That is your title divider. So, if you want to change it, they have all sorts of little options right here. They have a star. You can add the star. Yeah. Uh no, no, no. I don't. Those lines are ugly. Chevron. What's that? Let's look at that chevron. Okay, I think the I think this was uh good. We're just gonna I'm gonna leave it at that. If it's up to your preference. I like the way that looks. That looks good. It looks clean. Okay. Uh we want this numbered. Post background color, we want to keep that as white. Uh post title section title color, we're going to leave that as black. And you can always like, you know, fiddle with these. If you want to go ahead and look around, maybe you want it purple. You can go ahead and decorate it however you want your website to look. And remember, a lot of these are going to show up on the other pages, not necessarily the front page. Okay. So, post section background color, I want to keep that as white. All right. So, once I'm done here, I'm going to click on save and publish. And I'm going to click on post widget. Oops, I'm sorry. Front page widget. There we go. All right. So, this is our front page now. And it looks like we've, you know, we've actually made some progress. Right here, we have a description of our products. We have the sales. They can add it to cart on the front page. However, let's go ahead and get rid of this ugly sidebar, shall we? Okay, let's do that. So, this theme is a little confusing. And to get to our dashboard, you've noticed that nothing's up here. Oh my gosh, it's actually down here where it says dashboard. Trust me, I spent probably 30 40 minutes trying to find the button. I couldn't find it. It was very frustrating. Okay, so now we're going to go to appearance and we're going to go to widgets. And this is our right sidebar right here. These were the things that were showing up. We want to go ahead and delete all of these. All right. So, let's go ahead and delete all these. Click this little arrow and click delete. Click the arrow. Click delete. Click the arrow. Click delete. And you're just going to keep going down to get rid of all these archives and categories. We don't really need this for our websites. It doesn't look good. I don't like it. our meta. There we go. Delete. All right. Looks good. It's all gone. Now, let's go ahead and check our website. Visit site. All right. It looks it's starting to look really good all of a sudden. You see that? It looks amazing. And we can add these to carts. We can buy it. Right now, it's already in the cart just by clicking it. We want to make it as easy as possible for our traffic that's coming in. We want to make it very easy and user friendly. We don't want to scare them off. Trust me, it takes anything to scare somebody off a website. All right. So, let's go ahead and keep scrolling down. Let's go ahead and add in some more content right here. So, to do that, we're going to go ahead back and click on customize. All right. So, we're at our front page right here. And we're at our front page widgets. Now, let's go ahead and add in another widget, shall we? Let's go ahead and click on add a widget and let's do the about widget. Let's give them a small taste about us. You know, a small uh you know education about us. So now we see right here we have a new space right here and it says a little about the optimizer. So we can go put a little about us. Oh, spell it wrong. and um the most amazing fruits ever. All right, so we've added that in. And now our heading color, you can change the color of this to uh whatever you would like. So I'm going to change it to blue. And it changes to blue. So let's go ahead. I'm going to go and leave, you know, I'm going to leave that. That looks good. The text color, whatever text you want this, I want it as a dark black. I want it easier to read on the eyes. So, I change it to black. If you want to add a background color, you can do that. Uh, I'm going to go ahead and give it a sh a small shade. Let's give it a small gray shade like that. There we go. That looks good. And we can scroll down. We can't add in a background image because we're not in the pro version. Don't worry. Uh, it's not a big deal. And once we're done here, we're going to click on save and publish. But a quick reminder, sorry, I forgot this. If you want to edit content, you're going to click on edit content. And now we see all this information right here. So if you want to go ahead and talk about your company, this is where you're going to do it. And you can also add in an image here, too. So let's say you want to add in an image. So I want to add it in on the top. No, I'm going to add it in the bottom. Let's go and add it in right here. So my little cursor is right here. Click on add media. And I want to go ahead and put in uh this fruit basket. [Music] Yeah, the fruit basket. Okay. Okay, the fruit basket. So there it is, the fruit basket. I want to click on save and close. And as you can see right now, we have the fruit basket up. And if you want to change the size of this image, we can do that, too. Go back to edit content and click on the picture. And you see this little pencil right here that says edit, you want to leftclick that. All right. So now we can go ahead and change the size of this right here. See how it says medium, full size, thumbnail, however you want the picture to look. Let's go full size. Let's make it a little bit bigger. Full size is usually big, but for this was a small image, so it shouldn't be that big. Yeah, it it made it a little bit bigger just because the image was small. Okay. So, once we're done here, uh you click on save and publish. And let's go ahead and close this. Now, we want to go ahead and keep making more content. So, I want to add something down here. Now, click on add a widget. And I want to enter in the advanced text widget. Now, what this is going to do, it's going to go ahead and give our website more color, more flavor, more uh it's going to make it more beautiful. Okay. right here. We can edit the content to say something like uh free shipping, you know, um all orders have free shipping and are amazing money back. Okay. And if you click this Google to uh the the toggle Google thing stuff, you can actually make this bigger. It's going to give you more options right here. all these right here. You can enter in a new character like something like these. But uh I don't want to enter these in. But I can make this bigger right here by highlighting this. And you see where it says paragraph? I can do maybe heading three. There you go. Now the text is bigger. I'm going to go save and close. All right. So now you see that it's changed a little bit. And right here, top and bottom padding, this is the size. So, by making it bigger, I'm going to make this bar much bigger. Whoa. Very big, right? All right. So, I'm going to go ahead and leave it back down. I want it too big. All right. So, leave it like that. You can change the text color right here to whatever you would like. Maybe I'll change it to the to the blue color I have. I think that'll look good. Okay. Now, I want to add in a background image because on this advanced widget, I can add in a background image. So, I'm going to go ahead and click on select image, and I'm going to enter in um uh this right here, these delicious fruit. Okay, great. So, I added in the image. And remember, you can make it bigger. So, if you really want people to um you know, if you want to show a picture, you really want them to see that, you can make it bigger. This text color is not working out for me. Let's change it back to white. All right. So, now that we've done that, we've added our little area. Right now, it's sort of giving our website flavor and color. And as you can see, we have nothing else to fill out. So, let's just go ahead and click on save and publish. And we can go ahead and click on front page widgets. Now, I want to add in another widget right here. So, let's go back to front page widgets. And let's go ahead and close this. Okay. So, now we're at this part right here. Let's click on add a widget. And our block widget. This is where I want to show people sort of like um highlighted highlighted, you know, uh images. I want to make them buy this right here. I'm going to put my fruit baskets right here. Sort of like as a featured like, oh, look how good this looks. Okay. So, for block one, you're going to click on block one. And that's this block right here. Okay. So, amazing amazing fruit basket block image. We're going to go ahead and ignore that part right there. I don't want to enter the block image in because it looks bad from this theme. For example, I'll show you. I'm going to click on this right here and insert insert images. I don't like the way that looks. I want it to be in the content right here.
Original Description
Visit Hostgator: http://darrelwilson.com/hostgator
Are you Looking To Build An eCommerce Website? This tutorial shows you how you can make your own eCommerce Website for free. Start your own online store with wordpress!
Visit Hostgator
www.darrelwilson.com/hostgator
Use Code DARREL99 for first month of 1 cent
Use Quickfeb30 for 25% entire hosting plan!
Need a custom website built for you? Check out my fiverr gig
https://www.fiverr.com/tass03
To PROMOTE Your website and get traffic, Check the SEO packages! Get ranked fast!
http://darrelwilson.com/store/
In this step by step tutorial, I will show you how you can create your own online store and start selling products online for free. Save money and make your own free website in 60 minutes. In this tutorial, you will learn how to make a website from scratch for free. No coding knowledge required
Once you watch this tutorial, you will be able to make your own eCommerce website for free from scratch! Its So easy! I will show you how to make your website free
For More Tutorials on how to make a free website, visit my website http://www.DarrelWilson.com
If you are interested in Last Pass which is an amazing program that stores all your passwords, get your free trial!
https://lastpass.com/enterprise_trial.php?esrc=dwilson03
Watch on YouTube ↗
(saves to browser)
Sign in to unlock AI tutor explanation · ⚡30
Playlist
Uploads from Darrel Wilson · Darrel Wilson · 5 of 60
1
 2
2
 3
3
 4
4
 ▶
▶
 6
6
 7
7
 8
8
 9
9
 10
10
 11
11
 12
12
 13
13
 14
14
 15
15
 16
16
 17
17
 18
18
 19
19
 20
20
 21
21
 22
22
 23
23
 24
24
 25
25
 26
26
 27
27
 28
28
 29
29
 30
30
 31
31
 32
32
 33
33
 34
34
 35
35
 36
36
 37
37
 38
38
 39
39
 40
40
 41
41
 42
42
 43
43
 44
44
 45
45
 46
46
 47
47
 48
48
 49
49
 50
50
 51
51
 52
52
 53
53
 54
54
 55
55
 56
56
 57
57
 58
58
 59
59
 60
60

How To Add Google Analytics To Your Wordpress Website 2016!
Darrel Wilson
How To Embed A Youtube Video On Your Wordpress Website in 60 Seconds
Darrel Wilson
How To Make A Wordpress Website | For Business | 2016
Darrel Wilson
How to make a Free Wordpress Website for Music or Fanpages - Beginners Tutorial 2016
Darrel Wilson
How To Create An Amazing eCommerce Website with Wordpress - 2017 | FREE Theme
Darrel Wilson
How To Make A Wordpress Website 2016 | Beginners Tutorial
Darrel Wilson
How To Make A Blog With Wordpress - 2016 | Beginners Tutorial
Darrel Wilson
How To Create A Beautiful and Free eCommerce Website with Wordpress 2017 (Online Store!)
Darrel Wilson
How To Make A WordPress Website 2017 - Step By Step Wordpress Tutorial
Darrel Wilson
How To Create A Stunning and Free eCommerce Website With Wordpress 2017 | Online Store Tutorial
Darrel Wilson
How To Setup Subscriptions and Recurring Payments For Your Website | Paypal Tutorial 2016
Darrel Wilson
How To Make A PREMIUM eCommerce Website with WordPress | Online Store Tutorial 2016!
Darrel Wilson
How To Create Amazing Landing Pages For Your WordPress Website! | Divi Theme Tutorial
Darrel Wilson
Yoast Seo Tutorial 2016 - How To Setup Yoast SEO Plugin - Wordpress SEO By Yoast
Darrel Wilson
How To Create a Coming Soon(Under Construction) Page in Wordpress 2016!
Darrel Wilson
Onlywire: Promote Your Wordpress Website to +50 Social Networks With Social Media SEO
Darrel Wilson
How To Create A Professional and Free eCommerce Website with Wordpress 2017 (Online Store)
Darrel Wilson
How To Add Intergeo Maps Plugin For Your Wordpress Website
Darrel Wilson
Top 11 Best Wordpress Plugins 2018 | Must Have Plugins For Wordpress!
Darrel Wilson
How to Create a Free eCommerce Website with Wordpress 2017
Darrel Wilson
How To Make Beautiful Web Pages For Your WordPress Website! | Divi Theme Tutorial
Darrel Wilson
How To Reset Your Wordpress Website | Reset Wordpress Back To Original Settings
Darrel Wilson
Top 10 Free and Responsive Wordpress Themes 2017
Darrel Wilson
How To Add Amazing Resume Layout Packs For Your Wordpress Website | Divi Theme tutorial
Darrel Wilson
20 Best Websites To Sell Your Products! The Best Websites To Sell Online !
Darrel Wilson
SEO Tutorial For Beginners 2016 | What Is SEO and How Does It Work?
Darrel Wilson
Best Web Hosting 2016! FREE DOMAINS! Top 5 Wordpress Web Hosting!
Darrel Wilson
How To Use Facebook Ads For Beginners 2017 | Complete Facebook Ads Tutorial
Darrel Wilson
NEW Divi Theme 3.0 Visual Editor for Wordpress | Divi Theme Review!
Darrel Wilson
How To Update The Divi Theme to 3.0 | Update Divi Theme From 2.7 to 3.0! Elegant Themes!
Darrel Wilson
NEW Divi Theme 3.0 Layout Packs! | Divi Theme Review For Wordpress
Darrel Wilson
Divi Theme 3.0 Tutorials for Wordpress. Coming Soon.
Darrel Wilson
How To Make a Wordpress Website 2017 | NEW Divi Theme 3.0 Tutorial For Beginners!
Darrel Wilson
How To Make A Wordpress Website 2017 | NEW Divi Theme 3.0 Tutorial - AMAZING!
Darrel Wilson
How To Use The Bloom Plugin By Elegant Themes | Add An Email opt-in Form To Your Wordpress Website
Darrel Wilson
How To Advertise Your Website On Reddit 2016 | MARKET Your Website and Get Traffic!
Darrel Wilson
Divi Theme 3.0 Customization | Tips and Tricks For Divi 3.0 for Wordpress!
Darrel Wilson
Divi Theme 3.0 Customization and Review | Tips on Divi 3.0 for Wordpress! MUST WATCH!
Darrel Wilson
Flippa.com Review: Buy And Sell Websites + Domains With Flippa Auctions
Darrel Wilson
Udemy Course: How To Make A Wordpress Website With The Divi Theme 2016! EVERY MODULE COVERED!
Darrel Wilson
How To Create An eCommerce Website With Wordpress 2017 | ONLINE STORE | NEW 3.0 Divi Theme -AMAZING!
Darrel Wilson
FREE and NEW 3.0 Divi Theme Layouts For Wordpress - Review, Tutorial, And Customization!
Darrel Wilson
NEW 3.0 Divi Theme Customization For Wordpress | Create Amazing Animations! -Must WATCH!
Darrel Wilson
How To Add Live Chat In Wordpress For FREE! - Best Live Chat Plugin For Your Website
Darrel Wilson
Yoast Seo Tutorial 2017 - How To Setup Yoast SEO Plugin - Wordpress SEO By Yoast
Darrel Wilson
10k Subscribers. Thank You All!
Darrel Wilson
How To Install and Setup Google Analytics To Your Wordpress Website - 2016! EASY!
Darrel Wilson
How To Advertise and Promote on Youtube For Beginners | Youtube Advertising Tutorial 2017
Darrel Wilson
How To Make A Wordpress Blog - Create A Blog With Wordpress - EXTRA THEME
Darrel Wilson
NEW DIVI THEME 3.0 Layout Packs | Importing Divi Theme Layouts For Wordpress
Darrel Wilson
How To Make A Parallax Wordpress Website 2017 -NEW!!
Darrel Wilson
How To Make The Divi Slider Fullscreen | Divi Theme 3.0 Customization
Darrel Wilson
Elementor Page Builder Tutorial - How To Create A Wordpress Website 2017
Darrel Wilson
SEO For Beginners 2017 | How To Rank High In Google | Freelancer.com Tutorial
Darrel Wilson
Yoast Seo Premium Tutorial 2017 | Wordpress SEO By Yoast
Darrel Wilson
How To Install Wordpress With TMDhosting - MAXIMUM TMDHOSTING COUPON CODE!!
Darrel Wilson
How To Make A Wordpress Website 2019 | Divi Theme Tutorial
Darrel Wilson
Divi Theme Customization: How to Create Diagonal Lines Between Sections in Divi Theme
Darrel Wilson
NEW Divi Theme Tutorial On Udemy And Skillshare! 😀
Darrel Wilson
Unsplash.com: Best Free Photography Pictures and Images From Around The World | Unsplash Tribute
Darrel Wilson
More on: Tool Use & Function Calling
View skill →Related AI Lessons
⚡
⚡
⚡
⚡
How to prepare TIC teacher exams in Spain with AI (oposiciones 2026)
Dev.to AI
Why I built a simple AI provider wrapper (and you might too)
Dev.to · zhongqiyue
This ChatGPT Prompt Replaced 3 Hours of PowerPoint Work
Medium · AI
This ChatGPT Prompt Replaced 3 Hours of PowerPoint Work
Medium · ChatGPT
🎓
Tutor Explanation
