End-to-End: Automated Hyperparameter Tuning For Deep Neural Networks
Key Takeaways
This video demonstrates end-to-end automated hyperparameter tuning for deep neural networks using Optuna and PyTorch, covering data preparation, model design, training, and hyperparameter optimization.
Full Transcript
hello everyone and welcome to my new video in this video i'm going to show you how you can use optuna to tune hyper parameters of neural network so it's it's a difficult task to tune into most of most of the things there to come by intuition or by some small experiments so you can make some small experiments if you have a large data set on and the neural network is going to take it's taking a lot of time it's not it's not very straightforward so we will be using optuna today and we also need some kind of dataset to start with so one of the dataset that is in my mind is one of the character compilations going on right now it's called mechanism of action prediction uh so in which based on drug activity uh you in which you classify drugs based on their biological activity so uh we don't have to go through the details because it's just an example data set that we will be using today so we have a file with training features and it's a tabular dataset so it seems like first three columns are uh categorical except the very first one which is uh probably id column and everything else is just numerical so uh the way i'm approaching this problem is not the ideal approach obviously so this is only to show you how you can use optuna to tune your neural network and then you have some targets so you see like there are many different targets 207 targets for each id that you have so the first thing that we do when we look at this data set it's tabular so uh it should take one vector for all the features and one vector for all the outputs for each sample so the first thing that you need to do is to start creating some kind of uh data set class yeah we will be using pytorch so you start creating some kind of data set class and let's let me make it compact today so i'm just be going to be using two files and one of them is utils.pi which will consist of all the utils so let's import some stuff or we don't even need to import anything right now so let's just get started and then then we can we can start with tuning but we need these small things first so we define a class and it's called mechanism of actions mechanisms of action so i will say more data set let's say this is my class and then inside this we have uh an init function what is this init function going to take so this is uh where everything becomes a little bit important so it should have uh the targets and it should have uh the features so let's say self and features comma targets so here uh the features are in this data set we have uh different kinds of features right so um i think there are more than 500 features uh let's just check 876 columns so 875 features and uh then we say self.features is features and self.targets is targets now here both features and targets are numpy array and then we say uh then we define a get item function self and we also define one more function called the length and here you can just return so if if they are features and targets are uh numpy arrays so you can have self dot features dot shape zero shape zero whatever you want and here we can now uh return an item so given by an index so item i'm going to increase the size of this a little bit for you and hide this one okay so uh item so item is return a dictionary with x and y let's say so x is your torch tensor and now we need to import torch okay so access your dot sensor uh tensor and um let's see drawer start tensor uh which will take self.features then all all the features for a given item index and the d type of this will be charge dot float because these are float features and similarly you have uh y which is targets y self dot targets so don't worry about this complaining i still have to fix some stuff but this works so um now uh what do we have uh we got our data set object and we have an x and y and now we want to uh get started with reading this so let's try let's make one more file and call it train dot pi i still need to i still need to download the data set so let me do that in the background so i have downloaded the data set and all the data is in uh input folder and you can also see the features okay let's not see the features it's huge and let's create one more folder called source and put all our code in there did we get it yeah so all this can be moved to the source folder okay so now we have we have a training file and in training file what we want to do is we want to uh read the data so we need to create a function in which we read the data we uh possibly we split it so splitting is something that i'm not showing you here today that because i've shown you a lot of times so you can obviously do that on your own so let's import a few things import import pandas as pd and uh let's also import numpy or maybe not and then let's select a device we will be training our models on gpu today epochs so it doesn't matter how many epochs we choose because we are tuning it and let's say we have one function called run training now uh in all all my previous videos we have seen that like we always divide it into folds and then we take take according to the fold but instead we will be doing something different here we won't be dividing into folds uh now um uh before uh the training we will just divide it or maybe we we can okay let's just divide it into folds and it makes our life much easier so that's also the first thing that we should do so yeah let's not do it in a wrong manner so createfolds.5 and uh here we can uh create our folds so let's import pandas pandas as pd and now the problem is okay let's let's start with our main function f name [Music] okay then we read the csv file which is our train features.csv so input train underscore features dot csv so we have to do that and then we create a uh empty a new column called k fold and assign minus one and uh you can you can obviously uh do some randomization so it's not it's not a requirement how you do it if in the end you achieve some result so i just like to do it this way then drop the reset the index and then drop the index and your target column is targets is everything except the um signal id so here it's not correct so you you have to you have to take the csv with the targets in it so train targets scored dot csv and then you drop the column called sig id which is the id column and uh access is one dot values so this becomes all your targets now the interesting part here is it's a multi-label classification problem and for multi-label classification problem if you want to do uh um stratification it's uh it comes out of the box from uh libraries that you can use it's called lighter strat so from microstratifiers import multi label uh why is it not suggesting anything or a multi-level strategy fight k-fold okay so we got all these things saying something is wrong unused input okay yeah because we haven't used it yet and then you can do for for um first you initialize this multi-label stratified k fold is your multi-level yeah it should be suggesting i don't know why it's not suggesting me stratified k fold and then n splits whatever number of splits you want so let's say we want five splits so for fold comma uh training comma val and enumerate it's like scikit-learn stratified k-fold so mk uh mskf dot split and then you have x x is your data frame and y is your targets so that's all you need to do and then you loop inside here so you can do df.lock uh val comma k fold is equal to the fold number and save this data frame in the end to csv input slash train uh targets underscore fold start csv and don't save the index okay so this is our file to split the data and this is obviously not required for this video but it's there um so let's go to the source folder so today i'm using my dell machine with a quadro 5000 gpu and now i run python create folds.csv but first i need to activate the environment python createfolds.cs bye and it has created the fold for me so if i have to look i can go and look at the file but we don't need to do that and i hope it's correct it looks correct it doesn't seem like there is any kind of mistake so this is validation so we are always taking validation this is this you can skip if you want um okay that's fine looks good and now we go to our training code so now we were defining this run training function so that takes a fold now the fold is the information that that we have and it also takes a few more arguments that we will come to later so now let's say what is the data frame pd.read csv input slash train underscore features.csu so we got the train features now the training now the features here they also consist of these categorical columns and for the sake of like this video what i'm going to do is i'm going to drop those columns so our data frame will become the ef.drop you can use them if you want uh but you have to one hot encode them so i'm just saving time cpn and the third column was cp time those and cp type so that was the first column cp type cp time cp dose okay cp underscore type i will just keep it here cpr type time and those access is one okay so we have our data frame with click this in the run training function and now we have all the features that we need uh to train the model so uh let's also add targets score targets or just call it scored df target df targets data frame is pd dot read underscore csv then you have input slash train underscore target underscore false was it yeah dot csv okay so we got our training features we got our targets and uh now we have like a week or yeah this is like the folds it also has a folds information so now we can take um or maybe we can just call it folds to make it easy and folds have targets whatever you want to call it so targets df and then we we generate a new data frame full data frame let's say which is targets uh underscore df uh no let's just create the features so features is df dot drop second restore id x is equal to one dot columns so except the cigarette column everything else is your in instead of feature we can save future columns and uh then we also have target columns okay so here it will be targets underscore df and then what you do is you're going to merge these data frames so df is df.merge targets underscore df uh on the sig id column and we will do a left join how is left so i think we got we got some things and we can say we can try to run it if okay uh run training fold is zero it doesn't matter but it's required so that's why i put it there and let's clear this thing pi is something happening probably is happening but we don't know anything you're trying to merge on object in 64 columns okay so there is something definitely wrong and let me take a look so we made a big mistake here we didn't add the comma and that is a really a very big mistake so otherwise it was giving absurd results so we need to train that we need to create folds again it shouldn't take time and then let's also check the values so the values seem okay so like in the end you see three four two one and now go back here to our training code and here target columns is uh not just we don't have to just drop sig id but we also need to drop the k fold column okay so uh then you merge on this and it should work now let's see so now it should work hopefully it does yeah okay so it's working so you have sig id and you have all the different kinds of uh features and all kinds of targets and you have the k-fold column too so now the fun begins the fun part so where we will be designing the neural network and everything else so uh but before that let's also split the data because it's nice to just do it now and then we go into the neural network so now you have a trained df which is your df and then df dot k fold is not equal to fold and and then we also reset the index index drop equal to true so this is what we have now and similarly we also have a valid df and only difference is this is same as four okay uh so we got trained here we got validaf and um but for uh but for our uh data loader we need uh in the format of uh numpy arrays so i will just say xtrain is train underscore df and then features dot 2 underscore numpy so this is my x train and my y train and y train is train df target columns that's what i feature columns sorry should be feature columns and this one should be target columns and similarly we have um x valid and y valid and all those very important you have to you have to do that and this will take valid df and valid df and everything else remains the same and now what we can do is we can also import the utils file that we have created here mutils and now we can create our data loaders so train data set will be util start more data set so it takes features and targets so let me just copy them put them here features is my xtrain targets as my white train and similarly i have a valid data set features is x valid and y valid um now we also we have input to torch here we have and so we can also create our data loaders so train loader will be uh charge dot utils.data dot data loader and here you will have train data set and batch size so this is since this is tabular it can handle large batch sizes and num workers let's say it and similarly we have a valid loader which takes valid data instead and everything else i can keep the same i i don't care much about that and you can also probably include [Music] shuffle shuffle equal to true probably why not so now all this should work and we can move to the next step okay so no errors um so now we go back to our youtubes and quickly we will create a engine class to train and evaluate our model so let's see we are in utils and here we can create the engine class so engine class is also it's the same thing that you have been looking in if you're looking at my videos so you have seen me build engine so many times but i'm going to do it anyways so class engine and then we define the init function uh which takes self model optimizer sk uh device it doesn't take the scheduler because let's not use a scheduler which uh we need for like inside every batch but we only use the one after epoch so self dot model this model and self dot device there's my device we don't even need the device because okay let's let's do that this device and self dot optimizer is optimizer okay so we got the init function and then we use i'm gonna loss function so targets outputs and what is it returning it's returning bc with logit loss let's say and dot bce so we have to import an n from torch.nn import and then our import torch.nn um so we got we got this part and and then we see with uh logic logit loss and here we have outputs comma targets okay one thing in this function i'm not using self so it's a static method limited to this class but it's yeah it is static it's it doesn't have it's not using anything else from class bce with logit loss yeah okay and now we have our train function which takes the training data loader so let's say it's just let's just call it data loader and here what we do we put the model in train mode uh we have some kind of final loss so uh here they are using msc loss or variation of mse loss i think column wise mse i i don't remember but let's say we are using mse loss too or well we are using bce with logic loss for for this video sorry so for data in data loader uh self.optimizer dot zero grad so use your current optimizer and then your inputs are data x and you send it to self.device similarly you have targets is data y self.device so you got inputs you got your targets now you have outputs and that comes from the model inputs right so it should be self dot model so we have targets we have output and now we can calculate the loss so loss is sub dot loss function and we did opposite so we need to include the targets first and then outputs uh okay and then we do backward we lost it backward self dot optimizer dot step and that's all and final loss we just add loss dot item and in the end when we are returning so we just return final underscore loss divided by the length of data loader okay so this becomes our training function simple and easy right and similarly we have evaluate function which is nothing but just a copy of this eval and we don't need optimizer zero graph we don't need uh loss backward optimization everything else remains the same right um let's just spell it nicely correctly so we got a training function we got an evaluation function and now we need to build the model itself so what we are going to do is we are going to build a model with some parameters and let's try so class model and dot module um then we define an init function and then here in a function is going to take a few more things than you see usually so let's say it takes number of features what are the number of features in the uh data set that you have number of targets okay and it takes a few more things and this is where the optimization part begins so few more things include hidden size number of layers hidden size and maybe dropout okay i hope you can see everything okay okay my auto formatter says it's fine so i will just change it to end features and targets number features them targets num and layers so now it fits um okay so we say super in it now we can write our um sometimes something like we can define a list layers what layers you want so for underscore and range and layers so the number of layers um you just have to append to uh this list so if the length of layers is zero layers dot append and then dot let's say we start with the linear layer num and features and uh hidden size and similarly we we we can keep opening more more layers but first let's uh so this is like one one of the layers so we have a batch normalization if we want one one dimensional and this is hidden size here okay so yeah up under this you own this and you can also append [Music] layers dot opened dropout which is the same as the dropout argument i mean the value comes from the dropout argument okay and layers dot upland uh and then some kind of activation relieve activation let's say and if the layers if we don't have anything in layers we do this because we need to start from n features but otherwise we start with hidden size so let's add all that and instead of n features this will be hidden size and you can you can also modify it so you can have different kinds of variations of layers that you want and then in the end uh we also append some outputs layers are open and dot linear and here we have so the input will be hidden size and output will be and targets so we got everything dot model so now you have to design a model using all these layers that you have appended so you can do an n dot sequential and star asterisk layers so you have different designer sequential model models using layers in a list and def forward self comma x uh x uh or you can just do return self.model x awesome we are almost done so we have our uh model we got our engine we have dataset and now we go back to our training file so when we go back to our training file uh we can add the engine and the models and everything else and see what happens so let's say my model is utils dot model and since it's not suggesting me i have to copy paste stuff so end features and targets okay um so we got this and we have n features and layers hidden size dropout so let's say n features is x strain dot shape zero that's what sorry one so that's the number of features i have and end target is uh y train the shape one and layers is two hidden sizes uh i don't know 128 drop out is 0.3 so this will fetch me a model depending on the parameters that i have supplied and now we send the model to device and we have optimizer which is let let's use adam optimizer so we will also talk about this in uh this video a little bit how you can tune this model.parameters comma uh sorry comma learning rate oh sorry ah lr 0.01 let's say and i'm not adding any scheduler if you want you can add it i think the video is going to be a bit longer so util start engine um and here you have model optimizer and what else did we have it was model we have we have model we have our device obviously and devices device okay so we got everything and let's say our best loss is infinity i think we imported numpy no we didn't import numpy as np so let's say our best losses uh infinite we don't we don't even need that one anyways so early stopping um lighter let's say we wait for 10 iterations to stop and early stopping counter as uh zero so what we do for epoch and a box we call the training part so training part is also very easy so your train loss will be returned by engine.train and that will take train data loader i hope we did that or it's called train loader so train loader and similarly we have valid loss that will be returned by valid uh loader and engine dot evaluate these are the functions that you can reuse in almost any kind of problem that you want and now now what we can do is we can probably print something so let's print let's print uh i don't know fold fold epoch then let's print train loss valid loss so just just to keep track and see if everything is working fine and if valid loss is less than uh best loss then best loss is valid underscore loss and let's add one more parameter because you would like to save the good models right so save underscore model equal to false so if you tell it to save the model then it's going to save the model so and for saving the model you you just check if save model then you save the model dodge dot save model dot state underscore predict comma model underscore whatever the fold is uh so fold dot bin model underscore fold dot bin uh so if if the save model parameter is true then it's going to save the model okay else and if valid loss is not uh less than best loss then early stopping counter plus equal to one and if my so this is my poor man's early stopping stopping counter is greater than early stopping then break the loop uh early stopping uh iter yeah so if we are if we are not improving for 10 iterations then we stop okay so now everything is done and you should be able to train this model let's see if we have epoxy boxes there and let's make it 100 i don't want to uh to blow up so let's see if it trains okay yeah obviously and that's what the error was and it should be range i'm training something in the first time it's yeah you have to be very lucky and then we see if it's training okay so it does seem to be doing and we are quite lucky um so you can see like the training loss and validation loss the validation loss is also decreasing and uh everything is looking nice so you can let it train if you want but that's not why we're here for we're here to tune it so let's see and yeah it reached some kind of a good uh loss too so i don't know what it was because i'm not printing that but anyways [Music] now the fun part which is not much fun anymore so uh now what we do is we design a optimization function or an object we develop design objective function sorry not optimization so first of all what we are going to do is we are going to import optuna okay and uh now we uh write a objective function so this objective function uh when you're writing an objective function it should take an argument called trial so def objective and it should take a argument called trial and now here you define a dictionary called params so which is a dictionary and it it says uh so every time this trial is called these paragraphs are created so here you have number of layers let's say we are tuning for number of layers and the trials come from optuna so uh if you go to optimum documentation the optin.trial here you will see what you can try to suggest so you can have suggest categorical okay let's click on that so you can have such a categorical you can have you can suggest discrete uniform suggest some kind of float value uh in log uniform or uniform distribution and i think that's all you need to tune anything you want so trial why am i writing a trail all the time trial dot suggest underscore end and what is the name of the parameter so usually this is same as the name that you have provided in the key you can have a different name if you want and number of layer can be anywhere between one and seven and so this is this is where you define the kind of kind of the grid that you want but it's not grid search and hidden underscore size trial dot suggest and hit an underscore size and here you can have the hidden size what you want like 16 to 048 maybe and uh you can then uh we had uh like an argument for dropout in the neural network class so we can also add dropout trial dot suggest so now we can uh take it from a uniform distribution uh drop out comma let's say dropout is anywhere between zero point to 0.7 and uh learning rate let's say we also want to tune the learning rate because why not we can trial dot suggest underscore uniform learning underscore rate okay let's not do uh suggest uniform but instead we can do suggest log uniform learning rate and from 1 e minus 6 to 1 e minus 3 that sounds good and we create a list called all losses so all losses will consist of all losses from different folds and i say for f underscore for fold in range five because we have five folds uh run the training and also the training should return something and this is something that we didn't do and we should have done that uh return best underscore loss and that's it so we are returning the best loss we have all the losses and uh now what you do here is uh let's say this is there is a some something like a temp temporary loss run underscore training and you run the training with a given fold and you set save model to false because you don't want to save the model uh when when it's tuning the parameters uh and all losses dot append uh templars and in the end it it it will return the mean loss return and p dot mean of all underscore losses but now one one thing where did we use params we didn't even use params right we have to use it so let's add another argument here params um and now we modify our training function so we go to training function and add another argument params and here uh now we change stuff so params will everything here will come from the dictionary so this will be num layers and similarly you have uh i think the name was hidden size so you have params hidden size and then you have params uh dropout uh was there anything else learning rate yes so here params learning rate and now you can start tuning with optuna such cool man and it's not so much work designing the neural network is much more work right so um you create a study um it's called study so you can have in any name you want so optuna dot create study and here you create you you define a direction and in this case we will be minimizing the loss minimize or it can be maximized if you're if you're returning a uc or something like that and study dot optimize partial objective so we can also we also need to create a partial objective partial objective uh or we don't need to create that probably not objective because uh i was thinking about something else we don't have any other parameters except trial here so we don't need to create any kind of partial function so we have um objective and trials let's say we run it for 20 trials and then you can print some stuff best trial and print the information about the best trial so you can use uh trial let's say trial underscore is study dot best trial okay and you can print uh like uh the values of the trial trial dot values trial underscore dot values um and you can also like print some print the best parameters so we we can just do we can just do that and say uh because we want to know the best parameters right trial underscore dot best underscore dot params so this these are your best parameters so now if you want to if you want to uh train the neural network from scratch and then save the model using the best parameters so you have to do that in the end if you're not saving for all the runs and you don't have to save for all the runs so i will say for j in range 5 score is run underscore training so here we had the full number and params will be best params or trial dot underscore uh trial underscore dot uh params and save underscore model equal to true so your model will be saved only once with the best parameters available scores is plus equal to scr and then in the end you can print uh what kind of outer world score you got so scores divided by five awesome now we have to see if it actually works um okay let's clear this thing and just run the training file so you see it is working but uh that's like the the very first fold so it's doing something it's also taking a little bit of time than the last time but let's go on and see what happens so seems to be working quite okay i think i will let it run and come back to you so when it's running you will also see like after all the five folds so now it has finished one one trial trial zero and it says uh it finished with value of 0.08 so you see like uh the loss is very high but also to make it a little bit faster i change some stuff um so you see it chose one one layer hidden size was 67 dropout was 0.57 learning rate was 5.59 into 10 to the power -5 and uh this is currently the best trial so after every trial it's going to print this information and uh so so let it continue running and maybe you will find very good loss i did so um what's what else you can do is you can maybe you can also create a function that chooses the optimizer for you and uh you based on a string argument so uh that can be added as trial dot such as categorical so this is just an extra information that i'm telling you so you can do all different kinds of stuff and uh that that makes like optional very simple and easy to use and go try it try building a neural network from scratch and then try to find the optimal number of layers and hidden size and drop out and learning rate and whatnot and you can also like choose hidden states for each and every layer so the more choices you have the more time is going to find take to find optimal parameters but that's something that you already know and i hope you liked this video if there was something that you didn't understand or if there was something that where somewhere i made a mistake please let me know in comments and if you do like the video do click on the like button and do subscribe and share it with your friends and see you next time bye
Original Description
In this video, I am going to show you how you can do #HyperparameterOptimization for a #NeuralNetwork automatically using Optuna. This is an end-to-end video in which I select a problem and design a neural network in #PyTorch and then I find the optimal number of layers, drop out, learning rate, and other parameters using Optuna.
The dataset used in this video can be found here: https://www.kaggle.com/c/lish-moa
Please subscribe and like the video to help me keep motivated to make awesome videos like this one. :)
00:00 Introduction
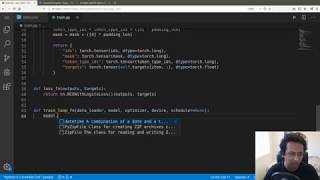
01:56 Dataset class
06:17 Start with train.py
08:19 Cross-validation folds
13:38 Reading the data
24:10 Engine
29:48 Model
35:10 Add model and engine to training
43:05 Optuna
49:02 Start tuning with Optuna
52:50 Training, suggestions and outro
To buy my book, Approaching (Almost) Any Machine Learning problem, please visit: https://bit.ly/buyaaml
Follow me on:
Twitter: https://twitter.com/abhi1thakur
LinkedIn: https://www.linkedin.com/in/abhi1thakur/
Kaggle: https://kaggle.com/abhishek
Watch on YouTube ↗
(saves to browser)
Sign in to unlock AI tutor explanation · ⚡30
Playlist
Uploads from Abhishek Thakur · Abhishek Thakur · 58 of 60
1
 2
2
 3
3
 4
4
 5
5
 6
6
 7
7
 8
8
 9
9
 10
10
 11
11
 12
12
 13
13
 14
14
 15
15
 16
16
 17
17
 18
18
 19
19
 20
20
 21
21
 22
22
 23
23
 24
24
 25
25
 26
26
 27
27
 28
28
 29
29
 30
30
 31
31
 32
32
 33
33
 34
34
 35
35
 36
36
 37
37
 38
38
 39
39
 40
40
 41
41
 42
42
 43
43
 44
44
 45
45
 46
46
 47
47
 48
48
 49
49
 50
50
 51
51
 52
52
 53
53
 54
54
 55
55
 56
56
 57
57
 ▶
▶
 59
59
 60
60

Episode 1.1: Intro and building a machine learning framework
Abhishek Thakur
Episode 1.2: Building an inference for the machine learning framework
Abhishek Thakur
Episode 2: A Cross Validation Framework
Abhishek Thakur
Tips N Tricks #2: Setting up development environment for machine learning
Abhishek Thakur
Episode 3: Handling Categorical Features in Machine Learning Problems
Abhishek Thakur
BERT on Steroids: Fine-tuning BERT for a dataset using PyTorch and Google Cloud TPUs
Abhishek Thakur
Special Announcement: Approaching (almost) any machine learning problem
Abhishek Thakur
Training BERT Language Model From Scratch On TPUs
Abhishek Thakur
Bengali.AI: Handwritten Grapheme Classification Using PyTorch (Part-1)
Abhishek Thakur
Bengali.AI: Handwritten Grapheme Classification Using PyTorch (Part-2)
Abhishek Thakur
Episode 4: Simple and Basic Binary Classification Metrics
Abhishek Thakur
Training Sentiment Model Using BERT and Serving it with Flask API
Abhishek Thakur
Episode 5: Entity Embeddings for Categorical Variables
Abhishek Thakur
Tips N Tricks #5: 3 Simple and Easy Ways to Cache Functions in Python
Abhishek Thakur
Multi-Lingual Toxic Comment Classification using BERT and TPUs with PyTorch
Abhishek Thakur
Text Extraction From a Corpus Using BERT (AKA Question Answering)
Abhishek Thakur
10K Subscribers: Approaching (almost) Any Machine Learning Problem and Talk Show
Abhishek Thakur
Data Processing For Question & Answering Systems: BERT vs. RoBERTa
Abhishek Thakur
Tips N Tricks #6: How to train multiple deep neural networks on TPUs simultaneously
Abhishek Thakur
Sentencepiece Tokenizer With Offsets For T5, ALBERT, XLM-RoBERTa And Many More
Abhishek Thakur
Talks # 1:Andrey Lukyanenko - Handwritten digit recognition w/ a twist & topic modelling over time
Abhishek Thakur
Episode 6: Simple and Basic Evaluation Metrics For Regression
Abhishek Thakur
Talks # 2: Subhaditya Mukherjee - Image restoration using Deep Learning: Dehazing
Abhishek Thakur
Basic git commands everyone should know about
Abhishek Thakur
How do I start my career in Data Science?
Abhishek Thakur
Talks # 3: Lorenzo Ampil - Introduction to T5 for Sentiment Span Extraction
Abhishek Thakur
Detecting Skin Cancer (Melanoma) With Deep Learning
Abhishek Thakur
Talks # 4: Sebastien Fischman - Pytorch-TabNet: Beating XGBoost on Tabular Data Using Deep Learning
Abhishek Thakur
Build a web-app to serve a deep learning model for skin cancer detection
Abhishek Thakur
Talks # 5: Parul Pandey: Data Science, Diversity and Kaggle
Abhishek Thakur
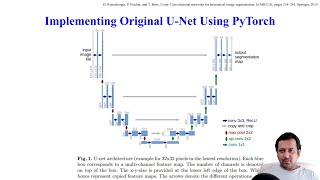
Implementing original U-Net from scratch using PyTorch
Abhishek Thakur
Tips N Tricks # 8: Using automatic mixed precision training with PyTorch 1.6
Abhishek Thakur
Talks # 6: Mani Sarkar: From backend development to machine learning
Abhishek Thakur
Dockerizing the skin cancer detection web application
Abhishek Thakur
How to train a deep learning model using docker?
Abhishek Thakur
Building an entity extraction model using BERT
Abhishek Thakur
Train custom object detection model with YOLO V5
Abhishek Thakur
Talks # 7: Moez Ali: Machine learning with PyCaret
Abhishek Thakur
How to convert almost any PyTorch model to ONNX and serve it using flask
Abhishek Thakur
Hyperparameter Optimization: This Tutorial Is All You Need
Abhishek Thakur
I finally got a copy of "Approaching (Almost) Any Machine Learning Problem"
Abhishek Thakur
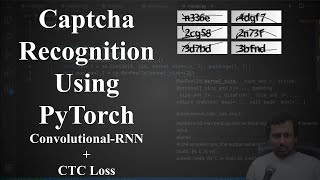
Captcha recognition using PyTorch (Convolutional-RNN + CTC Loss)
Abhishek Thakur
Live Q&A: Getting Started With Data Science
Abhishek Thakur
WTFML: Simple, reusable code for PyTorch models
Abhishek Thakur
Talks # 8: Sebastián Ramírez; Build a machine learning API from scratch with FastAPI
Abhishek Thakur
Data Science PC Configs: From Low Range to Super-High Range
Abhishek Thakur
BERT Model Architectures For Semantic Similarity
Abhishek Thakur
I just got access to GitHub's Codespaces and it's amazing!
Abhishek Thakur
Talks # 9: Vladimir Iglovikov; Detecting Masked Faces In The Pandemic World
Abhishek Thakur
Tips To Build A Good Data Science / Machine Learning Project (For Your Portfolio)
Abhishek Thakur
Docker For Data Scientists
Abhishek Thakur
How To Become A Data Scientist In 1 Year (Learn From A Real World Example)
Abhishek Thakur
Talks # 10: Tanishq Abraham; What are CycleGANs? (a novel deep learning tool in pathology)
Abhishek Thakur
Deploy Any Machine Learning Or Deep Learning Model On Google Cloud Platform (App Engine)
Abhishek Thakur
Pair Programming: Deep Learning Model For Drug Classification With Andrey Lukyanenko
Abhishek Thakur
VS Code (codeserver) on Google Colab / Kaggle / Anywhere
Abhishek Thakur
Talks # 11: Jean-François Puget; Did you know GPUs are not just for Deep Learning?
Abhishek Thakur
End-to-End: Automated Hyperparameter Tuning For Deep Neural Networks
Abhishek Thakur
Deploy Any Machine Learning (or Deep Learning) Endpoint on Google Cloud Platform In 10 minutes
Abhishek Thakur
Ensembling, Blending & Stacking
Abhishek Thakur
More on: Supervised Learning
View skill →


Related AI Lessons
⚡
⚡
⚡
⚡
Data Preprocessing: Encoding and Feature Scaling in Machine Learning
Medium · Machine Learning
Data Preprocessing: Encoding and Feature Scaling in Machine Learning
Medium · Data Science
Data Preprocessing: Encoding and Feature Scaling in Machine Learning
Medium · Python
The Python Dictionary Trick That Makes Interviewers Smile
Dev.to · Ameer Abdullah
Chapters (11)
Introduction
1:56
Dataset class
6:17
Start with train.py
8:19
Cross-validation folds
13:38
Reading the data
24:10
Engine
29:48
Model
35:10
Add model and engine to training
43:05
Optuna
49:02
Start tuning with Optuna
52:50
Training, suggestions and outro
🎓
Tutor Explanation