Game Programming S2 E07 - Connecting
The Cherno
·
Intermediate
·9y ago
Key Takeaways
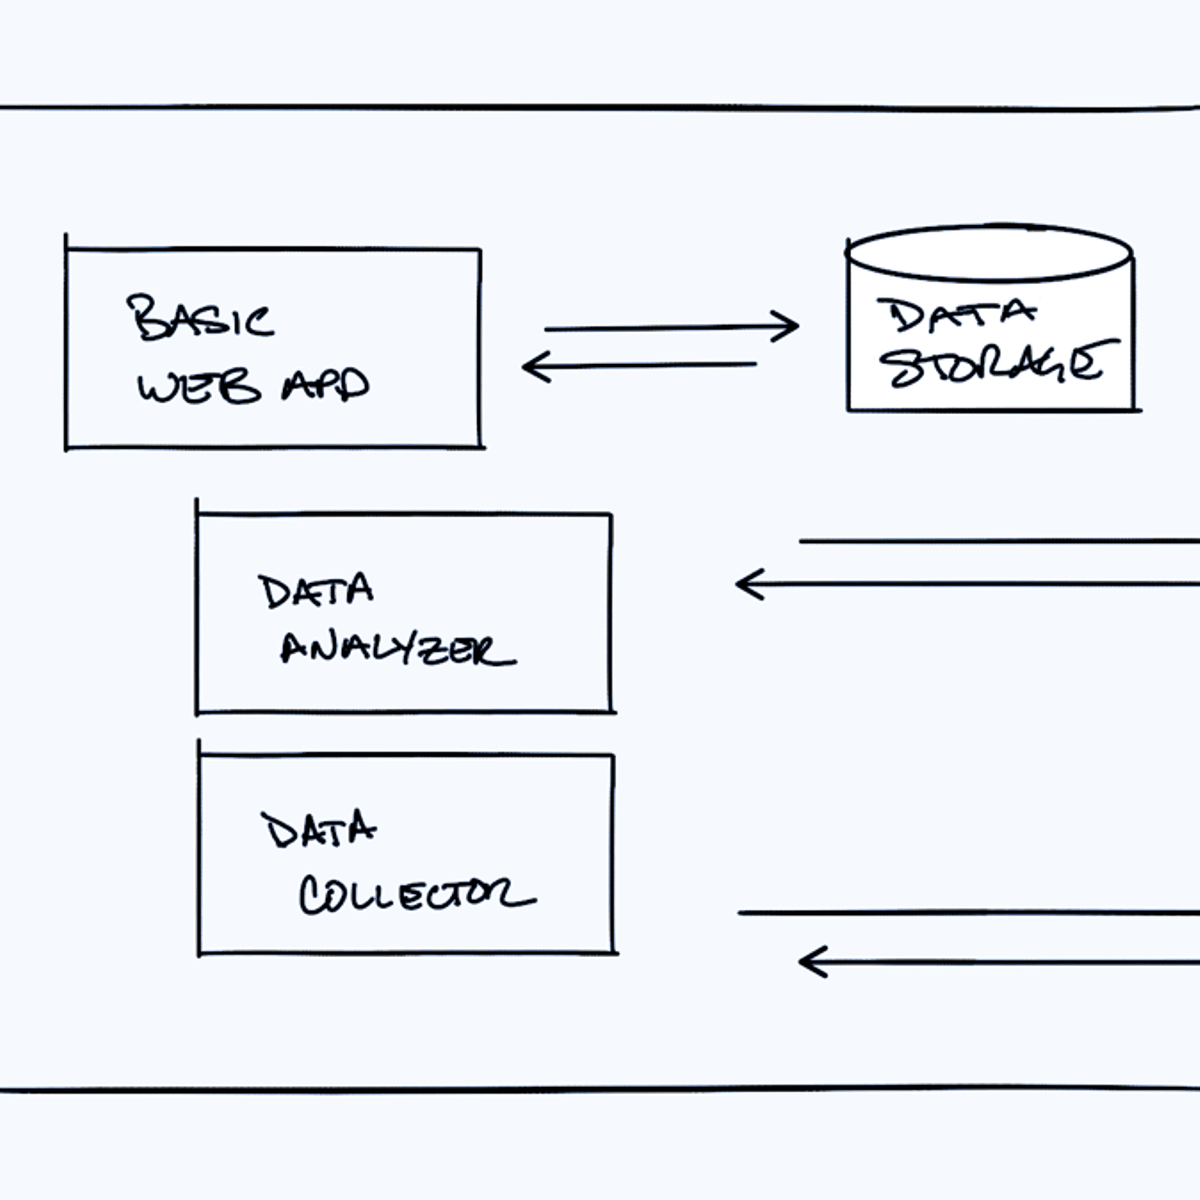
The Cherno demonstrates connecting a game client to a server using sockets and handling user connections, including packet construction, byte array manipulation, and client management using sets and hashing.
Full Transcript
[Music] hey what's up guys My Name Is AO and welcome to another episode of game programming So today we're going to continue off from where we left off last week if you guys missed that episode then go back and watch it you're going to need to um we're going to basically be talking about how the server is actually going to deal with clients and how clients can connect to the server um so uh that's obviously kind of a big deal that we need to deal with uh and like there are there are many different ways of actually having a server handle its clients um we're going to talk about one of them and we're going to implement some kind of system in which that will work okay so first of all if we go into our game class we'll see the kind of the main uh area of connection so we have our to-do here that says we should connect to the server and we are kind of connecting to the server but remember if we look at what we're actually doing in the client. connect section here um what we're what we're actually doing is We're translating the address that we've specified into an actual inet address object um we're creating a socket and then we're in in our send connection packet we're just sending this connection packet right we're not actually caring about whether or not it gets received or anything like that all we're doing literally is we're sending a packet that says I am connecting right um I mean like we're literally sending these bytes to the server and the server will I mean ideal like literally just like receive it I think and print it right um so processes a database dump packet so it will just print that it received a packet with our contents and that's it right there's no kind of interconnection going on it's just printing what it gets which in this case is the words you know connection packet um and that's it and then we're assuming that the connection is successful and we're sending a database so what we're actually going to do is we have connect which of course returns a bullan so we're going to basically uh first of all hand the case of um uh we didn't connect right uh and the way that this is really going to work and we're actually not going to do it this way and we'll see why in a minute but um uh this is like the rough idea of what we'll start where we'll kind of start off from so what we'll do on the sand connection packet is we have to decide some kind of packet that we want to send uh that is basically going to actually you know send a connection packet like what is what is a connection packet right eventually you might find that it might be a good idea to send the username and password as the connection packet right and again if you like you know if you're serious about security you might want to Hash the password first um if you have a database on the server which contains all the server has access to a database which contains every um every user in it then of course you would be storing passwords in the database hashed not plain text I hope um and so of course that way you could of course just use the client to take in the user's password hash the password there and then locally and then send a packet which has username and a hashed password to the server then the server can query the database and make sure that that user exists and the password is indeed correct okay that would be an ideal fairly secure way of actually logging in a user and then the server can of course reply being like no the password isn't correct or know that user doesn't exist or whatever kind of status you want to reply with or maybe you know everything's successful the user is now locked in um and then that way we have basically established a connection now we don't have any of that yet um in the future again it might be something that we do adding users and usernames and passwords and stuff like that um but right now we don't we don't have the UI for it and of course I don't really want to spend time setting up UI for that now or anything like that so we're going to skip that step entirely instead what we're going to do is just send our intent to connect over to the server and that's going to be it right so we're literally going to be like un connecting we might send the person's I don't I don't even know if we're taking in a name see that's another problem right we're not taking in any kind of username or player name uh everything's kind of nameless right now and we're going to kind of keep it that way for now um just to keep things real simple cuz I want to lay down this framework as like I want to make it as simple as possible and then we'll start extending each kind of feature so it's almost like if we had like a little tree that we would growing right we want to first kind of set up and it was like a binary tree or something so it was limited in you know how many how many nodes each or how many children each node can have um uh you know we're kind of setting up the the root kind of first and then from then we we'll start expanding each node and start kind of you know so I mean if you really want a computer science explanation for what I'm trying to say you would say that I'm kind of trying to do this development of breadth first rather than depth first so instead of fully completing one feature then moving on to the next one I'm kind of touching on each feature and we're going to kind of revisit them constantly that way I think it'll keep things a bit more interesting uh and also um I mean I like to have my entire game working badly first rather than having a little little section of my game working perfectly okay and I'm sure everyone's like that as well who wants to work on the same feature when the rest of the game isn't ready um so you have to kind of keep working on that so that's what we'll do so um connection packet that's probably not going to fly uh we're going to basically just make a private private final bite uh thing here that and I don't even know like um I honestly again someone's going to have to in fact if someone could look this up and do the research for me and just put it in the comments final static like I'm assuming we need both of them but again if something's final then it's obviously going to be static in the sense that it's clearly going to be the same for each class like in you know if you mark something as as like const or or static essentially in in C++ what you'll do is like the memory which it gets allocated for will kind of be part of the executable itself so if I make a constant kind of bite uh or a constant Char array or something in C++ then that string that I put in there or the data I put in there is actually going to be physically in the executable again this is Java I have no idea how it works unfortunately so if someone knows you know if final static is needed or just final like I'm basically just saying this is a hard constant that is going to be the same like I mean I would have thought the final would kind of implicitly make it static in a way because you can't change it so why would it obviously it's going to be the same across all instances or does this or does making it final mean that every client has its own memory to hold this I don't know I've never actually thought about it that hard and we probably don't need to but this is just something that I came up with on the spot right now and I was like huh I wonder if that makes any sense cuz I think in C you can't Mark Mark something as final and static or something all like constant static I'm not sure anyway this is going to be our so we'll have a bunch of these um so s score just means oh am I going to switch to my convention probably not let's just make it um so packet type connect or something and we'll just I mean this is a bite array we'll probably just we could send one bite we could send um here's what we'll do we'll send one bite for this and this is just going to be 01 okay we'll have another one though that is actually a header which is just like going to be two bytes probably that just kind of says you know hey this is um this is this is a packet for me um and for that of course uh we might just pick something like 80 40 I don't know again I'm just two random numbers well let's not do that two random numbers um and that's more than a b of course so maybe we'll do like uh let's do something that we can actually read no let's just do like 40 and in in HEX decimal and like maybe maybe like 4020 420 let's not do that let's do 4040 okay doesn't actually matter what this is this is just something that we can use to verify that we're not being fed malicious packets obviously again it's not particularly secure because anyone could decompile our code or binary even if it was C++ or whatever and be like oh look they're sending these two bytes at the front of every packet but it's just something that we're doing just to kind of have a more uniformly formed packet if that makes any sense and also that way we know that this is like the beginning of a new packet and not like you know in case our data gets corrupted anyway um again we might change that I don't really care what it's said to it doesn't matter um all right so send connection packet so we're going to basically send we're going to construct our our data um it's not going to be connection packet it's going to first of all be I guess our packet header um I don't actually know how we're going to write our bite arrays I don't know if we have a class that can deal with that immediately anyway so list probably could in a sense um I don't know if Java has this so I'm just going to make my own because it's probably useful for you guys anyway under util I'm just going to make a class called binary Rider this is going to be very similar to C's binary riter class if you guys have ever used that basically what this is going to be is an underlying list of bytes uh which is going to be our buffer um it's going to have a potentially a Constructor which takes in a size um a Constructor that again I would make this a default parameter but you can't with Java so I have to make two Constructors here so this does nothing uh this will basically instantiate the list to be in fact we might in that case do this instead you import that list so I'm going quite fast here cuz I didn't plan on actually doing this and time is running out um but we'll have this B it and I I think we can reserve a size right yes so initial capacity will be size okay so we have a list of byes here we're going to have a um probably can't do that cuz this is freaking Java ah okay doesn't matter we'll have we'll have to set this up probably we'll have we'll have right okay what right will do is basically just do you know buffer. add data um this is basically very similar to how our sterilization handles this except this way it's just kind of we don't need to supply the bite buffer with a preet size this is like a dynamically kind of dynamically growing uh thing here so for this we'll do um we'll just make a full loop we'll keep it simple I mean I'm sure we could use system. copy or something crazy uh but I am not feeling too confident with Java's API right now and also this is probably going to make sense for more of you um we you know I mean we could spend all day on this really but it's going to do the same thing every freaking time I don't know if well actually not every time because um we have to convert that to an what was that magical thing I used last time to convert an in into like a bite array or a yeah something like that I don't I want to Google it real quick I I think there was something really simple I know there's bit converter in C but of course there's this ridiculous thing yeah okay we'll just do that I guess oh Java sometimes I hate you okay so bite so let's do bite B for buffer I don't know so it's going to be bite buffer. allocate for this is such a waste of memory and stuff such a waste of CPU time unless it's doing something magically optimized um and then we're going to of course just hit up right with that okay so you guys get the idea this is what this is what this class is going to be and then finally the most important thing I guess is the get buffer uh method which is basically just going to return this buffer of ours uh uh uh as an array so to array I believe is correct so there's one one of these doesn't work properly I swear so I'm just going to quickly yeah I mean it might we might actually have to do this I really hope not but let's just assume that this works okay I'm not sure okay so it's already like you know not being happy about that you can do that see like why you why you can't cost raise can you in Java why not so we might have to do what's the point then we might have to do bite I really hope this works uh result to array result return result so does this this are you kidding me so it actually thinks the Primitive is not correct but they're the same thing though aren't they incredible incredible oh Java okay here we go so unbelievable so you actually have to iterate through it are you kidding me sorry I'm just going to share with you guys what I'm reading here from my quick Google searching that's not I don't care about that so you actually have to like are you actually kidding me this is ridiculous so I guess they are different wow wow this is uh this is great so what we'll do then I guess is we'll just say that's awful okay so bu result I really hope this one by the way what does this do actually what list array list so we need to get to the array list class and we need to see what it does because I think that one of these does the incorrect thing or at least does this allocate a new array or do we have to give it one that's already allocated that's my so array copy of blah blah blah what's the array so a is the thing if a do length is less than size then make a new array of A's so maybe it will cuz if the length I guess oh well that's kind a null pointer exception actually so it looks like we do actually have to give it an array that is the right size this would all be solved if we could just store you know bytes like this but of course we can't be for I don't know why for whatever reason okay I'm not going to get frustrated with Java today this is a happy episode maybe I'm Java in wrong so if you guys have a better way of doing this please post like a link to like a haste bin page or something um because I I can't like I actually can't believe that this is what people are supposed to do get size let's just size uh so to array we make another bite so this is just a lovely Feast of allocations going on right here then we copy everything which I guess I'll do using a for Loop and I guess we can just do that or do we actually need to like yeah so we can do that because they are equal but if they're arrays it's all it's all over which doesn't make any sense because the memory should be the same anyway that doesn't matter um this is our massive get buffer thing which would have been one line of C++ but point is we've got this now so this is what we're going to do we've got our data we've got data which is basically going to to be the way that we're going to set this up is we're going to have our binary writer there might be a class in Java again as I said that already does that I just felt like writing my own to show you guys what it would actually do we don't know what the size is going to be and we don't really care too much anyway so we do writer. right we pass in our packet header and then we pass in our um packet type connect thing right so we do writer. write packet type connect okay and that's going to be it um and then what we can do is just again H up send writer. getbuffer and that's all we need to do um as far as the connection packet goes okay so hopefully the server will receive this again we can check really easily if I just go to the server real quick um our dump thing right now uh actually as you can see creates a string out of the data which is not what we want to do at this point what we're actually going to do is dump the binary the way we're going to do that is uh basically go through each of the uh where's our data data. length we're going to go through each bite individually we're going to hit up system. out. print line or we'll actually do print f um and you guys will see where I'm going with this in a minute is that yep correct okay good um we're going to start off with two tabs um actually no we're not going to do this let's just ref out to this a little bit um so we'll start off with we'll do a print where we start off with two tabs and then we'll do a print F which will basically take in data um so let's see I'm going to take in a uh percentage sign X which means formatted as a hexad decimal uh thing um I don't know if we can tell it to actually be two digits though so we can even do like 01 instead of just one but we'll see what happens um so we'll do that and then we'll do data I of course okay and then every time uh we'll do every + 1 mod 4 so every four uh iteration skipping the first one of course every four byes maybe every eight bytes or something we'll make a new line so we'll say um every 8 bytes so when that equals zero we'll just do system to add print line um back sln and then another two tabs right and then at the end of this we'll also do a print line okay that way we'll have some reasonably formatted output um I will actually add like two space in between all of these byes as well but now now what we should be doing is printing bytes right so we'll quickly go back here and just format that nicely uh let's start up the server so I'll go server debug as let's just quickly write some code here that said something like [Music] um uh okay let's assume that started successfully so we'll do something like started server on Port 8192 server is listening okay um again we can probably handle some better logging later I just wanted to set something up really quickly just to get this to work so we'll start off with Java application okay good at least we know that's happening we'll start up our game which should send that connection packet so we'll start that as a Java application okay that was huge first of all but we'll go back to we'll stop this let's see debug oh what's going on let's stop that okay and we'll start the Ser I guess as well so here's what we have we have a huge amount of data it seems okay so you can see you can see that the packet it sent is absolutely massive okay we'll talk about that later but also you can see that in terms of what we've received I think one space would have been enough but you can see that in terms of what we've received and I could probably print 16 of these I think in one line uh there's 440 and there's one and the rest is just zero now the reason it's so big I'll quickly mention that now it doesn't really matter but honestly the reason it's big bigger remember is because when we create data so that's just going from the packet um actually um let's send we have a Max packet size which I think we use somewhere yes so yeah so over here when we receive the data buffer right and we kind of decide to soccer. receive it you can see that we received 10 24 bites so the rest of them are going to be empty now we can actually check how big it is um if we actually do something like uh packet. getet uh I think there's a proper way cuz unfortunately the data is not going to be there needs to there should be a way to see how many bytes it actually read um unfortunately I don't remember what that is though so we receive a packet um okay here we go okay get length it seems is the right thing so get length Okay so we can do that and if we do that it'll be fine so let's remove that space as I said let's maybe make 16 of these in one line um and then that should be good so we'll start that up real quickly again so we'll do uh debug as Java application uh debug as CH application close the game go back to our server and you can see that in this case um uh here it is I don't know why we got that not sure anyway you can see that we received three bytes which is correct um what actually is that what are we printing off after that oh we're PR we're printing it as a string anyway okay so let's not do that I think why why did we leave that in there wish I knew oh it doesn't matter we'll get rid of that new string thing because that's what the at signs are for um Okay cool so we're receiving the connection packet successfully basically so when we process it again we'll see we have two kind of ways to process stuff we have a we have a you know checking to see if a string equals rcdb and then we'll also have one other thing which as I said we have this thing so what we'll do is else if um uh I don't know how to do this man so we we need to check to see if the first two BS are look I might just do this because I honestly don't know how to do this um properly in Java so we'll do uh that and I promise you we will fix this so then the third bite will be the type so again if the case is one which I might just format as that for now even though it is exactly the same of course um we can say something like received connection packet okay again really quick test uh to run so if we just we should get that hopefully if we just go rain server um and in fact I might go to game and just not send that RC database cuz I really don't care about that so we'll quickly debug that debuggee that as some people might say um okay cool so there we go so we didn't actually receive a connection packet wonderful why not let's go back to server and see what happened so um why did it not like my thing well that's clearly false right we dumped the packet if data zero is that that is what we send and data one is that oh data two whoops whoops cuz data 3 would have been zero cuz it's empty it's filled with zeros so let's do that again debug as Java application debug as Java app location and this time hopefully we would have yeah received connection packet beautiful so what what are we going to do with that connection packet well I'm glad you asked because we are quickly since we're running out of time we're going to quickly um I'll show you guys the main idea I did hope to get more done this episode but we had to write that whole binary riter thing and everything but um in our server what we'll do will have a um we'll have a uh client now I don't really want to call this client because [Music] um because it's maybe I'll call it server client just because when I search for client and stuff even though they are in different name spaces or different packages like I kind of you know I think it's better just having it maybe server client so this is what a server client's going to have it's going to have an address it's going to have and this is like roughly going to be like a pod kind of structure like it's going to be plan old data just like this is just going to be like a struct really just filled with information we need to describe our client um I'll probably end up adding methods and functionality to it anyway but we'll just have the basics thing basic basic things like address and port and maybe like a status okay which for now might just be a bulling so maybe this is more more or less an is kind of connected thing okay and again since this is going to be kind of a pod uh structure I'm going to make everything public because again it's just going to be a struct so public server client um and I guess we can create a new client with an address and a port um and then we'll set the stus true I I don't really know we'll just do that for now uh whoops we need to make sure we assigned these puppies okay so what's going to happen is when we receive a connection packet inside our server what we'll do is the server will actually have a private list um for now we'll refer to it as a list we'll we we might change that data structure into something a little better um like like a like a set maybe that would be a lot better yeah we'll probably make it a set eventually I just don't want to deal with hashing right now but we'll make it a set or maybe even a no a set would be fine yeah we'll make it a set I mean what's what's it going to we could optionally make it like a hash table or hash map and then have the keys be uh the username because that would be quite a fast hash instead of hashing the whole object we might do that anyway yeah well okay here's what we're going to do we're going to we're going to quickly set this up as a set actually so we'll have a set uh of server client um called clients um we're going to uh make this a new I think hashset yep and I know you don't have to write it in here but I like writing it twice anyway just so I know what's happening um makes the code a little bit more readable uh so clients um what's going to happen is when we actually create re receiver connection packet we're going to say clients. add new server clients packet. get address packet. getport okay congrat like we've got our our client now um and the one thing I will do is um we will like to to do will be to have a username okay so what we'll do is we'll actually we will store a or at least a user ID I think for like at least for now so we'll have something like public int um user ID which for now again this is going to be a bit stupid but bear with me it's fine um and it will work private static and uh user ID counter maybe some of you see where this is going so we're basically going to assign user ID to user ID counter Plus+ which means that it will every time it creates a new server client it will increment that static field meaning that we'll get a unique um user ID for each client all the way up to about 2 billion which should be enough I think so we'll be fine um maybe we'll start it at one though just because uh zero might be like you know no user ID or invalid or something weird Okay so there we go we've got a user id id now and since that is unique what we can do is and I think that I'm actually not even sure let's just quickly uh look up object and see what the hash code is an INT okay so let's take this is that what I want why is that native okay anyway I'm assuming that I can just say public in hash code and that'll overwrite that right nope how do I do this um I'm assuming hash code is what what it would use for set sets anyway ah it's a Capital C so you're happy with that okay and then I'm just going to return cuz I think it Returns the memory address or something like that or the object ID by default but we want to the reason I'm changing hash code is because we might want to compare you know two objects together for for example or just have a like just because we we might create a new server client object with the same user ID or something with the same address and all that stuff and we don't want it to think that that's a different object because it is still the same user of course because we use user ID instead so we can again just return a user ID is our hash code that will be a unique value so that's all we need to um basically uh use our hash for so that we can like that will be our hash and then we can look up that'll be our look up into the set right um so for those of you who don't know first of all cuz I don't think sets are used that often or I don't think sets are used as often as they should unfortunately a lot of people um a lot of kind of amateur programmers I'll say um will just use list for everything like an array list for everything um and uh you know whilst that is okay and probably wouldn't have a huge performance penalty in our case because there aren't billions of or even thousands of clients um having something like a set makes sense so set is basically a constant time lookup because it uses a hash function to figure out where the object you're looking for actually is in memory um and of course the only only requirement for a set over list is that every object there has to be unique right obviously because otherwise if you have two objects with the same thing well you can have like a multi set but we won't talk about that cuz it's stupid um you can have a set uh you know you can't have duplicate objects cuz then it wouldn't know which one to get right um so typically if you know you're always going to have a set of unique objects use a set because your lookup times are going to be so much faster if you're searching for an object if you never have to search for objects if all you're interested in is just iterating over the list again and again and again then maybe just use a list right but of course if you need specific objects like for example example I want to find chero as my client how do I do that um having a set is going to be way better um you can also like eventually we'll probably like we can still use [Music] um uh what was I saying I mean cuz again what we're doing right now is we're hashing based on just the user ID so that's not ideal but it's just it's a beginning um we'll eventually probably hash based on the name of the user that way you can quickly create a new server client object with just a name and then that will be kind of your way to compare and like retrieve ones that you want so anyway now that we've done this um if we basically go into uh I will basically go up here into listen and under process maybe up here I will set a break point or something or in fact I don't even need to I'm just going to run the server and then the client close the client uh under the server I'm going to hit pause uh switch into the debug view um and then what I should see is under variables which I see nothing I mean what I should see uh let me just switch to the right thread I guess listen thread or maybe I'll just go into the Stace yeah here we go you can see that inside this I should have clients I just this is a set so it's probably not going to we have size one in here um I don't know if I can actually there it is key server client okay we can see we've got an inet address which will be equal to um we can't really see it but it'll Lin is a set object and then the port of course 57360 which is our Port status is true user ID is one okay so there's our object we've successfully connected a client the server now retains that client meaning the server can now send you know a message to all clients or something like that um so we have that going on and of course the next step would be replying to the client and being like hey I've received your connection I've added you to the list this list you are now connected to the server and that's what we're going to cover next time if you enjoy this video please hit the like button if you really enjoy this video and you want access to the source code and you want to support the series then feel free to Pledge on patreon just $5 a month will get you access to a private GitHub repository which is over here which contains every single commit or rather every like a commit for each episode of game programming uh so that you can you can compare the code changes between every episode and so that you can just download the code without having to copy it if you prefer to just kind of sit back relax and watch the videos without having to type along so anyway and of course that helps the series out and ensures that I can keep putting out these videos all right that's it I'll see you guys next week uh yeah CH out [Music]
Original Description
Source Code ► https://www.patreon.com/thecherno
Follow me on Instagram! ► http://instagram.com/thecherno
Twitter ► http://www.twitter.com/thecherno
Slack ► http://www.slack.thecherno.com
Stream ► http://www.twitch.tv/thecherno
Website ► http://www.thecherno.com
Facebook ► http://www.facebook.com/thecherno
Want more? You can help out by supporting me on Patreon! https://www.patreon.com/thecherno
-------------------------------------------------------------------------------------------------
Website: http://www.thecherno.com
Twitter: http://www.twitter.com/thecherno
Facebook: http://www.facebook.com/thecherno
Subreddit: http://www.reddit.com/r/thecherno/
Steam Group: http://www.steamcommunity.com/groups/thecherno
-------------------------------------------------------------------------------------------------
Outro music is by Approaching Nirvana: http://www.youtube.com/approachingnirvana
Watch on YouTube ↗
(saves to browser)
Sign in to unlock AI tutor explanation · ⚡30
Playlist
Uploads from The Cherno · The Cherno · 0 of 60
← Previous
Next →
1
 2
2
 3
3
 4
4
 5
5
 6
6
 7
7
 8
8
 9
9
 10
10
 11
11
 12
12
 13
13
 14
14
 15
15
 16
16
 17
17
 18
18
 19
19
 20
20
 21
21
 22
22
 23
23
 24
24
 25
25
 26
26
 27
27
 28
28
 29
29
 30
30
 31
31
 32
32
 33
33
 34
34
 35
35
 36
36
 37
37
 38
38
 39
39
 40
40
 41
41
 42
42
 43
43
 44
44
 45
45
 46
46
 47
47
 48
48
 49
49
 50
50
 51
51
 52
52
 53
53
 54
54
 55
55
 56
56
 57
57
 58
58
 59
59
 60
60

3D Game Programming - Episode 1 - Window
The Cherno
3D Game Programming - Episode 2 - Game Loop
The Cherno
3D Game Programming - Episode 3 - Arrays
The Cherno
3D Game Programming - Episode 4 - Drawing Pixels!
The Cherno
3D Game Programming - Episode 4.5 - How Rendering Works
The Cherno
3D Game Programming - Episode 5 - Playing with Pixels!
The Cherno
3D Game Programming - Episode 6 - Performance Boosting
The Cherno
3D Game Programming - Episode 7 - FPS Counter
The Cherno
3D Game Programming - Episode 8 - Alpha Support and More
The Cherno
3D Game Programming - Episode 9 - Beginning 3D
The Cherno
3D Game Programming - Episode 10 - Floors and Animation
The Cherno
3D Game Programming - Episode 11 - Rotation
The Cherno
3D Game Programming - Episode 12 - User Input
The Cherno
3D Game Programming - Episode 13 - Render Distance Limiter!
The Cherno
3D Game Programming - Episode 14 - Basic Mouse Movement
The Cherno
3D Game Programming - Episode 15 - Textures + More!
The Cherno
3D Game Programming - Episode 16 - Walking, Crouching, Sprinting + More
The Cherno
3D Game Programming - Episode 16.5 - Exporting Runnable Jars
The Cherno
3D Game Programming - Episode 17 - Small Adjustments + Birthday!
The Cherno
3D Game Programming - Episode 17.5 - Creating an Applet
The Cherno
3D Game Programming - Episode 18 - The Beginning of Walls
The Cherno
3D Game Programming - Episode 18.1 - A Few More Things
The Cherno
Episode 18.5 - Creating an EXE File in Java
The Cherno
3D Game Programming - Episode 19 - Rendering Walls
The Cherno
3D Game Programming - Episode 20 - Continuing Walls, Fixing Bugs, and Managing Crashes
The Cherno
3D Game Programming - Episode 21 - Texturing Walls, Fixing Clipping, and Fixing the Mouse
The Cherno
3D Game Programming - Episode 22 - Random Level Generator + Properly Fixing Clipping
The Cherno
3D Game Programming - Episode 23 - Graphical User Interface (GUI) Launcher
The Cherno
3D Game Programming - Episode 24 - Making Our Launcher Work
The Cherno
3D Game Programming - Episode 25 - Writing and Reading Files
The Cherno
3D Game Programming - Episode 26 - Custom Resolutions
The Cherno
3D Game Programming - Episode 27 - Decorating the Launcher
The Cherno
3D Game Programming - Episode 28 - Continuing our Custom Launcher!
The Cherno
3D Game Programming - Episode 29 - Launching The Game
The Cherno
3D Game Programming - Episode 30 - Colour Processing In-Depth
The Cherno
3D Game Programming - Episode 31 - Sprites!
The Cherno
3D Game Programming - Episode 32 - Sprite Mapping
The Cherno
3D Game Programming - Episode 33 - High Resolution Rendering
The Cherno
3D Game Programming - Episode 34 - Entities
The Cherno
Genesis - My Game for Ludum Dare 24
The Cherno
Vlog + Ludum Dare Results
The Cherno
Game Programming - Episode 1 - Resolution
The Cherno
Game Programming - Episode 2 - Threads
The Cherno
Game Programming - Episode 3 - Game Loop
The Cherno
Game Programming - Episode 4 - Window
The Cherno
Episode 5 - Buffer Strategy
The Cherno
Game Programming - Episode 6 - Graphics Initialized
The Cherno
Game Programming - Episode 7 - Buffered Image and Rasters
The Cherno
Game Programming - Episode 8 - The Screen Class
The Cherno
Game Programming - Episode 9 - Rendering Pixels
The Cherno
Game Programming - Episode 10 - Clearing the Screen
The Cherno
Game Programming - Episode 11 - "Out of Bounds, Baby!"
The Cherno
Game Programming - Episode 12 - Negative Bounds
The Cherno
Game Programming - Episode 13 - Timer
The Cherno
Game Programming - Episode 14 - FPS Counter
The Cherno
Episode 15 - Tiles
The Cherno
Game Programming - Episode 16 - The Map
The Cherno
The Walls 2 - Minecraft PvP Survival Map
The Cherno
Game Programming - Episode 17 - Key Input
The Cherno
Game Programming - Episode 18 - Controlling The Map
The Cherno
More on: Distributed Systems
View skill →


🎓
Tutor Explanation
