Kubernetes Tutorial for Beginners [FULL COURSE in 4 Hours]
Key Takeaways
This video provides a comprehensive introduction to Kubernetes, covering its components, architecture, and practical applications, with hands-on demonstrations and examples using tools like Docker, Minikube, and Kubectl.
Full Transcript
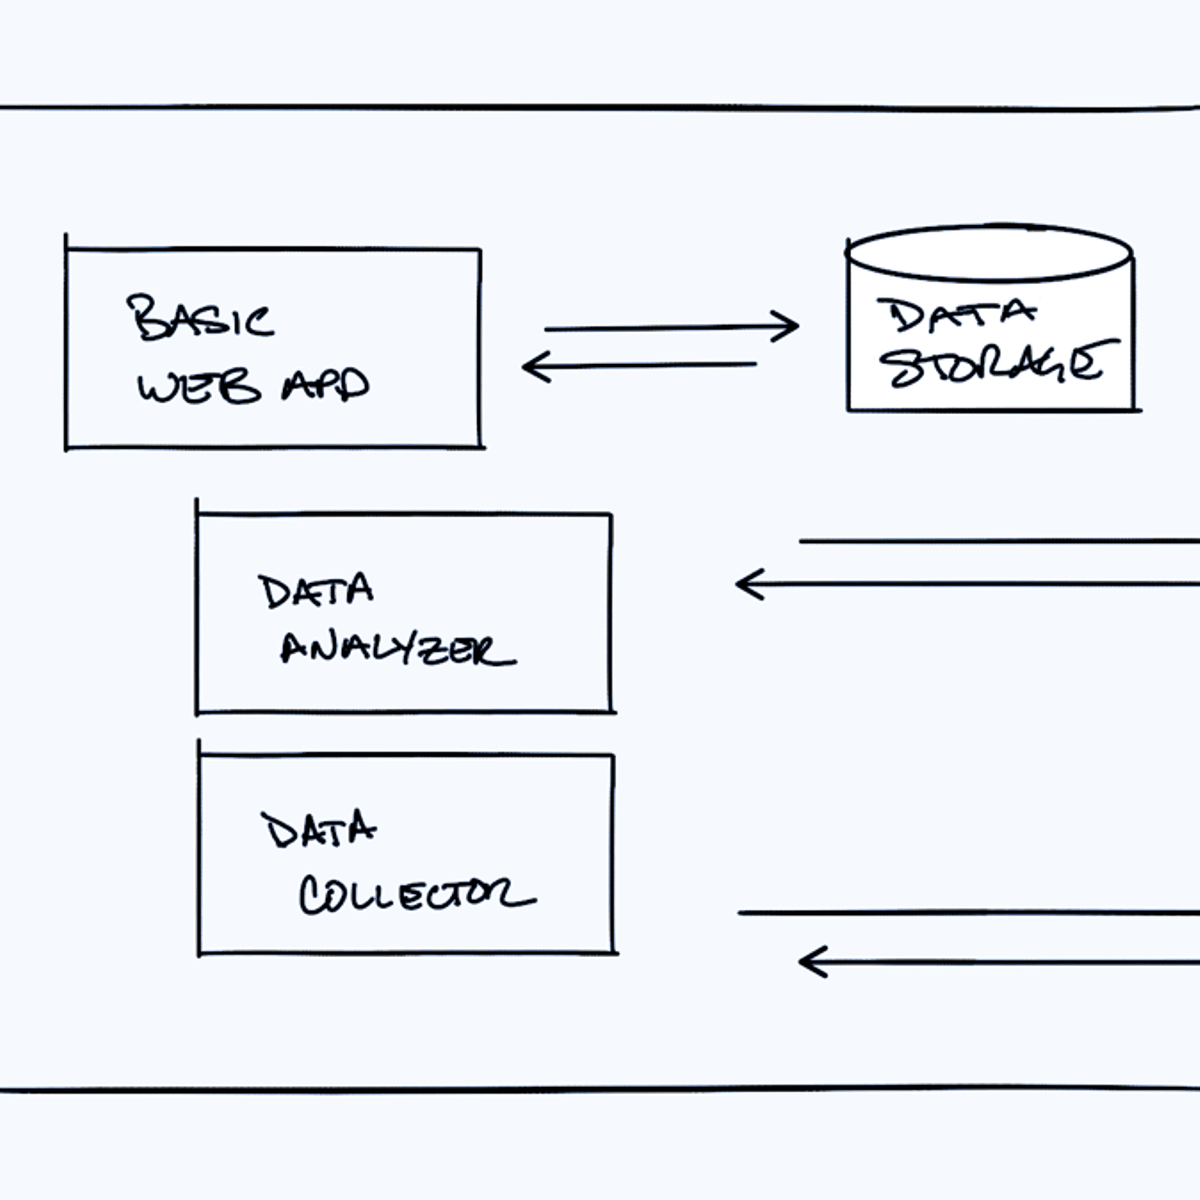
hello and welcome to this complete kubernetes course the course is a mix of animated theoretic explanations but also Hands-On demos for you to follow along so let's quickly go through the topics I'll cover in this course the first part gives you a great introduction to kubernetes we'll start with the basic concepts of what kubernetes actually is what problems it solves in the kubernetes architecture you will learn how you can use kubernetes by showcasing all the main components after learning the main Concepts we will learn and install minicube for a local kubernetes cluster and we will go through the main commands of creating debugging and deleting pods using cubectl which is kubernetes command line tool after knowing cubectl main commands I will explain kubernetes yaml configuration files which we will use to create and configure components then we will go through a practical use case where we'll deploy a simple application setup in kubernetes cluster locally to get your first hands-on experience with kubernetes and feel more confident about the tool in the second part we will go into more advanced and important Concepts like organizing your components using namespaces how to make your app available from outside using kubernetes Ingress and learn about Helm which is the package manager for kubernetes in addition we will look at three components in more detail first how to persist data in kubernetes using volumes second how to deploy stateful applications like databases using stateful set component and lastly we will look at the different kubernetes service types for different use cases if you like the course be sure to subscribe to my channel for more videos like this and also check out the video description for more related courses on udemy Etc if you guys have any questions during the course or after the course or you want to Simply stay in touch I would love to connect with you on social media so be sure to follow me there as well so in this video I'm going to explain what kubernetes is we're going to start off with the definition to see what official definition is and what it does then we're going to look at the problem solution case study of kubes basically why the kubernetes even come around and what problems does it solve so let's jump in right into the definition what is kubernetes so kubernetes is an open source container orchestration framework which was originally developed by Google so on the foundation it manages container speed Docker containers or from some other technology which basically means that kubernetes helps you manage applications that are made up of hundreds or maybe thousands of containers and it helps you manage them in different environments like physical machines virtual machines or Cloud environments or even hybrid deployment environments so what problems does kubernetes solve and what are the tasks of a container orchestration tool actually so to go through this chronologically the rise of microservices cost increased usage of container Technologies because the containers actually offer the perfect host for small independent applications like microservices and the rise of containers in the microservice technology actually resulted in applications that are now comprised of hundreds or sometimes maybe even thousands of containers now managing those loads of containers across multiple environments using scripts and self-made tools can be really complex and sometimes even impossible so that specific scenario actually caused the need for having container orchestration Technologies so what those orchestration tools like kubernetes do is actually guarantee following features one is high availability in simple words High availability means that the application has no downtime so it's always accessible by the users a second one is scalability which means that application has high performance it loads fast and the users have a very high response rates from the application and the third one is disaster recovery which basically means that if an infrastructure has some problems like data is lost or the servers explode or something bad happens with the service center the infrastructure has to have some kind of mechanism to pick up the data and to restore it to the latest state so that application doesn't actually lose any data and the containerized application can run from the latest state after the recovery and all of these are functionalities that container orchestration Technologies like kubernetes offer so in this video I want to give you an overview of the most basic fundamental components of kubernetes but just enough to actually get you started using kubernetes in practice either as a devops engineer or a software developer now kubernetes has tons of components but most of the time you're going to be working with just a handful of them so I'm gonna build a case of a simple JavaScript application with a simple database and I'm going to show you step by step how each component of kubernetes actually helps you to deploy your application and what is the role of each of those components so let's start with the basic setup of a worker node or in kubernetes terms a node which is a simple server a physical or virtual machine and the basic component or the smallest unit of kubernetes is a pod so what pod is is basically an abstraction over a container so if you're familiar with Docker containers or container images so basically what pod does is it creates this running environment or a layer on top of the container and the reason is because kubernetes wants to abstract away the container runtime or container Technologies so that you can replace them if you want to and also because you don't have to directly work with Docker whatever container technology you use in a kubernetes so you only interact with the kubernetes layer so we have an application pod which is our own application and that will maybe use a data database pod with its own container and this is also an important concept here pot is usually meant to run one application container inside of it you can run multiple containers inside one pod but usually it's only the case if you have one main application container and a helper container or some side service that has to run inside of that pod and as you say this is nothing special you just have one server and two containers running on it with a abstraction layer on top of it so now let's see how they communicate with each other in kubernetes world so kubernetes offers out of the box a virtual Network which means that each pod gets its own IP address not the container the Pod gets the IP address and each pod can communicate with each other using that IP address which is an internal IP address obviously it's not the public one so my application container can communicate with database using the IP address however pod components in kubernetes also an important concept are ephemeral which means that they can die very easily and when that happens for example if I lose a database container because the container crashed because the application crashed inside or because the nodes the server that I'm running them on uh ran out resources the Pod will die and a new one will get created in its place and when that happens it will get assigned a new IP address which obviously is inconvenient if you are communicating with the database using the IP address because now you have to adjust it every time pod restarts and because of that another component of kubernetes called service is used so service is basically a static IP address or permanent IP address that can be attached so to say to each pod so my app will have its own service and database pod will have its own service and the good thing here is that the life cycles of service and the Pod are not connected so even if the Pod dies the service and its IP address will stay so you don't have to change that endpoint anymore so now obviously you would want your application to be accessible through a browser right and for this you would have to create an external service so external Services a service that opens the communication from external sources but obviously you wouldn't want your database to be open to the public requests and for that you would create something called an internal service so this is a type of a service that you specify when creating one however if you notice the URL of the external service is not very practical so basically what you have is an HTTP protocol with a node IP address so often node not the service and the port number of the service which is good for test purposes if you want to test something very fast but not for the end product so usually you would want your url to look like this if you want to talk to your application with a secure protocol and a domain name and for that there is another component of kubernetes called Ingress so instead of service the request goes first to Ingress and it does the forwarding then to the service so now we saw some of the very basic components of kubernetes and as you see this is a very simple setup we just have one server and a couple of containers running and some Services nothing really special where kubernetes advantages or the actual cool features really come forward but we're gonna get there step by step so let's continue so as we said pots communicate with each other using a service so my application will have a database endpoint let's say called mongodb service that it uses to communicate with the database but where do you configure usually this database URL or endpoint usually you would do it in application properties file or as some kind of external environmental variable but usually it's inside of the built image of the application so for example if the endpoint of the service or service name in this case changed to mongodb you would have to adjust that URL in the application so usually you'd have to rebuild the application with a new version and you have to push it to the repository and now you'll have to pull that new image in your pod and restart the whole thing so a little bit tedious for a small change like database URL so for that purpose kubernetes has a component called configmap so what it does is it's basically your external configuration to your application so config map would usually contain configuration data like URLs of a database or some other services that you use and in kubernetes you just connect it to the Pod so that pod actually gets the data that configmap contains and now if you change the name of the service the endpoint of the service you just adjust the config map and that's it you don't have to build a new image and have to go through this whole cycle now part of the external configuration can also be database username and password right which may also change in the application deployment process but putting a password or other credentials in a config map in a plain text format would be insecure even though it's an external configuration so for this purpose kubernetes has another component called secret so secret is just like config map but the difference is that it's used to store secret data credentials for example and it's stored not in a plain text format of course but in base 64 encoded format so secret would contain things like credentials and of course I mean database user you could also put in config map but what's important is the passwords certificates things that you don't want other people to have access to would go in the secret and just like config map you just connect it to your pod so that pod can actually see those data and read from the secret you can actually use the data from config map or Secret inside of your application pod using for example environmental variables or even as a properties file so now to review we've actually looked at almost all mostly used kubernetes basic components we've looked at the pod we've seen how services are used what is ingress component useful for and we've also seen external configuration using config map and secrets so now let's see another very important concept generally which is data storage and how it works in kubernetes so we have this database part that our application uses and it has some data regenerate some data with this setup that you see now if the database container or the Pod gets restarted the data would be gone and that's problematic and inconvenient obviously because you want your database data or log data to be persisted reliably long term and the way you can do it in kubernetes is using another component of kubernetes called volumes and how it works is that it basically attaches a physical storage on a hard drive to your pod and that storage could be either on a local machine meaning on the same server node where the Pod is running or it could be on the remote storage meaning outside of the kubernetes cluster it could be a cloud storage or it could be your own premise storage which is not part of the kubernetes cluster so you just have an external reference on it so now when the database pod or container gets restarted all the data will be there persisted it's important to understand the distinction between the kubernetes cluster and all of its components and the storage regardless of whether it's a local or remote storage think of a storage as an external hard drive plugged in into the kubernetes cluster because the point is kubernetes clustered explicitly doesn't manage any data persistence which means that you as a kubernetes user or an administrator are responsible for backing up the data replicating and managing it and making sure that it's kept on a proper Hardware Etc because it's not taking care of kubernetes so now let's see everything is running perfectly and a user can access our application through a browser now with this setup what happens if my application pod dies right crashes or I have to restart the Pod because I built a new container image basically I would have a downtime where a user can reach my application which is obviously a very bad thing if it happens in production and this is exactly the advantage of distributed systems and containers so instead of relying on just one application pod and one database part Etc we are replicating everything on multiple servers so we would have another node where a replica or clone of our application would run which will also be connected to the service so remember previously we said the service is like an persistent static IP address with a DNS name so that you don't have to constantly adjust the endpoint when a pod dies but service is also a load balancer which means that the service will actually catch the request and forward it to whichever part is list busy so it has both of these functionalities but in order to create the the second replica of the my application pod you wouldn't create a second part but instead you would Define a blueprint for a my application pod and specify how many replicas of that pod you would like to run and that component or that blueprint is called deployment which is another component of kubernetes and in practice you would not be working with pulse or you would not be creating pods you would be creating deployments because there you can specify how many replicas and you can also scale up or scale down number of replicas of parts that you need so with pod we said that part is a layer of abstraction on top of containers and deployment is another abstraction on top of pods which makes it more convenient to interact with the pods replicate them and do some other configuration so in practice you would mostly work with deployments and not with pots so now if one of the replicas of your application pod would die the service will forward the requests to another one so your application would still be accessible for the user so now you're probably wondering what about the database pod because if the database part diet your application also wouldn't be accessible so we need a database replica as well however we can't replicate database using a deployment and the reason for that is because database has a state which is its data meaning that if we have clones or replicas of the database they would all need to access the same shared data storage and there you would need some kind of mechanism that manages which pods are currently writing to that storage or which pods are reading from that storage in order to avoid the data inconsistencies and that mechanism in addition to replicating feature is offered by another kubernetes component called stateful set so this component is meant specifically for applications like databases so MySQL mongodb elasticsearch or any other stateful applications or databases should be created using stateful sets and not deployments it's a very important distinction and stateful said just like deployment would take care of replicating the pots and scaling them up or scaling them down but making sure the database reads and writes are synchronized so that no database inconsistencies are offered however I must mention here that deploying database applications using stateful sets in kubernetes cluster can be somewhat tedious so it's definitely more difficult than working with deployments where you don't have all these challenges that's why it's also a common practice to host database applications outside of the kubernetes cluster and just have the deployments or stateless applications that replicate and scale with no problem inside of the kubernetes cluster and communicate with the external database so now that we have two replicas of my application pod and two replicas of the database and they're both load balanced our setup is more robust which means that now even if Node 1 the whole node server was actually rebooted or crashed and nothing could run on it we would still have a second node with application and database pods running on it and the application would still be accessible by the user until these two replicas get recreated so you can avoid downtime so to summarize we have looked at the most used kubernetes components we start with the pods and the services in order to communicate between the parts and the Ingress component which is used to Route traffic into the cluster we've also looked at external configuration using config maps and secrets and data persistence using volumes and finally we've looked at pod blueprints with replicating mechanisms like deployments and stateful sets where stateful set is used specifically for stateful applications like databases and yes there are a lot more components that kubernetes offers but these are really the core the basic ones just using these core components you can actually build pretty powerful kubernetes clusters video we're gonna talk about basic architecture of kubernetes so we're going to look at two types of nodes that kubernetes operates on one is master and another one is slave and we're going to see what is the difference between those and which role each one of them has inside of the cluster and we're going to go through the basic concepts of how kubernetes does what it does and how the cluster is self-managed and self-healing and automated and how you as a operator of the kubernetes cluster should end up having much less manual effort and we're going to start with this basic setup of one node with two application Parts running on it so one of the main components of kubernetes architecture are its worker servers or nodes and each node will have multiple application pods with containers running on that node and the way kubernetes does it is using three processes that must be installed on every node that are used to schedule and manage those parts so nodes are the cluster servers that actually do the work that's why sometimes also called worker nodes so the first process that needs to run on every node is the container runtime in my example I have Docker but it could be some other technology as well so because application pods have containers running inside a container runtime needs to be installed on every node but the process that actually schedules those can those pods and the containers in underneath is cubelet which is a process of kubernetes itself unlike container runtime that has interface with both container runtime and the Machine the node itself because at the end of the day cubelet is responsible for taking that configuration and actually running a pod or starting a pod with a container inside and then assigning resources from that node to The Container like CPU RAM and storage resources so usually kubernetes cluster is made up of multiple nodes which also must have container runtime and cubelet services installed and you can have hundreds of those worker nodes which will run other pods and containers and replicas of the existing parts like my app and database pods in this example and the way that communication between them works is using Services which is sort of a load balancer that basically catch matches the request directed to the part or the application like database for example and then forwards it to the respective part and the third process that is responsible for forwarding requests from services to pods is actually Cube proxy that also must be installed on every node and Q proxy has actually intelligent forwarding logic inside that makes sure that the communication also works in a performant way with low overhead for example if an application my app replica is making a requested database instead of service just randomly forwarding the request to any replica it will actually forward it to the replica that is running on the same node as the Pod that initiated the request thus this way avoiding the network overhead of sending the request to another machine so to summarize two kubernetes processes cubelet and Cube proxy must be installed on every kubernetes worker node along with an independent container runtime in order for kubernetes cluster to function properly but now the question is how do you interact with this cluster or do you decide on which node a new application pod or database pod should be scheduled or if a replica part dies what process actually monitors it and then reschedules it or restarts it again or when we add another server how does it join the cluster to become another node and get pods and other components created on it and the answer is all these managing processes are done by Master nodes so Master servers or masternodes have completely different processes running inside and these are four processes that run on every masternode that control the cluster State and the worker nodes as well so the first service is API server so when you as a user want to deploy a new application in a kubernetes cluster you interact with the API server using some client it could be a UI like kubernetes dashboard could be command line tool like cubelet or a kubernetes API so API server is like a cluster Gateway which gets the initial request of any updates into the cluster or even the queries from the cluster and it also acts as a gatekeeper for authentication to make sure that only authenticated and authorized requests get through to the cluster that means whenever you want to schedule new pods deploy new applications create new service or any other components you have to talk to the API server on the master node and the API server then validate your request and if everything is fine then it will forward your request to other processes in order to schedule the Pod or create this component that you requested and also if you want to query the status of your deployment or the cluster Health Etc you make a request to the API server and it gives you the response which is good for security because you just have one entry point into the cluster another Master process is a scheduler so as I mentioned if you send an API server a request to schedule a new pod API server after it validates your request will actually hand it over to the scheduler in order to start that application pod on one of the worker nodes and of course instead of just randomly assigning to any node schedule has this whole intelligent way of deciding on which specific worker node the next pod will be scheduled or next component will be scheduled so first it will look at your request and see how much resources the application that you want to schedule will need how much CPU how much RAM and then it it's going to look at and it's going to go through the worker nodes and see the available resources on each one of them and if it says that OneNote is the least busy or has the most resources available it will schedule the new part on that note an important Point here is that scheduler just decides on which nodes a new pod will be scheduled the process that actually does the scheduling that actually starts that pod with a container is the cubelet so it gets the request from the scheduler and executes the request on that note the next component is controller manager which is another crucial component because what happens when pods die on any node there must be a way to detect that the nodes died and then reschedule those pods as soon as possible so what controller manager does is detect the State changes like crashing of pods for example so when pods die controller manager detects that and tries to recover the cluster State as soon as possible and for that it makes a request to the scheduler to reschedule those dead Parts in the same cycle happens here where the scheduler decides based on the resource calculation which worker nodes should restart those pods again and makes requests to the corresponding cubelets on those worker nodes to actually restart the pods and finally the last Master process is etcd which is a key Value Store of a cluster State you can think of it as a cluster brain actually which means that every change in the cluster for example when a new pod gets scheduled when a pod dies all of these changes get saved or updated into this key Value Store of edcd and the reason why atcd store is a cluster brain is because all of this mechanism with scheduler controller manager Etc works because of its data so for example how does scheduler know what resources are available on on each worker node or how does controller manager know that a cluster stay changed in some way for example pods diet or that cubelet restarted new pods upon the request of a scheduler or when you make a query request to API server about the cluster health or for example your application deployment state where does API server get all this state information from so all of this information is stored in hcd cluster what is not stored in the LCD key value store is the actual application data for example if you have a database application running inside of a cluster the data will be stored somewhere else not in the hcd this is just a cluster State information which is used for master processes to communicate with the work processes and vice versa so now you probably already see that Master processes are absolutely crucial for the cluster operation especially the SCD store which contains some data must be reliably stored or replicated so in practice kubernetes cluster is usually made up of multiple Masters where each Master node runs its Master processes where of course the API server is load balanced and the it's a d store forms a distributed storage across all the master nodes so now that we saw what processes run on worker nodes and masternodes let's actually have a look at at a really stick example of a cluster setup so in a very small cluster you would probably have two masternodes and three worker notes also to note here the hardware resources of Master and nodes servers actually differ the master processes are more important but they actually have less load of work so they need less resources like CPU RAM and storage whereas the worker nodes do the actual job of running those pods with containers inside therefore they need more resources and as your application complexity and its demand of resources increases you may actually add more master and node servers to your cluster and thus forming a more powerful and robust cluster to meet your application resource requirements so in an existing kubernetes cluster you can actually add new master or node servers pretty easily so if you want to add a master server you just get a new bare server you install all the master processes on it and add it to the kubernetes cluster same way if you need two worker nodes you get pair servers you install all the worker node processes like container runtime cubelet and Q proxy on it and add it to the kubernetes cluster that's it and this way you can infinitely increase the power and resources of your kubernetes cluster is your replication complexity and its resource demand increases so in this video I'm going to show you what minicube and Cube CTL are and how to set them up so first of all let's see what is minicube usually in kubernetes world when you're setting up a production cluster it will look something like this so you would have multiple Masters uh at least two in a production setting and you would have multiple worker nodes and masternodes and the worker nodes have their own separate responsibility so as you see on the diagram you would have actual separate virtual or physical machines that each represent a node now if you want to test something on your local environment or if you want to try something out very quickly for example deploying new application or new components and you want to test it on your local machine obviously setting up a cluster like this will be pretty difficult or maybe even impossible if you don't have enough resources like memory and CPU Etc and exactly for the use case there's this open source tool that is called a mini Cube so what a mini cube is is basically one node cluster where the master processes and the work processes both run on one node and this node will have a Docker container runtime pre-installed so you will be able to run the containers or the pods with containers on this node and the way it's going to run on your laptop is through a virtual box or some other hypervisor so basically minicube will create a virtual box on your laptop and the nodes that you see here of this node will run in that virtual box so to summarize minicube is a OneNote kubernetes cluster that runs in a virtualbox on your laptop which you can use for testing kubernetes on your local setup so now that you've set up a cluster or a mini cluster on your laptop or PC on your local machine you need some way to interact with a cluster so you want to create components come configure it Etc and that's where cubectl comes in the picture so now that you have this virtual node on your local machine that represents minicube you need some way to interact with that cluster so you need a way to create pods and other kubernetes components on the Node and the way to do it is using cubectl which is a command line tool for kubernetes cluster so let's see how it actually works remember we said that minicube runs both master and work processes so one of the master processes called API server is actually the main entry point into the kubernetes cluster so if you want to do anything in the kubernetes if you want to configure anything create any component you first had to talk to the API server and the way to talk to the API server is through different clients so you can have a UI like a dashboard you can talk to it using kubernetes API or a command line tool which is Cube CTL and cubectl is actually the most powerful of all the three clients because with qcdl you can basically do anything in the kubernetes that you want and throughout these video tutorials we're going to be using cubectl mostly so once the cube CTL submits commands to the API server to create components delete components Etc the work processes on minicube node will actually make it happen so they will be actually executing the commands to create the pods to destroy the parts to create Services Etc so this is the mini Cube setup and this is how Cube CTL is used to interact with the cluster an important thing to note here is that qctl isn't just for minicube cluster if you have a cloud cluster or a hybrid cluster whatever Cube CTL is the tool to use to interact with any type of kubernetes cluster setup so that's important to note here so now that we know what minicube and Cube CTL are let's actually install them to see them in practice I'm using Mac so the installation process will probably be easier but I'm gonna put the links to the installation guides in the description so you can actually follow them to install it on your operating system just one thing to note here is that minicube needs a virtualization because as we mentioned it's going to run in a virtual box setup or some hypervisor so you will need to install some type of hypervisor it could be virtualbox I'm going to install a hyperkit but it's going to be in those step-by-step instructions as well so I'm going to show you how to install it on a Mac so I have a Mac OS Mojave so I'm going to show you how to install mini Cube on this Macos version and I'm going to be using Brew to install it so pretty update and the first thing is that I'm gonna install um a hypervisor hyperkit so I'm gonna go with the hyperkit go ahead and install it I already had it installed it so with you if you're doing it for the first time it might take a longer because it has to download all these dependencies and stuff and now I'm gonna install minicube and here's the thing mini Cube has Cube CTL as a dependency so when I execute this it's going to install cubectl as well so I don't need to install it separately so let's see here installing dependencies for minicube which is kubernetes CLI this is Cube CTL again because I already had it installed before it still has a local copy of the dependencies that's why it's pretty fast it might take longer if you're doing it for the first time so now that everything is installed let's actually check the commands so Cube CTL command should be working so I get this list of the commands with cubectl so it's there and mini Cube should be working as well and as you see mini Cube comes with this command line tool which is pretty simple so with one command it's gonna bring up the whole kubernetes cluster in this OneNote setup and that you can do stuff with it and you can just stop it or delete it it's pretty easy so now that we have both installed and the commands are there let's actually create a mini Cube kubernetes cluster and as you see there is a start command let's actually clear this so this is how we're going to start a kubernetes cluster Q mini Cube start and here is where the hypervisor installed comes in because since midi Cube needs to run in Virtual environment we're gonna tell minicube which hypervisor it should use to start a cluster so for that we're going to specify an option which is VM driver and here I'm going to set the hyperkey that I installed so I'm telling minicube please use hyperkit hypervisor to start this virtual mini Cube cluster so when I execute this it's going to download some stuff so again it may take a little bit longer if you're doing for the first time and as I mentioned mini Cube has Docker runtime or Docker Daemon pre-installed so even if you don't have Docker on your machine it's still gonna work so you would be able to create containers inside because it already contains Docker which is a pretty good thing if you don't have Docker already installed so done Cube CTL is now configured to use minicube which means the mini Cube cluster is set up and Cube CTL command which is meant to interact with the kubernetes Clusters is also connected with that mini Cube cluster which means if I do Cube CTL get notes which just gets me a status of the notes of the kubernetes cluster it's going to tell me that a mini Cube node is ready and as you see it's the only node and it has a must roll because it obviously has to run the master processes um and I can also get the status with minicube executing mini Cube status so I see host is running cubelet which is a service that actually runs the pods using container runtime is running so basically everything is running and by the way if you want to see kubernetes architecture in more detail and to understand how master and worker nodes actually work and what all these processes are I have a separate video that covers kubernetes architecture so you can check it out on this link and we can also check which version of kubernetes we have installed and usually it's going to be the latest version so with qctl version you actually know what the client version of kubernetes is and what the server version of kubernetes is and here we see we're using 1.17 and that's the kubernetes version that is running in the minicube cluster so if you see both client version and server version in the output it means that minicube is correctly installed so from this point on we're going to be interacting with the mini Cube cluster using cubectl command line tool so mini cube is basically just for the startup and for deleting the cluster but everything else configuring we're going to be doing through Cube CTL and all these commands that I executed here I'm gonna put them in a list in the comment section so you can actually copy them in this video I'm gonna show you some basic Cube CTL commands and how to create and debug Parts in minicube so now we have a mini Cube cluster and cubectl installed and once the cluster is set up you're gonna be using cubectl to basically do anything in the cluster to create components to get the status Etc so first thing we are gonna just get the status of the notes so we see that there is one node which is a muster and everything is going to run on that node because it's a mini Cube so with cubect you'll get I can check the parts and I don't have any that's why no resources I can check the services it keeps it will get services and I just have one default service and so on so this Cube CTL get I can list any kubernetes components so now since we don't have any parts we're going to create one and to create kubernetes components there is a cube CTL create command so if I do help on that Cube CTR uh create command I can see available commands for it so I can create all these components using Cube CTL create but there is no pod on the list because in kubernetes world the way it works is that the Pod is the smallest unit of the kubernetes cluster but usually in practice you're not creating pods or you're not working with the pods directly there is an abstraction layer over the pods that is called deployment so this is what we are going to be creating and that's going to create the parts underneath and this is a usage of qctl create deployment so I need to give a name of the deployment and then provide some options and the option that is required is the image because the Pod needs to be created based on certain some image or some container image so let's actually go ahead and create nginx deployment so Cube CTL create deployment we let's call it nginx deployment um image equals nginx it's just gonna go ahead and download the latest nginx image from Docker Hub that's how it's going to work so when I execute this you see deployment nginx Depot created so now if I do Coop CTO get deployment you see that I have one deployment created I have a status here which says it's not ready yet so if I do Cube CTL get part you see that now I have a pod which has a prefix of the deployment and some random hash here and it says container creating so it's not ready yet so if I do it again it's running and the way it works here is that when I create a deployment deployment has all the information or the blueprint for creating the Pod the for the this is the minimalistic or the most basic configuration for a deployment we're just saying the name and the image that's it the rest is just defaults and between deployment and Nepal there is another layer which is automatically managed by kubernetes deployment called replica set so if I do Cube CTL get replica set written together you see I have an nginx Depot replica set hash and it just gives me a state and if you notice here the Pod name has a prefix of deployment and the replica sets ID and then its own ID so this is how the Pod name is made up and the replica set basically is managing the replicas of a pod you in practice will never have to create replica set or delete a replica set or update in any way you're going to be working with deployments directly which is more convenient because in deployment you can configure the Pod blueprint completely you can say how many replicas of the part you want and you can do the rest of the configuration there here with this command we just created one pod or one replica but if you wanted to have two replicas of the nginx part we can just provide as additional options so this is how the layers work first you have the deployment the deployment manages a replica set a replica set manages all the replicas of that pod and the Pod is again an abstraction of a container and everything below the deployment should be managed automatically by kubernetes you shouldn't have to worry about any of it for example the image that it uses I will have to edit that in a deployment directly and not in the Pod so let's go ahead and do that right away so I'm going to do Cube CTL edit deployment and I'm going to provide the name genix and we get an auto generated configuration file of the deployment because in the command line we just gave two options everything else is default and auto generated by kubernetes um and you don't have to understand this now but I'm going to make a separate video where I break down the configuration file and the syntax of the configuration file for now let's just go ahead and scroll to the image which is somewhere down below and let's say I wanted to fixate the version to 1 16. and save that change and as you see deployment was edited and now when I do Cube CTL get pot I see that the old part so this one here is terminating and another one started 25 seconds ago so if I do it again the old part is gone and the new one got created with the new image and if I do if I get replica set I see that the old one has no pods in it and a new one has been created as well so we just edited the deployment configuration and everything else below that got automatically updated and that's the magic of kubernetes and that's how it works another very practical command is Cube CTL logs which basically shows you what the application running inside the Pod actually locked so if I do Cube CTL logs and I will need the Pod name for this um I will get nothing because nginx didn't log anything so let's actually create another deployment uh from mongodb so let's call it deployment and the image and the image will be so let's see here part so now I have the mongodb deployment creating so let's go ahead and log that status here means that pod was created but the container inside the Pod isn't running yet and when I try to lock obviously it tells me there is no container running so it can show me and it locks so let's get the status again at this point if I'm seeing that container isn't starting I can actually get some additional information by Cube CTL describe pod and the Pod name which here shows me what state changes happen inside the part so it pulled the image created the container and start a container so Cube CTL get pod it should be running already so now let's log it keeps it here logs and here we see the log output so it took a little bit but this is what the mongodb application container actually locked inside the Pod and obviously if container has some problems it's going to help with debugging to see what the application is actually printing so let's clear that and get the parts again so another very useful command when debugging when something is not working or you just want to check what's going on inside the Pod is Cube CTL exec so basically what it does is that it gets the terminal of that mongodb application container so if I do Cube CTL exec interactive terminal that's what it stands for I will need the Pod name Dash Dash so so with this command I get the terminal of the mongodb application container and as you see here I am inside the container of mongodb as a root user so I'm in a completely different setting now and as I said this is useful in debugging or when you want to test something or try something you can enter the container or get the terminal and execute some comments inside there so we can exit that again and of course with Cube CTL I can delete the pods so if I do get deployment I misspelled it so it keeps it here deployment I see that I have two of them and if I do because it get pod and replica set I have also two of them so let's say if I wanted to get rid of all the pods replica sets underneath I will have to delete the deployment so delete deployment and I'll have to provide the name of the deployment I'm gonna delete let's delete mongodb delete it and now if I'm gonna say Cube CTL get pod the Pod should be terminating and if I do get replica set the mongodb replica set is gone as well and the same if I do delete deployment nginx Deadpool and do the replica set see everything gone so all the crud operations create delete update Etc happens on the deployment level and everything underneath just follows automatically in the similar way way we can create other kubernetes resources like Services Etc however as you notice when we are creating kubernetes components like deployment using cubectl Create deployment um and I misspelled it all the time you'll have to provide all these options on the command line so you'll have to say the name and you'll have to specify the image and then you have this option one option two uh Etc and there could be a lot of things that you want to configure in a deployment or in a pod and obviously it will be impractical to write that all out on a command line so because of that in practice you would usually work with kubernetes configuration files meaning what component you're creating what the name of the component is what image is it based off and any other options they're all gathered in a configuration file and you just tell cubectl to execute that configuration file and the way you do it is using cubectl apply command and apply basically takes the file the configuration file as a parameter and does whatever you have written there so apply takes an option called minus F that stands for file and here you would say the name of the file so this will be the config file dot yaml this is the format that you're usually gonna use for configuration files and this is the command that executes whatever is in that configuration file so let's actually call it configuration file um I don't know nginx deployment and let's go ahead and create a very simplistic super basic uh nginx deployment file so here I'm gonna create that file so this is the basic configuration for the deployment so here I'm just specifying what I want to create I want to create a deployment the name of the deployment you can ignore these labels uh right now uh how many replicas of the parts I want to create and this plug right here the template and specification is a blueprint for the pods so specification for the deployment and specification for a pod and here we're just saying that we want one container inside of the pod with nginx image and we are going to bind that on Port 80. so this is going to be our configuration file and once we have that we can apply that configuration so deployment created so now if I get pod I see that nginx deployment pod was created and it's running and let's also see the deployment was created 52 seconds ago and now if I wanted to change something in that deployment I can actually change my local configuration for example I wanted two replicas instead of one I can apply that again deployment nginx deployment configured and as you see the difference here is that kubernetes can detect if the nginx deployment doesn't exist yet it's going to create one but if it already exists and I apply the configuration file again it's going to know that it should update it instead of creating a new one so if I do get deployment I see this is the old one or the old deployment and if I do Cube CTL get part I see the old one is still there and a new one got created because I increased the replica count which means that with Cube CTL apply you can both create and update a component and obviously you can do Coupe CTL with services volumes any other kubernetes components just like we did it with the deployment so in the next video I'm going to break down the syntax of the configuration file which is pretty logical and simple actually to understand and I'm going to explain all the different attributes and what they mean so you can write your own configuration files for different components so to summarize we've looked at a couple of cubectl commands in this video we saw how to create a component like deployment how to edit it and delete it we saw how to get status of PODS deployments replica sets cetera we also logged on the console whatever application is writing it to the console in the Pod and we saw how to get a terminal of a running container using cubectl exec and finally we saw how to use a kubernetes configuration file to create and update components using the cube CTL apply command and last but not least we saw Cube CTL describe command which will win a container isn't starting in a pot and you want to get some additional troubleshooting information about the pod in this video I'm going to show you the syntax and the contents of kubernetes configuration file which is the main tool for creating and configuring components i
Original Description
► Grab your free DevOps Roadmap: https://bit.ly/3RUQ7UK
💚 Become a DevOps Engineer - full educational program: https://bit.ly/3MRjKEE
Full Kubernetes Tutorial | Kubernetes Course | Hands-on course with a lot of demos
Connect with me 👋
INSTAGRAM ► https://bit.ly/2F3LXYJ
LINKEDIN ► https://bit.ly/3hWOLVT
▬▬▬▬▬▬ T I M E S T A M P S ⏰ ▬▬▬▬▬▬
0:00 - Course Overview
2:18 - What is K8s
5:20 - Main K8s Components
22:29 - K8s Architecture
34:47 - Minikube and kubectl - Local Setup
44:52 - Main Kubectl Commands - K8s CLI
1:02:03 - K8s YAML Configuration File
1:16:16 - Demo Project: MongoDB and MongoExpress
1:46:16 - Organizing your components with K8s Namespaces
2:01:52 - K8s Ingress explained
2:24:17 - Helm - Package Manager
2:38:07 - Persisting Data in K8s with Volumes
2:58:38 - Deploying Stateful Apps with StatefulSet
3:13:43 - K8s Services explained
▬▬▬▬▬▬ COURSE OVERVIEW 📚 ▬▬▬▬▬▬
🔥 What is Kubernetes 🔥
► What problems does Kubernetes solve?
► What features do container orchestration tools offer?
🔥 Main K8s Components 🔥
► Node & Pod
► Service & Ingress
► ConfigMap & Secret
► Volumes
► Deployment & StatefulSet
🔥 K8s Architecture 🔥
► Worker Nodes
► Master Nodes
► Api Server
► Scheduler
► Controller Manager
► etcd - the cluster brain
🔥 Minikube and kubectl - Local Setup 🔥
► What is minikube?
► What is kubectl?
► install minikube and kubectl
► create and start a minikube cluster
🔗 Links:
- Install Minikube (Mac, Linux and Windows): https://bit.ly/38bLcJy
- Install Kubectl: https://bit.ly/32bSI2Z
- Gitlab: If you are using Mac, you can follow along the commands. I listed them all here: https://bit.ly/3oZzuHY
🔥 Main Kubectl Commands - K8s CLI 🔥
► Get status of different components
► create a pod/deployment
► layers of abstraction
► change the pod/deployment
► debugging pods
► delete pod/deployment
► CRUD by applying configuration file
🔗 - Git repo link of all the commands: https:
Watch on YouTube ↗
(saves to browser)
Sign in to unlock AI tutor explanation · ⚡30
Playlist
Uploads from TechWorld with Nana · TechWorld with Nana · 58 of 60
1
 2
2
 3
3
 4
4
 5
5
 6
6
 7
7
 8
8
 9
9
 10
10
 11
11
 12
12
 13
13
 14
14
 15
15
 16
16
 17
17
 18
18
 19
19
 20
20
 21
21
 22
22
 23
23
 24
24
 25
25
 26
26
 27
27
 28
28
 29
29
 30
30
 31
31
 32
32
 33
33
 34
34
 35
35
 36
36
 37
37
 38
38
 39
39
 40
40
 41
41
 42
42
 43
43
 44
44
 45
45
 46
46
 47
47
 48
48
 49
49
 50
50
 51
51
 52
52
 53
53
 54
54
 55
55
 56
56
![Docker Tutorial for Beginners [FULL COURSE in 3 Hours]](https://i.ytimg.com/vi/3c-iBn73dDE/mqdefault.jpg) 57
57
 ▶
▶
![Kubernetes Tutorial for Beginners [FULL COURSE in 4 Hours]](https://i.ytimg.com/vi/X48VuDVv0do/mqdefault.jpg) 59
59
 60
60

What is Docker? Docker container concept explained || Docker Tutorial 1
TechWorld with Nana
What is a Docker Container? Docker Demo || Docker Tutorial 2
TechWorld with Nana
How to install docker? Step by Step || Docker Tutorial 3
TechWorld with Nana
8 Basic Docker Commands || Docker Tutorial 4
TechWorld with Nana
Debugging Docker Containers with docker exec and docker logs || Docker Tutorial 5
TechWorld with Nana
Docker vs Virtual Machine | simply explained || Docker Tutorial 6
TechWorld with Nana
Overview of Workflow with Docker - Docker in Practice || Docker Tutorial 7
TechWorld with Nana
Developing with Docker - Docker in Practice || Docker Tutorial 8
TechWorld with Nana
Docker Compose Tutorial - Docker in Practice || Docker Tutorial 9
TechWorld with Nana
Dockerfile Tutorial - Docker in Practice || Docker Tutorial 10
TechWorld with Nana
Private Repository explained | Registry on AWS - Docker in Practice || Docker Tutorial 11
TechWorld with Nana
Docker Volumes explained in 6 minutes
TechWorld with Nana
Deploying the containerized application with Docker Compose || Docker Tutorial 12
TechWorld with Nana
Docker Volumes Demo || Docker Tutorial 13
TechWorld with Nana
Docker vs Kubernetes vs Docker Swarm | Comparison in 5 mins
TechWorld with Nana
What is Kubernetes | Kubernetes explained in 15 mins
TechWorld with Nana
Kubernetes Components explained! Pods, Services, Secrets, ConfigMap | Kubernetes Tutorial 14
TechWorld with Nana
Kubernetes Architecture explained | Kubernetes Tutorial 15
TechWorld with Nana
Benefits of Kubernetes | Scalability, High Availability, Disaster Recovery | Kubernetes Tutorial 16
TechWorld with Nana
Minikube and Kubectl explained | Setup for Beginners | Kubernetes Tutorial 17
TechWorld with Nana
Top 3 programming languages to learn in 2020 | meta analysis
TechWorld with Nana
Kubectl Basic Commands - Create and Debug Pod in a Minikube cluster | Kubernetes Tutorial 18
TechWorld with Nana
Kubernetes YAML File Explained - Deployment and Service | Kubernetes Tutorial 19
TechWorld with Nana
Run Jenkins in Docker Container - Jenkins Pipeline Tutorial for Beginners 1/4
TechWorld with Nana
Create Multibranch Pipeline with Git - Jenkins Pipeline Tutorial for Beginners 2/4
TechWorld with Nana
Jenkinsfile - Jenkins Pipeline Tutorial for Beginners 3/4
TechWorld with Nana
Trigger Jenkins Build automatically - Jenkins Pipeline Tutorial for Beginners 4/4
TechWorld with Nana
Complete Application Deployment using Kubernetes Components | Kubernetes Tutorial 20
TechWorld with Nana
Kubernetes Namespaces Explained in 15 mins | Kubernetes Tutorial 21
TechWorld with Nana
Configure Build Tools in Jenkins and Jenkinsfile | Jenkins Tutorial
TechWorld with Nana
Complete Jenkins Pipeline Tutorial | Jenkinsfile explained
TechWorld with Nana
Kubernetes Ingress Tutorial for Beginners | simply explained | Kubernetes Tutorial 22
TechWorld with Nana
What is Helm in Kubernetes? Helm and Helm Charts explained | Kubernetes Tutorial 23
TechWorld with Nana
How Websites Work | simply explained with examples
TechWorld with Nana
What is JavaScript? | JavaScript Tutorial #1
TechWorld with Nana
What is Ansible | Ansible Playbook explained | Ansible Tutorial for Beginners
TechWorld with Nana
JavaScript Variables & JavaScript Data Types explained | JavaScript Tutorial #2
TechWorld with Nana
How Prometheus Monitoring works | Prometheus Architecture explained
TechWorld with Nana
Where to write JavaScript | Where to execute JavaScript Code | JavaScript Tutorial #3
TechWorld with Nana
JavaScript Operators & JavaScript Conditionals | JavaScript Tutorial #4
TechWorld with Nana
Pods and Containers - Kubernetes Networking | Container Communication inside the Pod
TechWorld with Nana
Kubernetes Volumes explained | Persistent Volume, Persistent Volume Claim & Storage Class
TechWorld with Nana
Kubernetes ConfigMap and Secret as Kubernetes Volumes | Demo
TechWorld with Nana
Pull Image from Private Docker Registry in Kubernetes cluster | Demo
TechWorld with Nana
Kubernetes StatefulSet simply explained | Deployment vs StatefulSet
TechWorld with Nana
Yaml Tutorial | Learn YAML in 18 mins
TechWorld with Nana
Terraform explained in 15 mins | Terraform Tutorial for Beginners
TechWorld with Nana
Setup Prometheus Monitoring on Kubernetes using Helm and Prometheus Operator | Part 1
TechWorld with Nana
Managed Kubernetes Cluster explained | Kubernetes on Cloud (1/2)
TechWorld with Nana
Step by Step Application Deployment on LKE using Helm | Kubernetes on Cloud (2/2)
TechWorld with Nana
Kubernetes Operator simply explained in 10 mins
TechWorld with Nana
What is Infrastructure as Code? Difference of Infrastructure as Code Tools
TechWorld with Nana
AWS EKS - Create Kubernetes cluster on Amazon EKS | the easy way
TechWorld with Nana
Prometheus Monitoring - Steps to monitor third-party apps using Prometheus Exporter | Part 2
TechWorld with Nana
GitHub Actions Tutorial - Basic Concepts and CI/CD Pipeline with Docker
TechWorld with Nana
Docker Tutorial for Beginners [FULL COURSE in 3 Hours]
TechWorld with Nana
Kubernetes Services explained | ClusterIP vs NodePort vs LoadBalancer vs Headless Service
TechWorld with Nana
Kubernetes Tutorial for Beginners [FULL COURSE in 4 Hours]
TechWorld with Nana
Containers on AWS Overview: ECS | EKS | Fargate | ECR
TechWorld with Nana
Kubernetes is dropping Docker support - What does it mean for YOU?
TechWorld with Nana
More on: Distributed Systems
View skill →


Related Reads
📰
📰
📰
📰
The 7 Layers Every Production Rate Limiter Needs
Medium · DevOps
Your Read Replica Just Promoted. The Cart Still Shows $0.00.
Medium · DevOps
One Replica Reconnected. Your Network Graph Went Vertical.
Medium · DevOps
Two Workers Held the Lock. Both Wrote. The TTL Was 10 Seconds. The Job Took 45.
Medium · DevOps
Chapters (14)
Course Overview
2:18
What is K8s
5:20
Main K8s Components
22:29
K8s Architecture
34:47
Minikube and kubectl - Local Setup
44:52
Main Kubectl Commands - K8s CLI
1:02:03
K8s YAML Configuration File
1:16:16
Demo Project: MongoDB and MongoExpress
1:46:16
Organizing your components with K8s Namespaces
2:01:52
K8s Ingress explained
2:24:17
Helm - Package Manager
2:38:07
Persisting Data in K8s with Volumes
2:58:38
Deploying Stateful Apps with StatefulSet
3:13:43
K8s Services explained
🎓
Tutor Explanation