Go tutorial Part 4 (Web tutorial part 2) - Using templates
Key Takeaways
This video tutorial demonstrates the use of Go templating language to implement inheritance and caching in a simple web application, utilizing tools such as Go, HTML, JavaScript, and Bootstrap. The tutorial covers creating a base HTML file, defining templates, and serving static files in a Go server.
Full Transcript
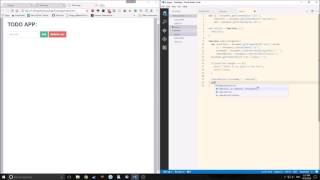
hi guys welcome to going tutorial part 4 this is tensor from the tensor programming blog today we're going to be expanding upon our knowledge of templates as you can see here I've got our weather that we were building in the last tutorial and we're going to start writing more things into it I'll show you how the go templating language works how we can implement inheritance caching and things of that nature okay so let's get started if you look over here you notice that there are a few more files in here I've got a statics folder which has all of our has JavaScript libraries bootstrap for example we've got jQuery I believe yeah bootstrap jQuery moderniser NPM etc and also some of the google fonts anyway I brought all those in I used initializer I'll show you what that is if you don't know initializer lets you just create boilerplate HTML as well as bring in certain things polyfills and jQuery etc etc you just download it comes in a zip file and you unzip it in wherever you want so yeah it's pretty nice if you want to start any kind of project okay so for a refresher let's take a look and I'll show you what the actual web app looks like and what it does so if we load it now as you can see this is also another change I did I added a bunch of Hello text into our text files so we have two pages test and edit we can edit these pages and when we edit them and hit save it actually writes our edits into a text file in the next tutorial we will get to how to actually write that into a database but for now let's expand the front-end what we need to do to expand the front-end is to create a base HTML file so let's create a new HTML file let's call it base and we're going to cut all of this out we're going to cut out the doctype so there we go just a very simple HTML skeleton and then we're going to use going its templating double curly braces we're gonna write define and we're gonna call it base we need to also put in an end statement here so that go knows that this is our template so inside of this template we're going to bring in main templates so we have two pages here then we can define both of them as main and we can just write template main and depending on the URL that we're at and we'll import one of these HTML files so let's actually define these now to find it our edit that HTML file as main and our test thought HTML file is now defined his main now if we were to run the app nothing would really happen in fact no pages would be displayed because go doesn't have instructions on how to actually parse these templates so we have to actually implement that into our main application here so the first thing we need to do is we need to create two global variables now you can implement these into a function if you want it makes things a little bit neater I guess but for the sake of simplicity we're just going to implement them directly as global variables so our first variable it's going to be called template view so it's our template for our view and it's going to equal template must so we're creating a new template and in this case our template is going to be called test and now we are reading in all the template files that we want to parse for this particular view in this case we're going to bring in base and test out HTML now we've created a second global variable as you can see template edit and this is parsing and caching the basin edit HTML now we need to actually edit our and our edit function so we can just comment out these two lines from both of the functions so in our view function we're just going to say template view execute template and then we're going to read in our IO writer so our HTTP response writer and then we're going to read in the string of the name of the actual base template which is just base and then we're going to read in the title of the actual template that we are using here which is just our p value here so that's it for this part and we can implement the same thing into edit so there we go first of all I screwed up and I put the base inside of this folder anesthetic folder let's move it to the web folder okay all right so as it is let's run this and see what happens we add an error because we forgot a quotation mark in Maine or in the test dot HTML we also had the same problem than at it as well okay so now we're running the program so if we reload test this is what it's going to look like it's not going to really look any different and edit is going to look the same let's actually look at the HTML here so if we look there's no real difference aside from the fact that we have a head with nothing in it and our body is right here so now we want to import all of our CSS and JavaScript so we're going to make a template for all of that stuff so let's make a file called index.html so the first thing we want to do is create a header and so all of this stuff is the stuff that's going to go inside the header of our base HTML so I've created this little piece of HTML by cutting it out of the initializer HTML index file so it's not really that difficult the only changes that we needed to make were we needed to change the file path for these static files because everything is now in this at exfoliant without it it won't actually know where to go to get these items so let's leave it as is now we need to implement this into our base HTML now notice I'm actually putting a dot here that's because this is a function whereas the define here is not a function in go in the templating language you need to put a dot when you're dealing with a function so when you're declaring something like template you're putting a dot here because it's telling it that it's a function if we look at our edit file for example D see here the dot and then title it's basically telling that we're pulling in a piece of information from a function in this case from our page struct and the same with our body here so we have a function here and then we have our variable and then we're saying okay feed this variable into this function that's basically what's going on as well in base except this is the function here and there's no variable that's being fed into it okay so before we run our program we need to actually implement this template into our HTML templates here okay so now I've added index to our two variables here and it should parse all of these variables together are all these templates together rather so notice that parsed files is a ver addict function so we can actually put in infinite infinite arguments because it uses a slice this is just something to note now let's run this and see what happens preview load everything now inside of our head we have all this stuff however we're also getting a bunch of problems as you can see we're getting some maguet errors here meaning that it's not actually loading these CSS and JavaScript files so we need to rectify this there's a very simple way to do that we just need to tell go where the actual files are located so we do this inside of the main function so basically what we're doing here is we're telling the go server to serve these files as well okay so here is our little function and as you can see we're passing multiple functions into this so we're basically saying okay we want to handle this statics folder we want to strip the static from our actual prefix and then we want to actually serve the static sober now if we rerun our program now we're getting no get errors things are looking a little bit different because the font just changed we have no CSS classes yet so nothing has really changed all that much so now we want to bring in some of that CSS and JavaScript functionality so this should be sufficient for our edit body now let's deal with our test body okay so now let's take a look and see what we've actually done so if we reload as you can see here we've got just a very simple looking HTML file we go to edit things look a little different as you can see our edit box looks a lot more interesting marseilles buttons blue it's kind of looking nice but it's still not looking like a great webpage and great web pages all have navigation so why don't we add a navigation file here something that we can actually navigate with we're actually going to go back into our index.html file and we're going to define a area called nav bar so here's our simple nav bar this is just a simple bootstrap nav bar notice that's basically we've put it inside of the same file as our header but because we're defining them as two separate blocks it won't really matter so we could in theory write all of our templates in one file though that would get a little confusing and as you'll see a little later that it's actually to our advantage to structure things this way there are some very subtle things that go has inside of it inside of the template language rather that allows it to do some really cool things so let's actually implement this into our base HTML so we want our navbar to be above our main and that should do it let's run this and take a look at what we've got all right so now we've got our little nav bar it doesn't look too great there's a little bit of padding here which is annoying normally I'd go in and I change the CSS slightly change it also another annoying thing is that if we go into the editing file we can't navigate to the other editing file as you can see here we're on the editing power if we hit test we go to the test URL of tests rather than the Edit URL of tests so we can actually change this before we start screwing around with the navbar I just figured I'd bring in a footer so I've brought in Ajax some jQuery bootstrap and then our is also coincidentally we've got Google Analytics here so if we want to have two separate nav bars depending on the page that we're on we can actually change it so let's actually remove the nav bar from this here and let's define it back into our one in our edit and one in our test in edit we will be putting in here edit edit so now if we run our program the navbar should change accordingly we're on the test route if we go into edit now we're changing back and forth between the editing as you can see editing test editing edit we could also add the other bits into here buttons rather but there's no real reason because we already have buttons that allow us to go back and forth so we could actually bring in a real footer here so I actually put an end to the page that would be nice make things look a little bit better and the way we're going to do that is we're actually going to use what are called blocks so a block is pretty simple block allows us to basically dynamically change a piece of HTML where we are so it's sort of like a variable that's sort of like allowing us to define a template as a variable so now we're gonna mess around with blocks so let's go into our index here and we're going to create a body so here's our body as you can see here's the actual HTML part of our body and now we're bringing in block main and we're ending things so basically what's going to happen is either in the edit HTML or the test HTML based on where we are is going to be imported into this block here so rather than being inserted in directly into the base HTML it's going to come into here first and then it's going to be changed into body which is then going to be inserted back into the base HTML nice and that sounds a little bit more complicated than it really is but it's not so we change our main to body let's run things and see what actually happened here so this actually worked I know it doesn't seem like anything really happened and that's because nothing visual acting but the difference is that no matter which page we go to we're actually using a different template and it saves us a little bit more time on the code and stuff and now we've got this little nice little bottom header here our footer rather and we can actually remove all this padding if we want make it actually align with the bottom on the screen as you can see things didn't really change but that's because we are not really in a place where the page actually takes up the entire page but if we go to our editing tab as you can see here we don't have any white space between the actual footer anymore okay guys so that's it for our template or at least our basic template tutorial in your next tutorial we'll start to work even more on our back-end so we'll actually build a little bit more on the actual application we'll give it a little bit more functionality and we're looking to adding a database either will use SQL or MongoDB or maybe even both so if you enjoyed this video please like and subscribe if you have any questions comment and if you for whatever reason didn't like the video and then go ahead and throw in a comment and a dislike and whatever you want alright guys hope you have a good night
Original Description
In this tutorial we expand upon the simple web app that we built in the last tutorial and add some functions in the templates.
Also check out our written Golang tutorial on our blog: http://tensor-programming.com/welcome-to-go/
Check out the Code on Github: https://github.com/tensor-programming/go-tutorial-4
Check out our Twitter: https://twitter.com/TensorProgram
Check out our Facebook: https://www.facebook.com/Tensor-Programming-1197847143611799/
Watch on YouTube ↗
(saves to browser)
Sign in to unlock AI tutor explanation · ⚡30
Playlist
Uploads from Tensor Programming · Tensor Programming · 12 of 60
1
 2
2
 3
3
 4
4
 5
5
 6
6
 7
7
 8
8
 9
9
 10
10
 11
11
 ▶
▶
 13
13
 14
14
 15
15
 16
16
 17
17
 18
18
 19
19
 20
20
 21
21
 22
22
 23
23
 24
24
 25
25
 26
26
 27
27
 28
28
 29
29
 30
30
 31
31
 32
32
 33
33
 34
34
 35
35
 36
36
 37
37
 38
38
 39
39
 40
40
 41
41
 42
42
 43
43
 44
44
 45
45
 46
46
 47
47
 48
48
 49
49
 50
50
 51
51
 52
52
 53
53
 54
54
 55
55
 56
56
 57
57
 58
58
 59
59
 60
60

NodeJs, Text editors and IDEs
Tensor Programming
Vanilla JS todo App
Tensor Programming
Elm Tutorial part 1
Tensor Programming
Elm Lang Tutorial, Part 2
Tensor Programming
Elm Tutorial Part 3
Tensor Programming
Elm Tutorial Part 4 -- Analog Clock App
Tensor Programming
Elm Tutorial part 5 -- Snake Game
Tensor Programming
Elm Tutorial part 6 -- Calculator
Tensor Programming
Go Tutorial part 1 -- Hello World and Static File Server
Tensor Programming
Go Tutorial part 2 -- Web Crawler
Tensor Programming
Go Tutorial Part 3 (Web App part 1)
Tensor Programming
Go tutorial Part 4 (Web tutorial part 2) - Using templates
Tensor Programming
Go tutorial part 5 (web app part 3)
Tensor Programming
Go tutorial part 6 (webapp part 4)
Tensor Programming
Go tutorial part 7 (web app part 5)
Tensor Programming
Go tutorial part 8 (Web app part 6)
Tensor Programming
Go tutorial Part 9 (web tutorial part 7)
Tensor Programming
Go tutorial Part 10 (web app part 8)
Tensor Programming
Go tutorial Part 11 (Web app Part 9)
Tensor Programming
Go Tutorial Part 12 (Web app Part 10)
Tensor Programming
Go Tutorial Part 13 (Web app Part 11)
Tensor Programming
Looking at Elm 0.18
Tensor Programming
Go tutorial Part 14 (Web tutorial part 12)
Tensor Programming
Go tutorial Part 15 (Web tutorial part 13)
Tensor Programming
Go tutorial part 16 (web app part 14)
Tensor Programming
Elm Tutorial Part 7 (SPA part 1)
Tensor Programming
Elm Tutorial Part 8 (SPA Part 2)
Tensor Programming
Electron Elm Tutorial
Tensor Programming
Go tutorial part 17 (web app part 15)
Tensor Programming
Up and Coming Programming Languages and Technologies for 2017
Tensor Programming
elixir tutorial part 1
Tensor Programming
elixir tutorial part 2
Tensor Programming
Elixir tutorial Part 3 (GenServer and Supervisor)
Tensor Programming
Elixir Tutorial Part 4 (GenStage)
Tensor Programming
Elixir Tutorial Part 5 (Plug and Cowboy)
Tensor Programming
Phoenix Framework Tutorial Part 1 (elixir part 6)
Tensor Programming
Phoenix Framework Tutorial Part 2 (elixir part 7)
Tensor Programming
Phoenix Framework Tutorial Part 3 (elixir part 8)
Tensor Programming
A Intro to Clojure and Clojure Syntax
Tensor Programming
An Update about the channel
Tensor Programming
Intro to Rustlang (Setup and Primitives)
Tensor Programming
Intro to Rustlang (Strings, Tuples, Arrays, Slices and Pretty Printing)
Tensor Programming
Intro to Rustlang (Ownership and Borrowing)
Tensor Programming
Intro to Rustlang (Structs, Methods, Functions, Related Functions and the Display/Debug Traits)
Tensor Programming
Intro to Rustlang (Control Flow, Conditionals and Pattern Matching)
Tensor Programming
Intro to RustLang (Enums and Options)
Tensor Programming
Intro to Rustlang (Vectors, HashMaps, Casting, If-Let, While-Let, and the Result Enum)
Tensor Programming
Rustlang Project: Snake Game
Tensor Programming
Intro to Rustlang (Traits and Generic Types)
Tensor Programming
Intro to Rust-lang (Closures, the Box Pointer and Iterators)
Tensor Programming
Intro to Rust-lang (Modules and Lifetimes)
Tensor Programming
Intro to Rust-lang (Macros and Metaprogramming)
Tensor Programming
Intro to Rust-lang (Error Handling)
Tensor Programming
Intro to Rust-lang (Concurrency, Threads, Channels, Mutex and Arc)
Tensor Programming
Intro to Rust-lang (Tests, Attributes, Configuration and Conditional compilation)
Tensor Programming
Rustlang Project: Port Sniffer CLI
Tensor Programming
Rustlang Project: Chat Application
Tensor Programming
Rustlang Project: CLI Toy Blockchain
Tensor Programming
Intro to Rust-lang (Setting up a Development Environment)
Tensor Programming
Intro to Rust-lang (Building a Web API with Iron)
Tensor Programming
More on: Prompt Craft
View skill →


Related Reads
📰
📰
📰
📰
My AI Bill Dropped 95% When I Switched to Chinese Models
Dev.to AI
AI Dubbing for Short Drama: The 2026 Playbook That Actually Scales
Dev.to AI
Why AI App Backends Are Becoming Accounting Systems
Dev.to · StructureIntelligence
I Let AI Build My WordPress Forms for a Week. Here’s What Actually Worked.
Medium · AI
🎓
Tutor Explanation
