Vanilla JS todo App
Skills:
ML Maths Basics60%
Key Takeaways
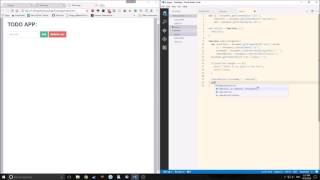
The video demonstrates how to build a Vanilla JS todo app using HTML, CSS, and JavaScript, covering topics such as DOM manipulation and event handling.
Full Transcript
hello guys this is tensor from the tensor programming blog today we're going to create a to-do app making just out of pure vanilla JavaScript there's gonna be no no js' no special libraries nothing like that it's gonna be very inefficient code but I'm just doing this to show that you can make stuff like this very simply out of JavaScript HTML and CSS as you can see this is what our app is going to look like when we finish that is with the stylesheet I'm not gonna go into the style sheet that I created here you can create your own or you don't NS a-- sara lee even have to use one or you can just go to our github and get my style sheet and use it for your own application it's up to you okay so let's start by making our HTML so I just used Emmet to create our snippet very simply and some of the HTML elements I'm going to put in here you don't necessarily have to use the only things you really need are the h1 here the input and the two buttons and that's and of course the unordered list so in this case we're going to change the title to to-do app and then we're going to add a div wrapper and then a div border these are for me they're just styling features for you they might not do anything so it's up to you if you want to add them inside of those I'm going to put it in h1 that just says to-do app and then next to the to-do app I'm going to put an input of type button or of type text rather of ID text with a placeholder and in this case our placeholder will just be add stuff with a few dots after it so it'll look like this you know add stuff okay so now we need to make our add button so button with type of ad and inside of it is going to be ad of course and then we're gonna have our remove all buttons so button with remove all and that's going to be in camel case and then inside it's gonna say remove oh okay and then underneath all of this we're gonna make our unordered list and that's going to be called list so unordered list ID of list okay and there's going to be nothing inside of that that's all gonna be manipulated by the JavaScript itself so let's take a look at what this looks like inside of our what we just built looks like so this is without the CSS this is what it will look like it's nothing special but it'll get the job done let me link the CSS here so okay CSS linked in everything looks a little bit better I guess it's really up to you if you want to do that and for JavaScript let's link our JavaScript in so source equals fjs so whatever you name your JavaScript app or your JavaScript file you're gonna link it in with the script and you can also do type equals text slash JavaScript you don't necessarily have to do that but I like to do that for consistency sake okay so now that we defined what our HTML looks like we need to actually start to work on the JavaScript itself so we need to think about what exactly does in a to-do app do what a to-do app does is that you enter text into the input box okay when you hit the Add button the input box clears and the text gets moved to below the input box into the unordered list so basically by hitting the Add button you're creating a bunch of elements inside of the unordered list and they just keep going down the page we also want to have buttons in each element that allow us to remove the elements if we want to so just a little button that we click and it removes an element you know one by one instead of removing them all at once with this big button up here so we will have the remove all button and then we will also have little buttons that we can click to remove the singular - duze okay so let's get started so first we need to define a few variables which basically it just means we need to bind a few of the HTML elements to these variables which for example I'm defining the unordered list to variable called ul next I'm going to bind both the buttons to different variables here so remove all is going to be our remove all button and I'm using the get element by ID function here since I define the IDS of each of our elements by very simple names remove all and add an list we can simply do something like that so in this case it's just gonna be add so there we go we've got our three elements in here and so the first thing we want to do is we want to add an on click event to the add button so add on click it's going to equal an anonymous function so function parentheses and then inside of it we're going to have a function called add Li which is what we're going to use to add the list elements to the unordered list and this function is going to get ul as its argument passed through it okay so now we're going to make that function right now the add our li function this function is going to deploy every time you click the add button okay so function add Li and let's say targets ul your I is getting passed into here and okay so let's start we need to make a few variable declarations here so variable input text equals document dot get element by ID and we're gonna get the text the input text so text we're gonna get the actual value so it's gonna be dot value as you can see you can string together these functions that way so this is just taking the value inside of here and nothing else so it's not taking any of the other parts of the HTML okay because I'm defining multiple barrios I'm using a comma so next we need to define the actual li that we're going to create so documents that create element and we're gonna make a li element so our li equals document dot create element li okay now because we're making a node we're gonna define a text node that's going to be attached to the li element some document dot create text node and we're going to call it and we're gonna put input text inside of it so the input text from here and then we're going to put a space just for consistency sake so we're going to concatenate a space under it so that it has space between it and the done button that we're gonna create so now we need to make that done button so remove button equals documents that create elements and let's say button because that's what we're making we're making a button element okay so the next thing we need to do is pretty simple we need to make sure that this box clears when we hit the Add button okay so to do that it's very simple document dot get element by ID so we get the element itself which is text and then we just change the value to an empty string and that'll clear the box all right so now we want to basically force the user to actually put something in the box so that if they hit the Add button it won't just add an empty string to you know the list because that would be annoying his house so if input box or input text rather dot length triple equals zero see this actually won't work if we just set it equal to zero you can have a negative string in there and that could cause some problems but for now it should be fine so alert there is no input in the box okay so a box will pop up and we'll see there's nothing in there you know please do whatever you can put whatever you want into that box and it's going to return false from the function so it's going to break out of the function return false to the environment and that's it okay so now we want to deal with the actual done buttons and how that works so removed button and what we're going to do is we're going to actually create the HTML element inside of the JavaScript so we're gonna give it a class name because my style has class name on it and it's called remove me some very simply the class name of the element is going to be removed me it's going to have inner HTML so it's going to have a name so inner HTML is going to equal done CAPITAL LETTERS done let's put a space there just in case we need one alright next oh whoops next we're going to give it an on-click attribute so remove button dot set attribute and to do this we give it an on-click attribute and we pass remove me this this means the actual element itself is being passed to itself there we go so now this won't actually work yet because we haven't defined the remove me function but everything else should be fine so actually if I save this and I reload this and I type something in it'll actually start to remove the text but it won't display it yet because we haven't created that functionality yet also the remove button won't work and this so here's the alert box that we created so if it's empty it just pops up and says there's no input in the box okay so now let's create the functionality that will actually add the text below the you know into the unordered list so Li dot append child and we're going to append the text note to it first then we're going to append the the button itself to it the reason we're doing the text node first because we want the text first and the button next so okay you can you can do them in either order if you want but this looks more aesthetically pleasing with the styling that I'm using so the next thing we're going to do is we're going to append all of that onto the target UI so the target unordered list is going to get all of that so append child and we're just going to append Li to it which is the text inside of it okay if we save that we start putting stuff in here let me reload it there we go see it starts giving us cool stuff and our remove button still doesn't work our done buttons do not work but we can add stuff and that's cool you know it's functionality that we didn't have before so now we need to make our remove me function and then we need to add an on click function to remove all button so first let's do the remove me function so function and remove me it's pretty simple inside will be an item bar upon't equals item dot parents elements and then we can go parent dot parents elements that remove child and then parent so basically what this is doing is we're getting the entire list itself and then we're or we're actually just getting the li itself and then we're removing it from the list okay so now if I reload this if I save and reload this I can now remove stuff very simply from the list still our remove all button doesn't work so let's do that now remove all on quick so like our add-on quick it's removal on click equals an anonymous function and this is very simple it's just the UIL variable is just going to become the innerhtml of it is just going to be empty and that just clears the entire UL so if I save that and I start typing stuff out like Emacs and I don't know JavaScript and I hit remove all it all goes away so that's it this is a very simple vanilla to do app I've got to get hub repository for it if you want to check it out there are various ways you could have written this if you wanted to various different things you can change about it I hope this just gives you a little insight into you know the development of JavaScript through the document object model and you know just vanilla JavaScript I mean this stuff is it's not very difficult it may seem so some parts of it may seem a little abstract at first but it's very easy to get used to anyway guys that's about all of it so I hope you all have a good day
Original Description
A live coding example of a Vanilla JS todo Application.
Again sorry about the bad mic. I made this video on a laptop.
Github with this example: https://github.com/tensor-programming/vanilla-todo-app
Twitter: https://twitter.com/TensorProgram
facebook: https://www.facebook.com/Tensor-Programming-1197847143611799/
Watch on YouTube ↗
(saves to browser)
Sign in to unlock AI tutor explanation · ⚡30
Playlist
Uploads from Tensor Programming · Tensor Programming · 2 of 60
1
 ▶
▶
 3
3
 4
4
 5
5
 6
6
 7
7
 8
8
 9
9
 10
10
 11
11
 12
12
 13
13
 14
14
 15
15
 16
16
 17
17
 18
18
 19
19
 20
20
 21
21
 22
22
 23
23
 24
24
 25
25
 26
26
 27
27
 28
28
 29
29
 30
30
 31
31
 32
32
 33
33
 34
34
 35
35
 36
36
 37
37
 38
38
 39
39
 40
40
 41
41
 42
42
 43
43
 44
44
 45
45
 46
46
 47
47
 48
48
 49
49
 50
50
 51
51
 52
52
 53
53
 54
54
 55
55
 56
56
 57
57
 58
58
 59
59
 60
60

NodeJs, Text editors and IDEs
Tensor Programming
Vanilla JS todo App
Tensor Programming
Elm Tutorial part 1
Tensor Programming
Elm Lang Tutorial, Part 2
Tensor Programming
Elm Tutorial Part 3
Tensor Programming
Elm Tutorial Part 4 -- Analog Clock App
Tensor Programming
Elm Tutorial part 5 -- Snake Game
Tensor Programming
Elm Tutorial part 6 -- Calculator
Tensor Programming
Go Tutorial part 1 -- Hello World and Static File Server
Tensor Programming
Go Tutorial part 2 -- Web Crawler
Tensor Programming
Go Tutorial Part 3 (Web App part 1)
Tensor Programming
Go tutorial Part 4 (Web tutorial part 2) - Using templates
Tensor Programming
Go tutorial part 5 (web app part 3)
Tensor Programming
Go tutorial part 6 (webapp part 4)
Tensor Programming
Go tutorial part 7 (web app part 5)
Tensor Programming
Go tutorial part 8 (Web app part 6)
Tensor Programming
Go tutorial Part 9 (web tutorial part 7)
Tensor Programming
Go tutorial Part 10 (web app part 8)
Tensor Programming
Go tutorial Part 11 (Web app Part 9)
Tensor Programming
Go Tutorial Part 12 (Web app Part 10)
Tensor Programming
Go Tutorial Part 13 (Web app Part 11)
Tensor Programming
Looking at Elm 0.18
Tensor Programming
Go tutorial Part 14 (Web tutorial part 12)
Tensor Programming
Go tutorial Part 15 (Web tutorial part 13)
Tensor Programming
Go tutorial part 16 (web app part 14)
Tensor Programming
Elm Tutorial Part 7 (SPA part 1)
Tensor Programming
Elm Tutorial Part 8 (SPA Part 2)
Tensor Programming
Electron Elm Tutorial
Tensor Programming
Go tutorial part 17 (web app part 15)
Tensor Programming
Up and Coming Programming Languages and Technologies for 2017
Tensor Programming
elixir tutorial part 1
Tensor Programming
elixir tutorial part 2
Tensor Programming
Elixir tutorial Part 3 (GenServer and Supervisor)
Tensor Programming
Elixir Tutorial Part 4 (GenStage)
Tensor Programming
Elixir Tutorial Part 5 (Plug and Cowboy)
Tensor Programming
Phoenix Framework Tutorial Part 1 (elixir part 6)
Tensor Programming
Phoenix Framework Tutorial Part 2 (elixir part 7)
Tensor Programming
Phoenix Framework Tutorial Part 3 (elixir part 8)
Tensor Programming
A Intro to Clojure and Clojure Syntax
Tensor Programming
An Update about the channel
Tensor Programming
Intro to Rustlang (Setup and Primitives)
Tensor Programming
Intro to Rustlang (Strings, Tuples, Arrays, Slices and Pretty Printing)
Tensor Programming
Intro to Rustlang (Ownership and Borrowing)
Tensor Programming
Intro to Rustlang (Structs, Methods, Functions, Related Functions and the Display/Debug Traits)
Tensor Programming
Intro to Rustlang (Control Flow, Conditionals and Pattern Matching)
Tensor Programming
Intro to RustLang (Enums and Options)
Tensor Programming
Intro to Rustlang (Vectors, HashMaps, Casting, If-Let, While-Let, and the Result Enum)
Tensor Programming
Rustlang Project: Snake Game
Tensor Programming
Intro to Rustlang (Traits and Generic Types)
Tensor Programming
Intro to Rust-lang (Closures, the Box Pointer and Iterators)
Tensor Programming
Intro to Rust-lang (Modules and Lifetimes)
Tensor Programming
Intro to Rust-lang (Macros and Metaprogramming)
Tensor Programming
Intro to Rust-lang (Error Handling)
Tensor Programming
Intro to Rust-lang (Concurrency, Threads, Channels, Mutex and Arc)
Tensor Programming
Intro to Rust-lang (Tests, Attributes, Configuration and Conditional compilation)
Tensor Programming
Rustlang Project: Port Sniffer CLI
Tensor Programming
Rustlang Project: Chat Application
Tensor Programming
Rustlang Project: CLI Toy Blockchain
Tensor Programming
Intro to Rust-lang (Setting up a Development Environment)
Tensor Programming
Intro to Rust-lang (Building a Web API with Iron)
Tensor Programming
More on: ML Maths Basics
View skill →


Related Reads
📰
📰
📰
📰
Stop Writing Python Classes Until You Learn The 4 Things You Can Do To Every Piece Of Data An…
Medium · Programming
Top 10 AI Evaluation Interview Questions and Answers
Medium · Machine Learning
We took highlight detection from 0.56 to 0.86 — with zero new footage and zero cloud training
Dev.to AI
If Python Were C++
Medium · Programming
🎓
Tutor Explanation
