Phoenix Framework Tutorial Part 1 (elixir part 6)
Key Takeaways
The video demonstrates how to use the Phoenix Framework for Elixir to build a real-time chat application, covering project setup, database configuration, and web socket development. It utilizes tools such as Phoenix Framework, Elixir, PostgreSQL, and JavaScript to create a multi-user chat interface with real-time messaging capabilities.
Full Transcript
hi guys welcome to the Phoenix tutorial part one my name is tensor from the tensor programming blog So today we're going to take our first look at the Phoenix framework for Elixir and we're going to use it to build a real-time chat application or at least we're going to use it to start building a real-time chat application so Phoenix is sort of like the rails of Elixir but at the same time it also has a lot of really cool features that rails just simply doesn't have all right so let's build our project to make a project with Phoenix you just type in mix phoenix. new and then you type in the project name in this case we're going to call it chatter because it's going to be a chat application now this will create our directory as you can see as well as a lot of files here and now we can fetch and install the dependencies this will run mix deps doget and it will run mpm install and set up brunch for us for those of you who want to follow along I'll be sure to leave a link to Phoenix in the description so you can install it in the mix all right so our dependencies are fix finished and as you can see we get a nice little message here that says that we're all set and we have two options so we can run our Phoenix application on a server as well as open up the interactive repple or we can just run the server itself and we can also create our database using mix Ecto doc create so before we actually spin up the server that's what we're going to have to do is set up our database all right so here's what our directory looks like as you can see there are a bunch of different folders in here as well as different files we have our mix. EX file here here we have a package.json file and as you can see we have a bunch of dependencies we have Babel brunch clean CSS CSS brunch JavaScript brunch and uglified JS as well as Phoenix and Phoenix HTML we also have this web folder so this is where most of the Phoenix framework exists is inside of this web folder you can see we have a views folder we have a templates folder which has all of our HTML we have a static folder which has our CSS and JavaScript and we can put of course our asset such as images and stuff in there we have a models folder which is currently empty because we have no models we have a controllers folder which has a single controller in it right now and we have a channels folder and this is where we're going to do most of our development for this application we also have a test folder this allows us to build tests for each of our components we have a priv folder now this has all of our static information in it like our static CSS and JavaScript the stuff that we really just don't want to touch then we have our node modules we also have our lib folder with like with any Elixir project this is where our main Elixir application resides and then we have our Elixir dependencies our config folder and a build folder so to set up our database we want to go into config and dev. EXs and we want to go all the way down to the bottom here this is configuring your database and by default Elixir uses postgress and it puts in the default username and password here which is postgress and postgress now my postgress is set up to use this username and password so I do not not need to make any changes here so after you set up your development file you can run mix Ecto create and this will create your database in your postgress SQL Server so running mix Ecto create will actually compile your entire project as you can see here it compiled the Chatter app and then it will create the database so the application that we're going to be building in this tutorial is going to be a chat application there are two major features that we want to implement the first one is a list of all the users who are currently connected to our application as as well as when they signed on to our application so we want to add a timestamp and then of course we want the ability for the users online to post messages to each other uh which each will see in real time so before we do all that I'm just going to run the server so that you can take a look and see what a clean Phoenix app looks like we do this just by running mix phoenix. server and by default this will put us out on local house 4000 here is our default Phoenix application as you can see here there's not really much going on our chat application is actually going to come in right here where you see this Jumbotron we will later we will actually remove all this other stuff here like the Phoenix framework logo for now we're just going to be editing this area of our application so we want to edit our template page index. html. file it has a bunch of HTML in it as well as embedded Elixir right here is some embedded Elixir for example and we can just take all of this and delete it if we save it all of that information disappeared from our application Phoenix has hot reloading which is pretty nice for development we want to create a div that surrounds everything so we're going to say div class row and then we're going to have a div inside of it and inside of this div is where we're going to have our username so when the user comes in we want them to be able to see their name so we'll put a span in here and the spam will have an ID of user this will be important because we'll be using JavaScript to get this user later then we need to use some embedded Elixir to get the username so to do this we use a lesser than sign then we use a percent sign then we use an equal sign to open up our embedded Elixir and then to close it we use a percent sign and a greater than sign we're going to get our username just by looking at our connection and then looking specifically at the parameters and trying to find the map of name user and we'll say something like hello there and then the username so if the username is say tensor it'll say hello there tensor all right so now we're going to make another div and then inside of this div we will have our messages and this messages will basically just be an unordered list and the way it will work is every single time somebody types a new message inside of the input below it and hits enter it will create a new list item underneath of our messages with our input and everything we will have a list of our online users and again we're going to use an unordered list to generate this and we'll just generate list items with the usern names inside of them all right so that's all we really need for our HTML let's take a look at what this looks like on our server as you can see we've got a text box here this will say hello there and then the name of the user that is logged in and we can actually log in as a user right now by typing in back SL Mark user equals and then our name and as you can see it says hello there tensor but of course it doesn't show tensor as being online and it doesn't show me anything else and that's because we haven't created the logic in our back end yet all right so now we want to bring a new module into our Phoenix application this module is called presents so we're going to use mix to do this we're going to say mix phoenix. gen dopr and as you can see this comes up with a nice little message it says add your new module to your supervision tree and then it gives us the code that we need so we can just copy this and if we go up to our lib folder and we go inside of our Chatter application here you can see we have our supervision tree right here so we can put our present supervisor right here to wire it up so what our present supervisor us is going to allow us to do is to actually track the users as they log in and out of our server so to get this process actually started we need to stop our server real quick and then restart it so for the most part you don't need to stop your Elixir servers but in this case because we've added a new module we need to terminate it and then restart it to spin up that process all right so the next thing we want to do is to actually create a web socket inside of our Phoenix application so if you don't know what web sockets are Let Me Explain real quick a socket is an open connection between a user's client and our application so the client and the server with a typical web app the client makes an HTTP request to the server and then the server returns a response however with a socket we can have a connection that remains open between the client in the server which allows us to exchange messages back and forth in real time so to actually enable our socket here the first thing we want to do is come into our web channels user socket file we want to uncomment line five so this channel room star chatter room Channel and then we want to come all the way down to this connect function and we want to modify it so this params variable we want to actually set a specific variable for it so we want to deal with our users specifically our user is a map currently so we're going to put that map in here and we're going to say user correspond with the user and then we're going to remove this socket part here and we're going to put a assign in here and the assign takes in our socket and then it takes in the key and the value in this case it's going to take in a key of user and then take in the value of user all right so this is basically allowing us to create our web socket but it's also letting us take use of what are called channels so Phoenix channels are sort of like in this case they're sort of like web rooms if we wanted our web app to have multiple rooms then we could create multiple Phoenix channels to account for this now in this current tutorial we're not going to have multiple channels but we may in the future so to handle the one channel that we're going to use we need to create a new file in this channels folder our file is going to be called room channel. ex we also want to use our chatter do web inside of this so this will specify that we want this to be a channel so to handle the channel logic of our application and then we also want to Alias our chatter dopr so that we have easy access to the presence module inside of this module next we want to create a join function here and the join function will take in this string that says room p and Lobby then it will take in an anonymous variable and then the socket and then we will send self as in the user and then we will correspond this with a callback function that refers to this atom after join so here is our callback function this handle info function and as you can see the two atom are corresponding and we're passing the socket through here as well and we're saying okay presents track and we want to track at the socket and then we want to use socket assigns user and we're going to map the user and we're going to find out when the user logged into the socket so when the user first came onto the socket and this will allow us to create a timestamp so that we know when a user logs in also the nice thing is this socket. assigns user is actually where our username is for example currently tensor is logged into our application so this will be replaced with tensor the field online at will be populated by this system time which will be based in milliseconds now we're going to use JavaScript to make this into more readable information and then we push all this back to the socket and then we update the list so our list is our list of users on the socket so now let's go into the JavaScript layer and handle all of our web socket information so to go into our socket layer we just go down to this here the JavaScript inside of this static folder and we want to go into this app.js as you can see all that's happening in here is that it's importing Phoenix HTML where we want to import a few other things and then we want to actually add some logic in here we want to import our socket and presentence from our Phoenix application then we want to define a user variable so as you can see here we're getting the element by ID user so if we go back into our template our user is inside of this span so we're getting our username from this con. prams finally we want to create a new socket so we're creating a new socket on this so route back/ socket so Elixir automatically puts the web socket on back slock and if we want to actually see this happening if we go into our actual Chatter application in the endpoint desex file you'll see here it says socket and then back SL socket and then it assigns chatter do users socket to this socket so we're pulling in that socket from our back end and then we're bringing it into our JavaScript and then we're connecting to it through this function here socket. connect so now we need to handle the presence so that we'll be able to see the users as they are logging in so we need to create a new JavaScript object so we're going to say let presence equal and then our object then we want to create an anonymous function so we're using this formatted timestamp variable and then we're binding it to this Anonymous function that takes in TS which stands for timestamp and then we're creating a date here using our timestamp so this is that milliseconds that we had before and then we are going to localize that date and create a string out of it so this will return a human readable version of the timestamp that we created in our back end so now we're actually creating our uh user object here so we're going to return a object with our user inside of it and then the online at and then of course we're going to call our formatted timestamp function here we're going to pass in this metas do onlinet and this is basically just the backend information that corresponds with online at if we go back to our room Channel you'll notice that we use this online at to build our millisecond timestamp and then we're just using it we're passing it through here as well just to get a readable version of it so finally we want to get our user list element so if you remember in our index.html we have a unordered list here with an ID of user list we're assigning it to this variable user list and then we're creating a function called render which takes in the presences which is this list and everything and then we are going to create some inner HTML here so we're going to say userlist doin HTML equals the presences. list we're passing the presences and the list by here and then we're creating a map and this is mapping a list item to our presence. user and then we're just saying online sense and this will have our timestamp inside of it and then we're adding it to our application so this is not enough yet we need to Define our room now so we're going to create a variable called room and we're going to get the channel That we're using and if you remember we're using this room call and Lobby channel so after telling our JavaScript about this channel here we need to handle two events so the first event is with our present state so when the server sends us the state of everybody who's online which happens when we first connect or if we ever disconnect from our application this will send everything to the HTML and then the presence diff is an event that happens when somebody joins while we're in the application and it just needs to add that person to the list so if we look at our application now as you can see here in our little box here it says tensor online since and it has the current date as well as the time so as you can see here we have tensor 2 and tensor one and over here it updated the list it says tensor first and then tensor 2 and it shows both of the time stamps as well so this is data that will stay here so now that we have it so that we can have multiple users in here and it will list those users and their timestamps we need to make it so that they can message each other so we're going to go back into our room channel. EX file and we're going to create a simple function here so this function is going to listen on our socket here and it's going to be listening for messages of type message new and then every time the JavaScript sends a message new type message it will then broadcast that message to everybody who's connected to the room including us the people who wrote the message and it will broadcast it in this format so it will give us the username and then the body which is the message itself and then it will have a timestamp on it as well so now we have to go back into our app.js and we have to write the JavaScript for this part so we're going to use a variable message input and we're going to assign it to our input and if you can see up here we have the ID of message list here and as you can see here we have an ID of new message on our input here so we're assigning that element to this variable and then we are adding an event listener to the variable and it's an event listener on the key press of the enter key so when we hit the enter key and when the value inside of our input is not empty then it will push a new message of type new back to our server and then of course it will clear the input then finally we want to create a message list variable now this is getting our message list element if you remember it's our list here our unordered list message list and then we are rendering that so we're making a new HTML element here and as you can see this is formatted with the username then a Tim stamp and then the message body itself and then every single time we have a new message we're calling this function here and then we are pending it to our list here and finally we are actually complete so if we type in a message so hi as you can see it's popping up but let's actually make this a little nicer so let's make a window here so that it doesn't just keep pushing down the input field as we type in messages so if we jump into our HTML here we can just write some style in here in line so we want a static height let's say 4 100 pixels we want a border say one pixel solid black then we want to deal with the Overflow in the y direction because you know our chat will move up and down so we'll just put it auto and that should be it so now let's take a look so here we go now we have a big box hello and as you can see it's saying tensor hello let's put a little bit of padding so we push this a little bit towards the center and let's say 10 pixels should be enough and let's save it and there we go that looks a little better all right so I made four different users as you can see here we have tensor able tensor metalman and H hey one 2 32 and we can just type in messages and they will show up on all the screens here so if we had actual people connected they would be able to talk to one another and then for example if say Jorge leaves you can see immediately it disappears and say tensor or say metalman now we're on metal man so let's say able tensor will leave so as you can see there it just disappears immediately so now we only have two people connected and if we put in say like tensor 2 here it will change so of course our messages are not persistent because we're not logging them into a database so while for example metalman can still see the messages from the other users uh tensor if I go back in as tensor I won't be able to see all the previous messages before I logged in now this is something that we will address in a future tutorial and we will also look into creating authentication and some other things all right guys well I hope you enjoyed this tutorial if you did feel free to subscribe and like if you have any questions or comments feel free to leave them in the box below and if you dislike the video then by all means dislike it as much as you want all right guys well have a good day
Original Description
In this tutorial we introduce the Phoenix framework for elixir and create a framework for a real-time chat application.
Github: https://github.com/tensor-programming/phoenix-tut-1
Feel free to donate:
BTC: 1ExBSiaEa3pceW98eptJwzR9QHrYZ71Xit
ETH: 0xD210Ea51F1615794A16080A108d2BC5471F60166
Phoenix: http://www.phoenixframework.org/
Check out our Twitter: https://twitter.com/TensorProgram
Check out our Facebook: https://www.facebook.com/Tensor-Programming-1197847143611799/
Watch on YouTube ↗
(saves to browser)
Sign in to unlock AI tutor explanation · ⚡30
Playlist
Uploads from Tensor Programming · Tensor Programming · 36 of 60
1
 2
2
 3
3
 4
4
 5
5
 6
6
 7
7
 8
8
 9
9
 10
10
 11
11
 12
12
 13
13
 14
14
 15
15
 16
16
 17
17
 18
18
 19
19
 20
20
 21
21
 22
22
 23
23
 24
24
 25
25
 26
26
 27
27
 28
28
 29
29
 30
30
 31
31
 32
32
 33
33
 34
34
 35
35
 ▶
▶
 37
37
 38
38
 39
39
 40
40
 41
41
 42
42
 43
43
 44
44
 45
45
 46
46
 47
47
 48
48
 49
49
 50
50
 51
51
 52
52
 53
53
 54
54
 55
55
 56
56
 57
57
 58
58
 59
59
 60
60

NodeJs, Text editors and IDEs
Tensor Programming
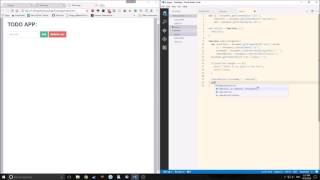
Vanilla JS todo App
Tensor Programming
Elm Tutorial part 1
Tensor Programming
Elm Lang Tutorial, Part 2
Tensor Programming
Elm Tutorial Part 3
Tensor Programming
Elm Tutorial Part 4 -- Analog Clock App
Tensor Programming
Elm Tutorial part 5 -- Snake Game
Tensor Programming
Elm Tutorial part 6 -- Calculator
Tensor Programming
Go Tutorial part 1 -- Hello World and Static File Server
Tensor Programming
Go Tutorial part 2 -- Web Crawler
Tensor Programming
Go Tutorial Part 3 (Web App part 1)
Tensor Programming
Go tutorial Part 4 (Web tutorial part 2) - Using templates
Tensor Programming
Go tutorial part 5 (web app part 3)
Tensor Programming
Go tutorial part 6 (webapp part 4)
Tensor Programming
Go tutorial part 7 (web app part 5)
Tensor Programming
Go tutorial part 8 (Web app part 6)
Tensor Programming
Go tutorial Part 9 (web tutorial part 7)
Tensor Programming
Go tutorial Part 10 (web app part 8)
Tensor Programming
Go tutorial Part 11 (Web app Part 9)
Tensor Programming
Go Tutorial Part 12 (Web app Part 10)
Tensor Programming
Go Tutorial Part 13 (Web app Part 11)
Tensor Programming
Looking at Elm 0.18
Tensor Programming
Go tutorial Part 14 (Web tutorial part 12)
Tensor Programming
Go tutorial Part 15 (Web tutorial part 13)
Tensor Programming
Go tutorial part 16 (web app part 14)
Tensor Programming
Elm Tutorial Part 7 (SPA part 1)
Tensor Programming
Elm Tutorial Part 8 (SPA Part 2)
Tensor Programming
Electron Elm Tutorial
Tensor Programming
Go tutorial part 17 (web app part 15)
Tensor Programming
Up and Coming Programming Languages and Technologies for 2017
Tensor Programming
elixir tutorial part 1
Tensor Programming
elixir tutorial part 2
Tensor Programming
Elixir tutorial Part 3 (GenServer and Supervisor)
Tensor Programming
Elixir Tutorial Part 4 (GenStage)
Tensor Programming
Elixir Tutorial Part 5 (Plug and Cowboy)
Tensor Programming
Phoenix Framework Tutorial Part 1 (elixir part 6)
Tensor Programming
Phoenix Framework Tutorial Part 2 (elixir part 7)
Tensor Programming
Phoenix Framework Tutorial Part 3 (elixir part 8)
Tensor Programming
A Intro to Clojure and Clojure Syntax
Tensor Programming
An Update about the channel
Tensor Programming
Intro to Rustlang (Setup and Primitives)
Tensor Programming
Intro to Rustlang (Strings, Tuples, Arrays, Slices and Pretty Printing)
Tensor Programming
Intro to Rustlang (Ownership and Borrowing)
Tensor Programming
Intro to Rustlang (Structs, Methods, Functions, Related Functions and the Display/Debug Traits)
Tensor Programming
Intro to Rustlang (Control Flow, Conditionals and Pattern Matching)
Tensor Programming
Intro to RustLang (Enums and Options)
Tensor Programming
Intro to Rustlang (Vectors, HashMaps, Casting, If-Let, While-Let, and the Result Enum)
Tensor Programming
Rustlang Project: Snake Game
Tensor Programming
Intro to Rustlang (Traits and Generic Types)
Tensor Programming
Intro to Rust-lang (Closures, the Box Pointer and Iterators)
Tensor Programming
Intro to Rust-lang (Modules and Lifetimes)
Tensor Programming
Intro to Rust-lang (Macros and Metaprogramming)
Tensor Programming
Intro to Rust-lang (Error Handling)
Tensor Programming
Intro to Rust-lang (Concurrency, Threads, Channels, Mutex and Arc)
Tensor Programming
Intro to Rust-lang (Tests, Attributes, Configuration and Conditional compilation)
Tensor Programming
Rustlang Project: Port Sniffer CLI
Tensor Programming
Rustlang Project: Chat Application
Tensor Programming
Rustlang Project: CLI Toy Blockchain
Tensor Programming
Intro to Rust-lang (Setting up a Development Environment)
Tensor Programming
Intro to Rust-lang (Building a Web API with Iron)
Tensor Programming
More on: LLM Foundations
View skill →


![Run Any AI LOCALLY for FREE Forever! [100% Beginner Tutorial]](https://i.ytimg.com/vi/8GFPZRgtEn8/mqdefault.jpg)


Related Reads
📰
📰
📰
📰
The no-code AI business stack that earns $5k/month on autopilot
Dev.to AI
GitHub’s April Changelog Exposes the Private-Repo Cost of Instant Reviews
Medium · AI
AI Did Not Kill Freelancing. It Changed What Clients Actually Pay For
Dev.to · Alcora
25 Best AI Tools in 2026 to Boost Productivity, Create Content & Make Money Online
Medium · Startup
🎓
Tutor Explanation